Build the wing – Top Flite TOPA0120 User Manual
Page 15
sections on the plans to obtain the shape of the
rudder. Use a razor plane and sanding block to
“rough in” the shape of the rudder. Final shaping
and fitting should be done after the fin is glued
onto the fuselage, but you may wish to tape the
rudder to the fin at this point to blend the upper
ends of both.
BUILD THE WING
NOTE: The wing halves are built
“UPSIDE-DOWN” on the plans. The jig
tabs are attached to what is, in the end,
the TOP surface of the wing.
NOTE: Since it is the standard
convention to show the Top View of the
wing, and the wing panels are built
upside-down, the LEFT wing panel is
built over the RIGHT Wing Top View
and vice-versa. This does not present
any problems; just be sure to build a
left and a right wing panel.
❑
1. Place the wing plan on your building board
and cover it with waxed paper (you may wish to cut
apart the wing panel sections of the plan to make
handling easier.)
❑
2. Hold the four 1/4” x 3/8” x 36” hard balsa
Spars over the wing plans. Mark the spars about
1/4” longer than they need to be. Cut off the spars
at the marks and save the scraps for the flap and
aileron servo mounts.
❑
3. Punch out all the die-cut 3/32” balsa wing
Ribs. Smooth out any imperfections with
sandpaper. Be sure to keep the jig tabs attached
to the ribs.
❑
4. Ribs W-1 through W-8 have punch marks
just aft of the spar that locate the aileron pushrods
for you. Drill a 3/16” hole at each of these marks.
❑
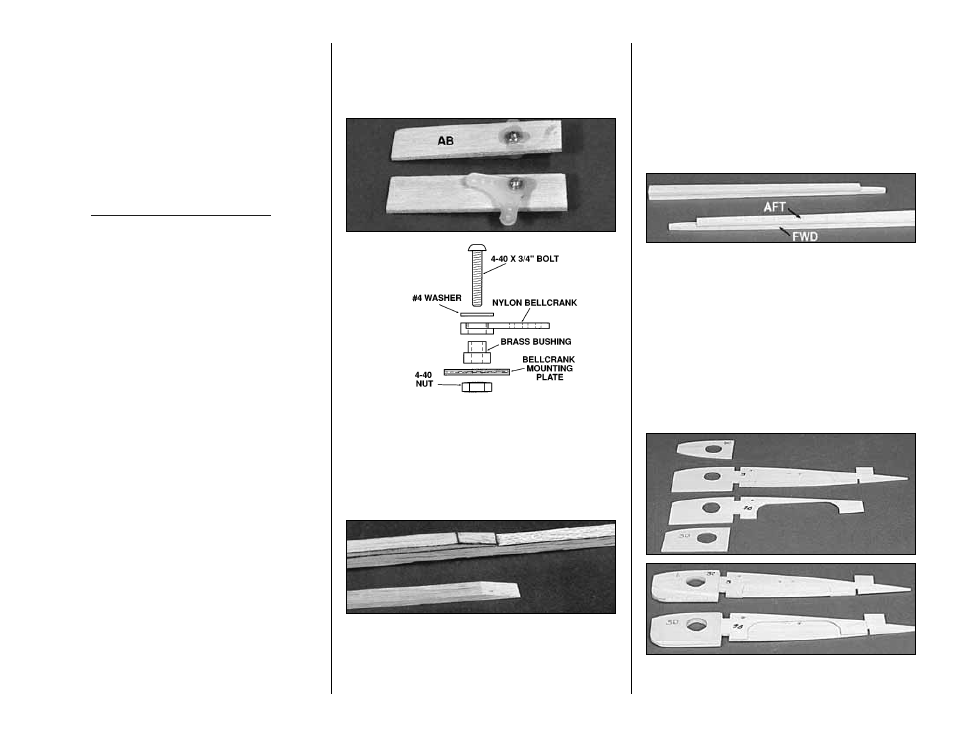
5. Drill 1/8” holes through the punch marks in
the two die-cut 1/8” plywood Aileron Bellcrank
Plates (AB). Assemble the bellcrank parts as
shown in the sketch. Be sure to put a drop of
6-minute epoxy on the 4-40 nut and threads to
prevent the bellcrank from vibrating loose.
❑
6. Taper one end of each of the four 1/8” x 3/8”
x 17-1/2” balsa Spar Doublers to match the spar
detail drawing on the plans. Glue a Spar Doubler
to each Spar with the root (non-tapered) end of the
doubler aligned with the root end of the spar.
NOTE: The top edge of the FWD
TRAILING EDGE AT AILERON curves
more than the bottom edge at the tip.
Since the wing is being built upside
down, the more curved edge faces
down next to the plans.
❑
7. Center the die-cut 1/4” balsa Aft Trailing
Edge at Aileron (A) on the die-cut 1/4” balsa
Forward Trailing Edge at Aileron (F) and glue
them together with CA. Be sure to make a left
and a right trailing edge. Use a sanding block to
taper the two pieces slightly as shown in the cross-
sectional drawing on the plan. These pieces are
die-cut slightly long to allow you to trim off any
imperfections.
❑
8. Each of the W-4 and W-3 ribs is made up of
four laminations. Refer to the plans for the proper
- 15 -