Warning – Reznor R6GN Option - Installation - High Static Blower Drive - Light Commercial User Manual
Page 6
6
MOTOR SHEAVE / PULLEYS / BELT
INSTALLATION & ADJUSTMENT
WARNING:
Never perform maintenance on energized or rotating
equipment. Always disconnect electrical power and
allow all rotating equipment to stop before servicing the
unit. Failure to do so may result in personal injury, loss
of limb, or death from electrical shock or entanglement
in moving parts.
Motor Pulley
The motor pulley or sheave is a variable pitch style pulley
which allows blower speed adjustments over a wide range
of applications. While the terms pulley and sheave can be
interchanged, in this document, the adjustable motor pulley is
referred to as a sheave or adjustable sheave, and the blower
sheave is referred to as the pulley or blower pulley. Refer to
the installation instructions supplied with the unit or refer to
Tables 7 - 32 (pages 11 - 32) in this manual for proper airfl ow
settings for each individual unit & kit. Do not adjust a motor
pulley to a setting that is not shown on the table for that unit’s
application for that specifi c kit. Refer to Table 2 (page 3) to
determine the proper blower chart for each application.
On 6-10T Packaged Models: The blower pulley in the kit is a
simple AK or BK style pulley, sized for the application and the
unit’s blower shaft size. To remove or install, simply loosen the
set screw and slide the pulley from the blower shaft. Make
sure the shaft key is retained for installation of the new pulley.
Single Groove Adjustable Motor Sheaves with Keyways
or Barrel Flats
IMPORTANT NOTES:
• Do not force belts over grooves! A belt tension checker
should be used to set tension.
• Future adjustments should be made by loosening the
belt tension and increasing or decreasing the pitch
diameter of the sheave by half or full turns as required.
Readjust belt tension before starting drive.
• Make sure the key is in place and that all set screws
are torqued properly before starting drive. Check set
screws and belt tension after 24 hours service.
• Sheaves can only be adjusted in 1/2 turn increments.
Never attempt to tighten a set screw on to the threaded
portion of the sheave barrel.
1. Make sure the shaft, sheave bore and keyway are free of
burrs, paint, etc.
2. Mount all sheaves on the motor or driving shaft with the
end containing the motor shaft set screw toward the motor.
NOTE: For single groove sheaves with keyways (Figure 3),
always make sure the motor sheave is fully installed onto
the motor shaft.
3. Fit shaft key between sheave & shaft and lock set screw
in place. Wrench torque to 110 in-lb min. - 130 in-lb max.
NOTE: Make sure both driving and driven sheaves are
in alignment and that shafts are parallel. Total axial and
parallel misalignment must not exceed 1/4°. See page 8
for information about V-belt alignment and tensioning.
4. Sheaves with Keyways: Loosen keyway set screw in
adjustable sheave and pull out the external key. NOTE: The
end of the key projects a small amount to provide a gripping
surface for removing. See Figure 3.
Sheaves with Barrel Flats: Loosen sheave set screw in
adjustable sheave until adjustable fl ange rotates freely.
5. Adjust sheave pitch diameter for desired speed by opening
rotating parts by half or full turn increments from closed
position. IMPORTANT: Do not set the motor sheave to
points not shown on the blower table for your application.
6. Sheaves with Barrel Flats: Tighten sheave set screw to 110
to 130 in-lb. with set screw located over the center of the
barrel fl at. DO NOT TIGHTEN THE SET SCREW ON THE
THREADED PART OF THE SHEAVE.
Sheaves with Keyways: Replace key and tighten the set
screw to 110 to 130 in-lb.
7. Install blower pulley and align the pulleys.
8. Install belts on the sheaves and adjust belt tension.
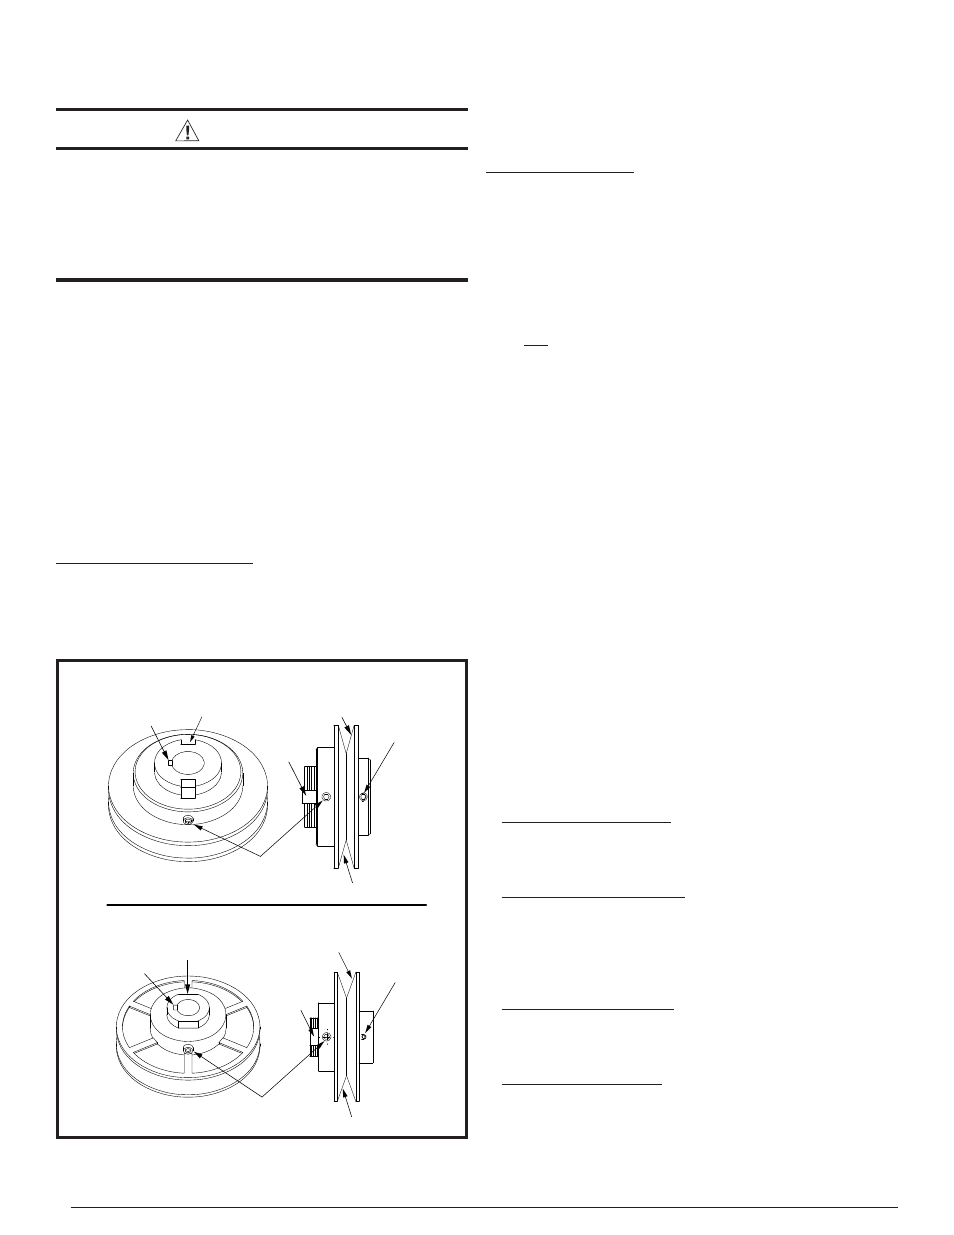
Figure 3. Adjustable Sheaves with Keyways or
Barrel Flats
Adjustable Sheave
Keyway Set Screw
Motor Shaft
Set Screw
Adjustable
Sheave Keyway
Motor Shaft
Set Screw
Adjustable Sheave
Set Screw
Stationary Sheave Face
Adjustable Sheave Face
Adjustable Sheave Face
ADUSTABLE SHEAVE WITH KEYWAYS
Key
Ke
y
Motor Shaft
Keyway
Stationary
Sheave Face
Motor Shaft
Keyway
ADUSTABLE SHEAVE WITH BARREL FLATS
Barrel
Flat
FLAT
Barrel
Flat
During installation, set the variable sheave position fi rst,
then adjust the blower pulley on the blower shaft to align the
centers of the pulley and sheave. The set screw should always
be above the pulley shaft key. Do not tighten the set screw
directly onto the blower shaft.
On 12.5-15T Models: The blower pulleys are referred to as
the split-taper style. This style of pulley positively locks the
blower pulley to the shaft for higher horsepower applications.
Refer to page 7 for instructions on how to install and remove
these pulleys.