Great Planes Learjet 40 Kit - GPMA0439 User Manual
Page 21
pulled in to meet it Wet the fuselage sides from F-2
forward, but keep the water away from the gluing surfaces.
Glue the firewall in place with 30-minute epoxy, then run a
bead of thick CA along the top edges of the tank floor Use
rubber bands or clamps to hold the sides together until the
epoxy cures Pin the fuselage sides to the board as close to
the firewall as you can to help keep the firewall centered
D 9 Without gluing, fit the 1/4" x 1/4" x 36" balsa top
stringers in the notches from F-2 to F-7 Mark the position
of F-4 on each stringer Cut halfway through the stringers
from the bottom so that they will make a clean bend at F-4
Glue all five stringers in place
D 11 Install the 3/32" x 3" x 13-1/8" forward top sheeting
from F-2 to F-4 Glue the first sheet to the top of the
fuselage side doubler and then trim it so that it extends to
the middle of the second stringer Wet the balsa if
necessary, then glue this sheet down Sheet the other
side. Fit and install the top sheet between them.
D 12 Install the 3/32" x 3" x 19-1/8" aft top sheeting the
same way as the forward sheeting, except that you may
find it easier to trim the side sheets roughly to shape before
gluing them to the top of the fuse doubler.
D 10 Center, then glue the 3/32" x 1-1/16" x 2" balsa
fillers between the stringers on both sides of F-4 Sand the
front and rear portions of the fillers and the tops of the
stringers so that the sheeting will lie flat on top of them
Sheeting a rounded surface.
Wet the outside of a balsa sheet, then flex it with the
grain for a minute or two to soften it up and start a curve
Align the sheet with the fuse side, then temporarily hold it
in place with clothespins
Mark the sheet for cutting Always trim the sheet to the
center of the appropriate stringer to allow for a gluing
surface for the next piece of sheeting
Apply medium or thick CA to all frame parts that the
sheet will contact. Roll the sheet into position, starting
along the lower edge Hold it in position by hand and with
clothespins until the CA cures Wick thin CA along the
top seam, wiping off the excess before it cures Repeat
for the other side of the fuse It's best to sheet alternate
sides to avoid building in a twist.
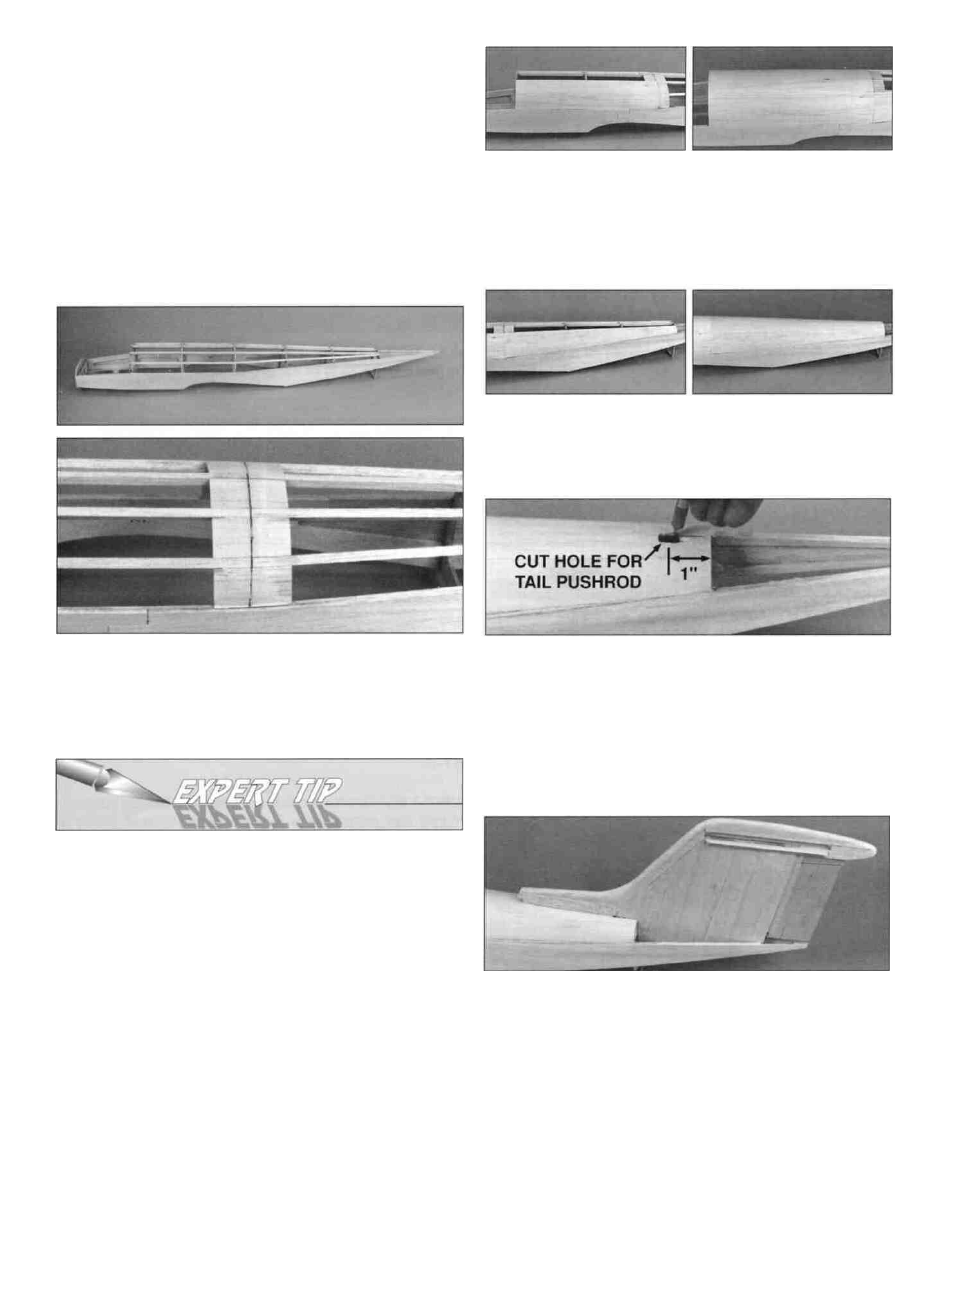
D 13 Trim and sand the top sheeting flush with F-2 and
F-7, then remove the fuse from the building board Cut a
3/8" diameter hole through the top sheeting and center
stringer 1" in front of F-7 for the tail surface pushrod tubes
NOTE: Before performing the following step, lightly draw a
centerline along the top of the fuse using the top center
stringer locations at F-2 and F-7 for reference.
D 14 Insert the completed vertical fin into the rear of the
fuselage Shim the rear of the fin so that it is centered
between the fuselage sides IMPORTANT: Carefully
check that the fin is lined up fore and aft with the
centerline of the fuselage Hold a 36" straightedge along
one side of the fin, then adjust the fin so that the
straightedge is parallel to the centerline on top of the fuse.
Be sure that the fin is perpendicular to the building board.
Mark the fin's position on the back of F-7, then pin it firmly
in place.
21