Installation guidelines, Ludlow – Waterworks Ludlow Low Profile Three Hole Deck Mounted Lavatory Faucet with Metal Lever Handles User Manual
Page 3
PRODUCT SUPPORT 800.927.2120 8am - 6pm EST
LUDLOW
Three Hole Deck Mounted Lavatory
Faucet
INSTALLATION GUIDELINES
Page 3 of 3
10.30.2013
These guidelines have been prepared for the professional contractor to aid in the installation of:
LUDLOW DECK MOUNTED LAVATORY FAUCET WITH METAL CROSS HANDLES (STYLE#
LDLS01) & METAL LEVER HANDLES (STYLE# LDLS10)
All dimensions are based on original specification and are subject to change and variation.
Please consult your Design Associate for current specifications.
SEE SERVICE PART DOCUMENT FOR PART ORDERING, AVAILABLE ON WATERWORKS.COM
Figure 4b
NOTCH
ESCUTCHEON
O-RING
ESCUTCHEON
TRIM
ADAPTER
13. Connect the OUTLET HOSE between the VALVE
BODY and SPOUT TEE, to complete this handle
installation.
14. Attach SUPPLY KIT [SOLD SEPARATELY] to inlet
on VALVE BODY, using the supply nut. See Figure 5.
Figure 5
SUPPLY KIT
[SOLD SEPARATELY]
SUPPLY NUT
OUTLET HOSES
15. Repeat steps 4-14 to install the second handle
assembly.
DRAIN INSTALLATION:
¾ See Figure 6 for steps 16 - 18.
16. Remove the TAILPIECE, NUT, PLASTIC WASHER &
RUBBER GASKET from the DRAIN FLANGE.
17. Set the DRAIN FLANGE in the lavatory drain
opening using putty or a clear adhesive silicone
depending on the mounting surface material.* Re-
install the RUBBER GASKET, PLASTIC WASHER
AND NUT. Tighten the NUT ,
making
sure
the
RUBBER GASKET makes a full seal. Putty or a clear
adhesive silicone may be used to ensure a water-
tight seal between the gasket and lavatory.*
18. Re-install the TAILPIECE to the DRAIN FLANGE and
connect to p-trap (SOLD SEPARATELY).
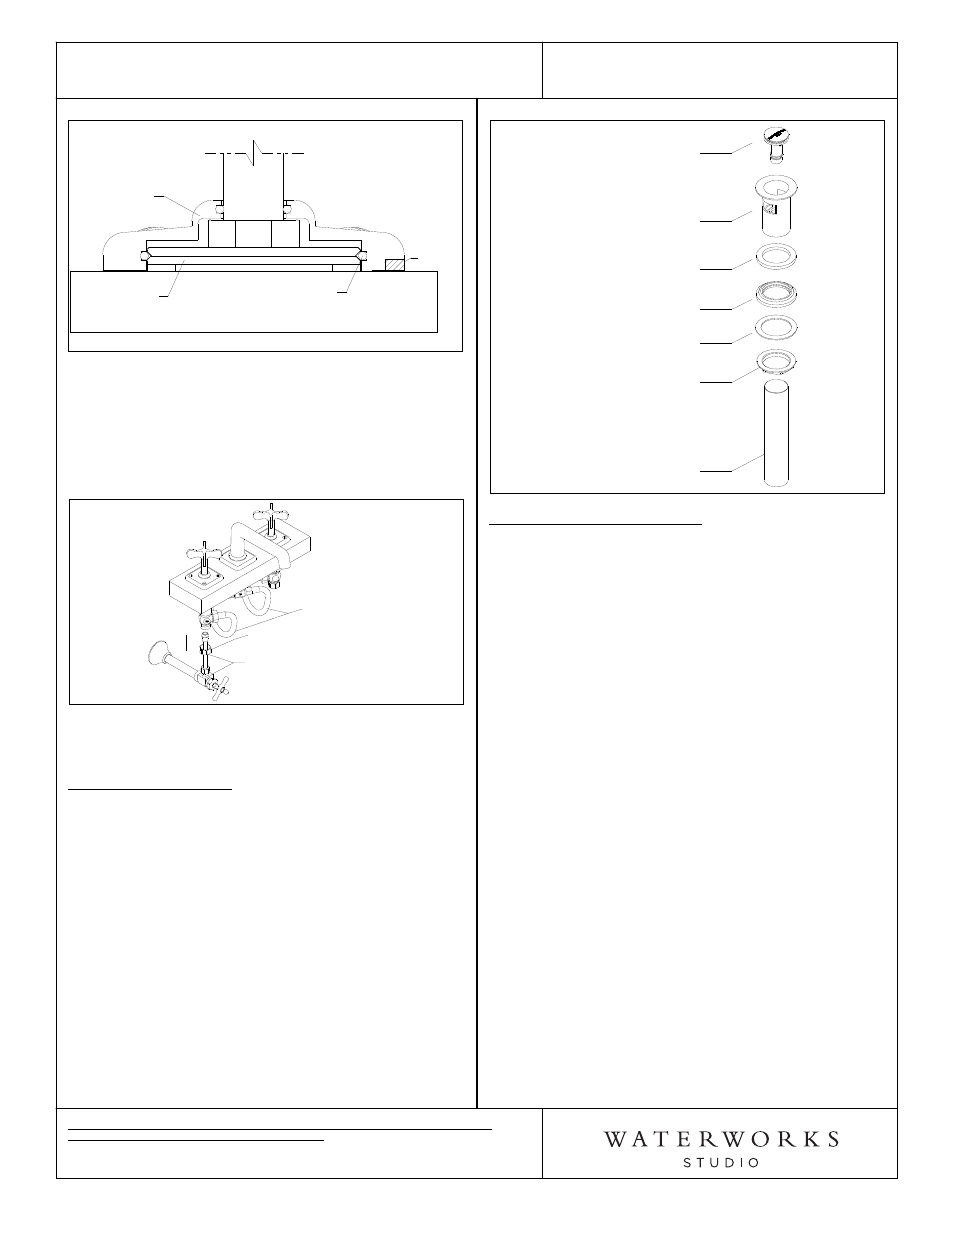
Figure 6
DRAIN STOPPER
DRAIN FLANGE
FOAM WASHER
RUBBER GASKET
TAILPIECE
NUT
PLASTIC WASHER
INSPECT THE INSTALLATION:
19. Remove the flow restricting AERATOR using the
tool provided, then carefully open the hot and cold
valves to flush out any debris in the supply lines. See
Figure 1.
20. Inspect all connections for leaks.
21. Close the drain and fill the sink with water to make
sure the drain stopper and gasket operates and
seals properly.
22. Re-install the flow restricting aerator making sure
the washer is in place.
¾ The screws on the escutcheons are aesthetic and do
not serve any mechanical purposes, and should not
be removed.
* Putty contains oils and can cause permanent
discoloration on certain materials such as marble,
granite and any porous surface.
¾ If further assistance is required, please contact
Product Support at 1-800-927-2120 (8am-6pm EST).
¾ See service part document for parts ordering,
available on WATERWORKS.COM.