P11-mull-splice-captured – Oldcastle BuildingEnvelope Reliance-HTC User Manual
Page 14
2 1
/2"
3/4
"
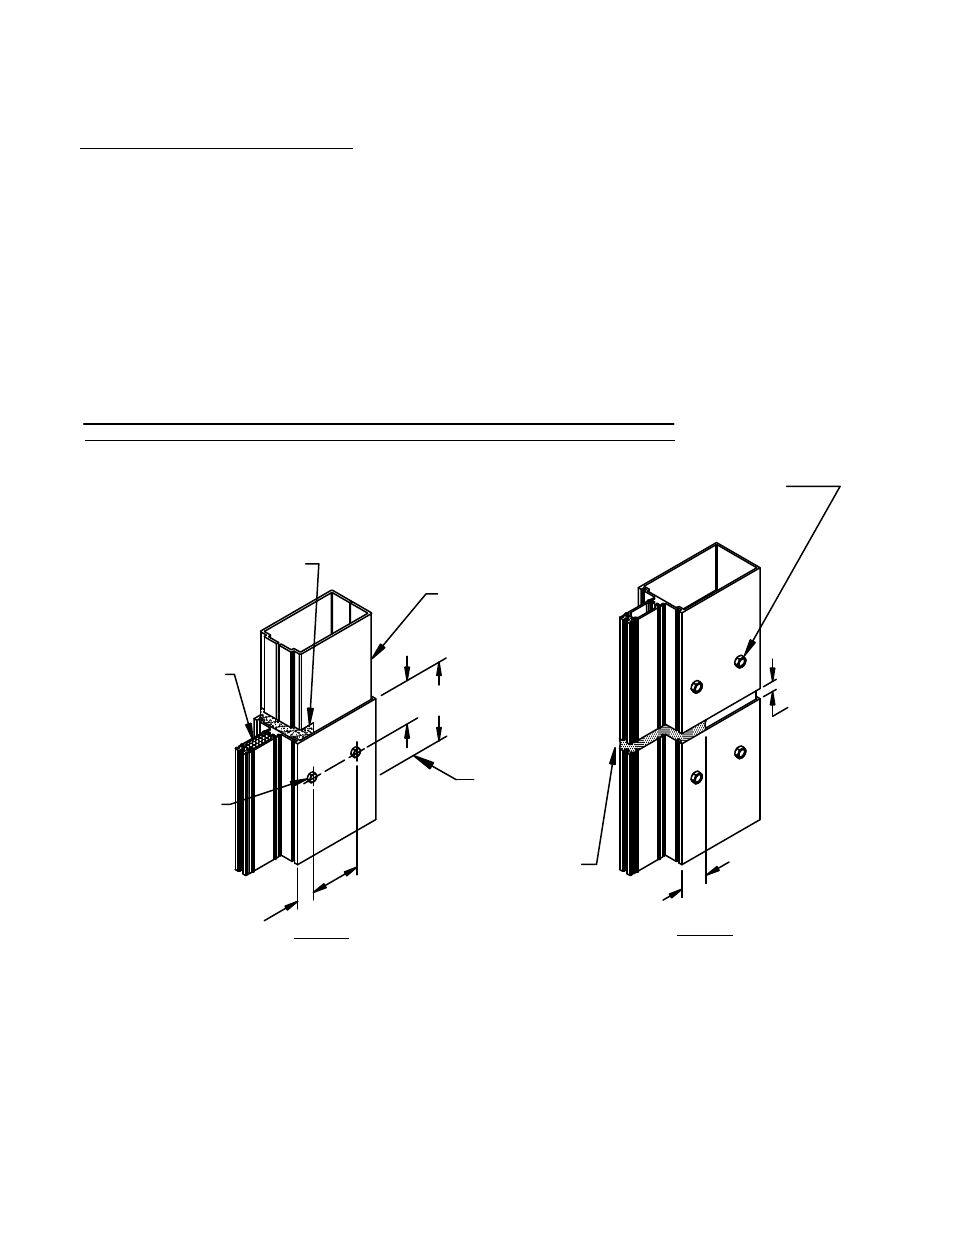
Apply bond breaker
tape along face of splice
Insert backer rod
into tongue of upper
& lower mullions
Seal joint between
mulls. Seal must run
across face, tongue
& min 1" down sides
of mullion.
1"
min
.
FS−322
#12−14 x 1"
HWH TEK
(2) per side
Attach splice with FS−322 (#12−14 x 1" HWH TEK),
(2) per side (fasteners required for deadload
splice only. Omit for expansion connection).
1/2
" jo
int
bas
ed
on
1/4
"
exp
ans
ion
.
STEP 1
Install splice
sleeve to each
side of mullion
STEP 2
FIGURE 7
Vertical Splicing
(Captured Mullion Shown; SSG Similar)
MULTI−SPAN INSTALLATION (cont’d):
2.1.9 Anchor the mullion to floor slab or beam. Do not overtighten bolt(s).
2.1.10 Repeat steps 2.1.8 and 2.1.9 until all lower verticals are in place. Check the D.L.O. every four
bays to ensure correct spacing and prevent dimensional buildup.
2.1.11 Install the next vertical above, temporarily shimming between verticals to maintain proper splice
joints (refer to approved shop drawings). SEE FIGURE 7.
2.1.12 Slide tee anchors into top of upper−most mullions. The tee anchors are designed to clear the shear
block fasteners. Attach tee anchor to building condition.
2.1.13 When the wall is set, remove shims between vertical mullions at splices, back off nut ¼ turn at
expansion anchors and stake bolts.
Continue with step 2.2 for remaining installation after all verticals have been erected.
1 1
/2" 4"
Bottom of
splice sleeve
2.2 Seal around shear blocks prior to installing each horizontal mullion. Install horizontal mullions as shown in
FIGURE 8. Prior to attaching screws, make sure sealant has been forced out of the holes in horizontal. If
not, apply a liberal amount of sealant into each hole. Secure horizontals to shear block with two (2)
FS−115 #10 x 1˜ Phillips Pan Head screw at each end of horizontal. Check head of screw to insure proper
seal, sealing track on each side of screw.
FRAME INSTALLATION
R E L I A N C E − H T C I N S T A L L A T I O N M A N U A L
MAY 2013
11
Phone: 1-866-OLDCASTLE (653-2278)
Web Address: www.oldcastlebe.com