Front mud flap installation – Rally Armor 2012-14 Impreza (4d/5d) User Manual
Page 2
IMF 22
Version 1.1 Release Date 08.05.2012
2
Front Mud Flap Installation
Begin by parking the vehicle on an even surface. Turn the steering wheel to allow access to the inner wheel well area.
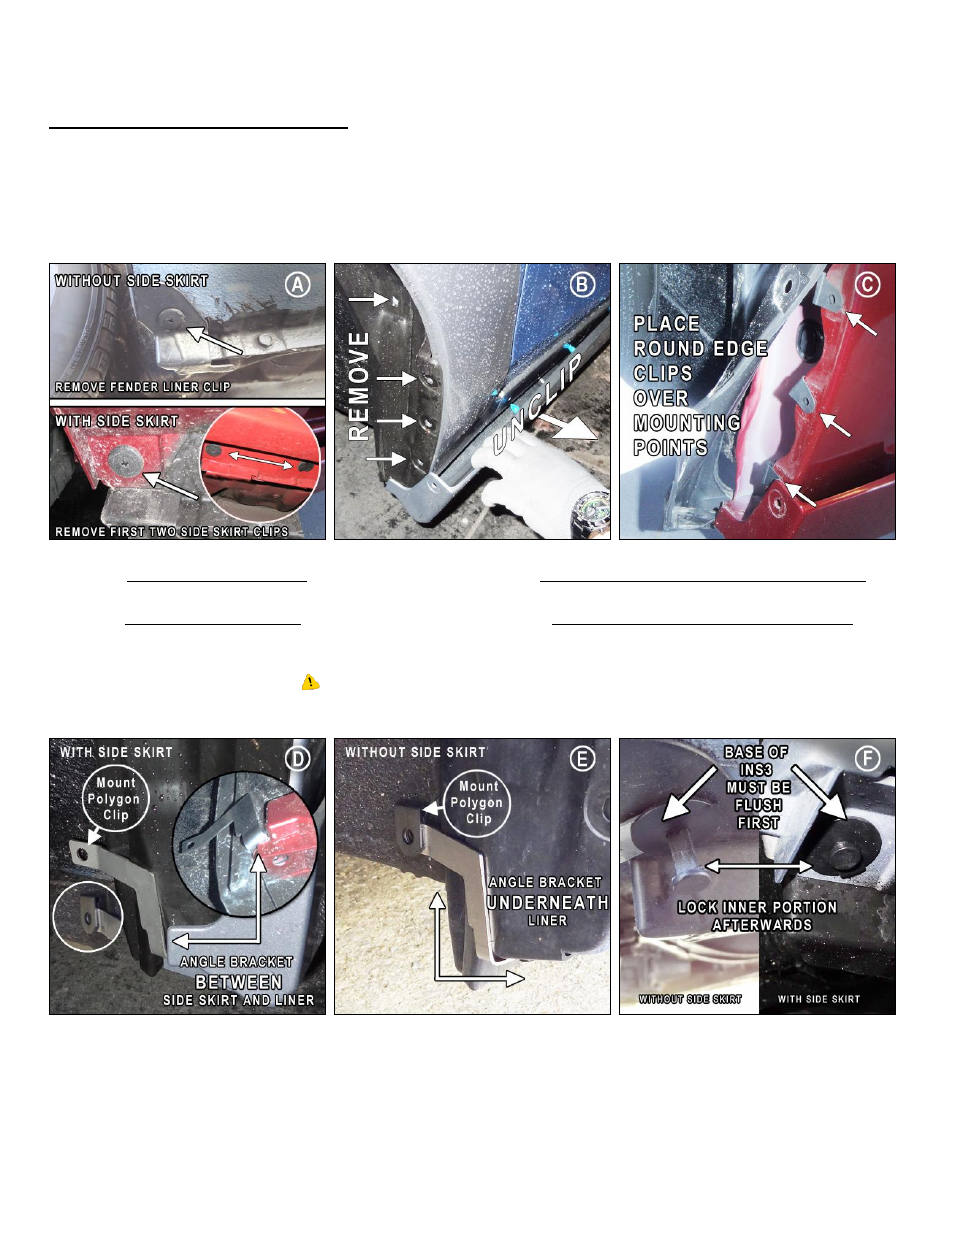
• (Figure A) Remove fender liner clip. On side skirt equipped vehicles, remove first two retaining clips.
• (Figure B) Remove the four OEM fender liner fasteners (as shown). Carefully unclip front portion of side skirt by pulling the outer
edge away just enough to release first two horizontal retainer clips. Pull liner away to gain access to the interior fender area.
• (Figure C) Place 3 supplied round edge clips (RoCl ) over mounting tabs at an angle (as shown). Reinstall liner and side skirt.
• (Figure D) Side skirt equipped vehicles: angle front bracket (HMF22-FR-BR) between the exposed section of the skirt and liner.
Interior portion of bracket is positioned against wall of wheel well. Place polygon clip (PolCl) over the inside bracket mounting point.
• (Figure E) Vehicles without side skirts: position front bracket (HMF22-FR-BR) at an angle underneath and flush against liner. Ensure
inner bracket is positioned against the wall of the wheel well.
• (Figure F)
Secure bracket by mounting insert (Ins3) FLUSH through the side skirt and bracket. Place polygon clip (PolCl) over the
interior mounting point of the bracket.
Important
-
BEFORE mounting insert (Ins3), pull inner stem OUT. Install the fastener where
the OUTER assembly is flat against the body or side skirt. Push stem into retainer, locking it into place.
•
• (Figure G) Mount the front mud flap with the logo facing the rear of the vehicle. Place the front mud flap against the corresponding
mounting points on the vehicle and bracket. Thread long screws (1.5SS) with washers (SmWash) through the flap and into each the 4
mounted clips. On the innermost mounting point of the bracket, place a spacer (.5SS) between the mud flap and polygon clip. Replace