Rally Armor 05 to 09 Subaru Legacy User Manual
Rally Armor For bicycles
Rally Armor 2005‐2009 Subaru Legacy & Outback Mud Flap Mounting Instructions
Please read the instructions thoroughly before attempting to install mud flaps. Rally Armor always recommends professional installation.
For high resolution images and the most up to date instructions, please visit our mounting instructions area on http://www.rallyarmor.com.
To protect and extend the life of your rally mud flap set care must be taken during parking and reversing.
The mud flap set contains 4 flaps total for all four tires of the vehicle. Front flaps (4 mounting holes) – Rear flaps (3 mounting holes).
The mounting hardware consists of:
Quantity
Hardware Item
Item ID
10
Polygon Edge Clips
PolCl
12
Washers
Wash
10
Short Stainless Steel Screws
1SS
2
Long Stainless Steel Screws
1.5SS
2
Plastic Inserts
Ins
2
Spacers
.5Sp
Recommended Tools: Short Phillips Screwdriver; Offset/Ratcheting Phillips; Flat head Screwdriver; Metal Pick
Front Mud Flap Installation
1. Begin by parking the vehicle on an even surface. Turn the steering wheel towards the side you are working on to gain access to the wheel
well area. Remove OEM splash guard if present.
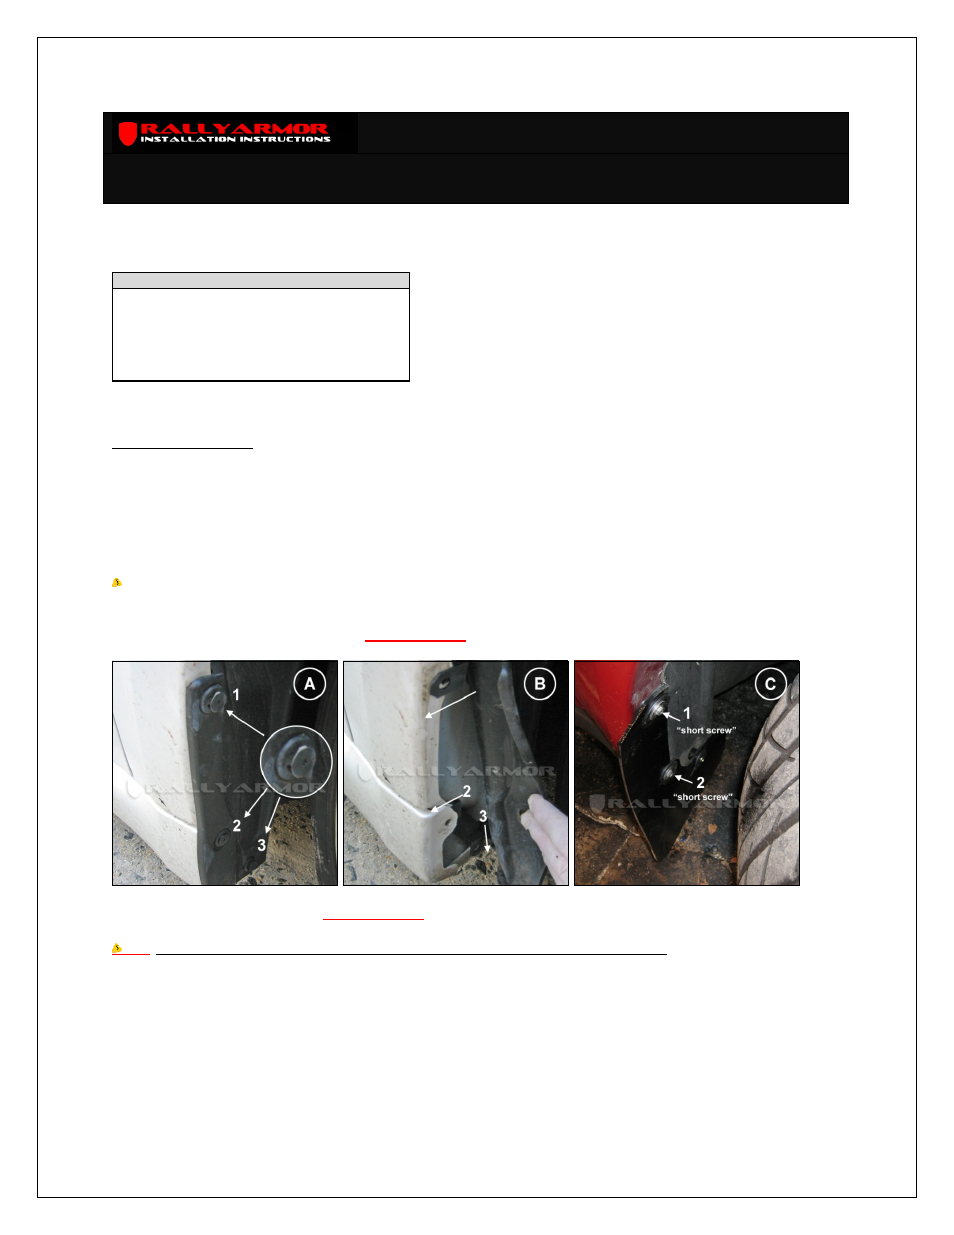
2. Remove the 3 wheel well fasteners (#1‐3) that secure the fender liner to the vehicle. To remove the fasteners, pop/unscrew the inner tab
out of the assembly first then remove the complete assembly by prying the outer edges of the fastener (Figure A).
3. Pull fender liner away from the body of the vehicle and position 3 polygon clips (PolCl), as shown, over mounting points #1, #2 and #3 (Figure
B). Point #2 clip is installed behind skirt on fender. Carefully reinstall liner over the clips. Replace liner as previously installed confirming clip
mounting holes are visible through liner.
Tip: Users with existing splash guards may also re use OEM clips with bolts for points 1 and 2 to mount.
4. Match front mud flap against the vehicle mounting points (#1‐3) with logo facing the rear of the vehicle. Place a short screw (1SS) through a
washer (Wash) and loosely thread mounting point #1. Do the same for mounting point #2. Users opting to use their existing hardware may also
utilize their bolts with washer (Wash) (Figure C).
*Do not fully tighten*
as you will need to adjust the mud flap before tightening the screws.
1
5. To secure mounting point #3, place a spacer (.5Sp) behind the mud flap. Place a long screw (1.5SS) through a washer (Wash) and loosely
thread the corresponding mud flap slot.
*Do not fully tighten.*
Adjustments will be made to the mud flap before tightening the screws (Figures
D and E).
Note:
Slot 3B is utilized on the Outback application. Hole 3A is for all other Legacy applications (Figure E).
6. Align mud flaps by walking away to view the mud flap from the rear of the vehicle. Confirm the edges of the flap are perpendicular to the
ground. If needed, make slight adjustments by shifting the upper/lower portions of the flap. Check each adjustment by walking away from the
vehicle and assessing the mud flap in relation to the ground and the body of the vehicle. After the flap is correctly aligned, tighten all hardware
only until snug (Figure F).