Rear installatio review th, On: please read he 2 mounting o, This entire secti ptions available – Rally Armor 08-11 Subaru Impreza & 08-10 WRX User Manual
Page 2: Ion below very c e before proceed, Carefully and ding
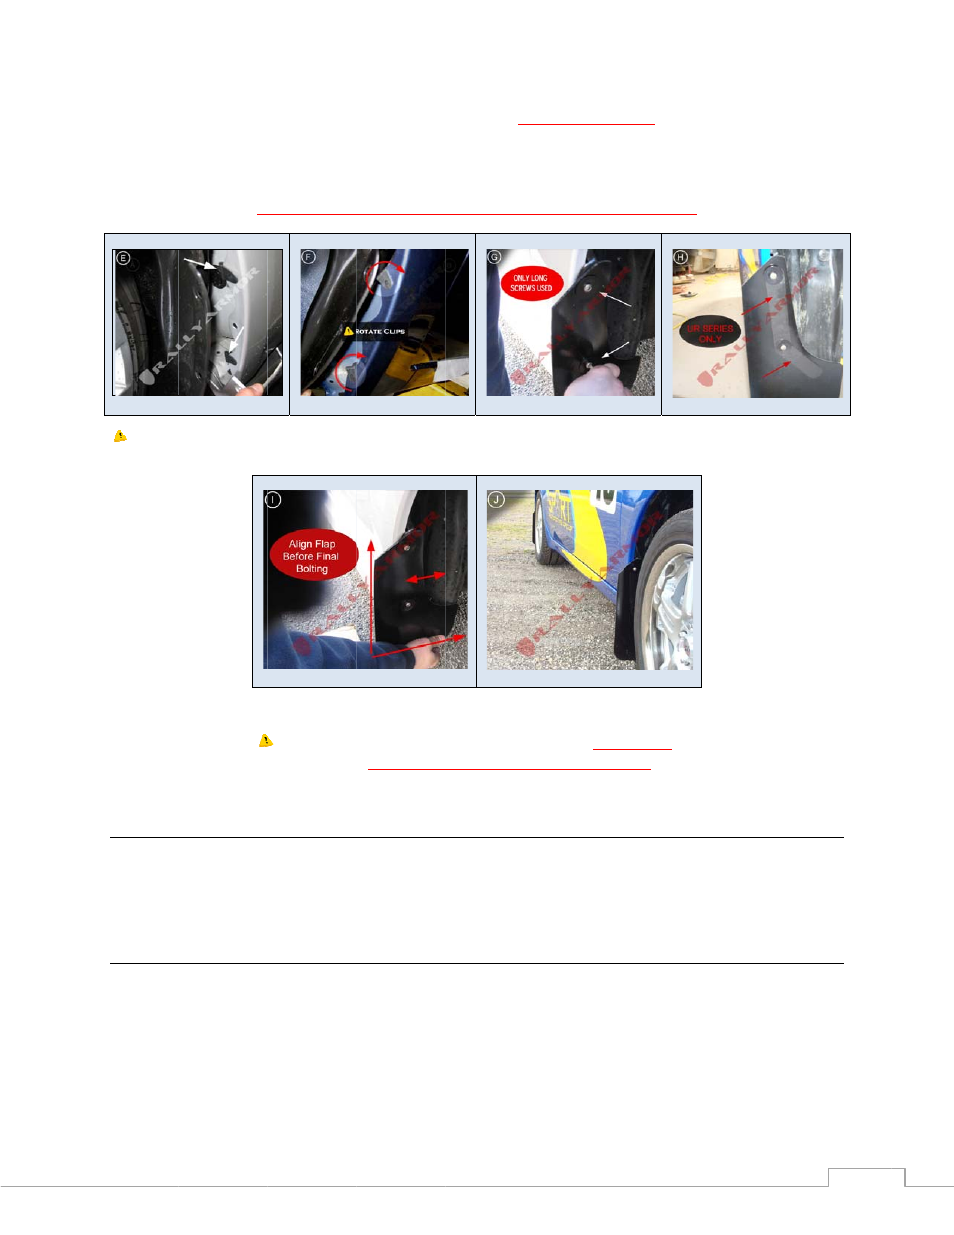
Place the rou
of the fender li
to original state
mounting slot (
For the UR seri
TIP #4:
You m
bolting. (Figure “I
Rear Mud Flap
The lack of a re
‐ A mounting as
‐ A hole to be c
Option #1
Rear
In summary, yo
1.
Pla
2.
Se
3.
Pl
4.
Ali
5.
Fi
und edge clips (item#
ner,
you must rotate
e, place front flap ag
(Figure “G” below). A
ies only
place bracke
The
ust align flap before fina
”). Front Installation Com
Installation
ear inner mounting p
ssembly to be added
created on inner whe
r Mud Flap Installati
ou will be:
acing the clips on the
ecuring on a clamp o
a.
(optional
acing mud flap on ve
igning and adjusting
nal bolting of rear m
# RoCl) over the two
e the clips
upwards (
ainst mounting hole
Adjust the mounting
et between washer a
e hardware is very stron
al bolting. Rally armor re
mplete (Figure “J”)
Rear installatio
review th
oint to accommodat
d to this Impreza (Op
eel well for a reinforc
on‐ Clamp method
e outer two holes of
on the inner wheel w
but recommended) C
ehicle, hand threadin
rear mud flap until p
mud flap.
o mounting holes (Fig
(for both sides of the
s (logo facing backwa
clips with the tip of t
nd flap before moun
ng and self threading bu
ecommends adjusting th
on: Please read
he 2 mounting o
te a wide mud flap o
tion #1) – Easiest op
ced mounting solutio
the rear bumper.
ell area.
Coating rear clamp w
ng mounting hardwa
perpendicular/even w
gure “E“below).
The
e vehicle) before repl
ard) and hand thread
the screw if needed
nting (Figure “H” belo
t over‐tightening the cli
he mud flap, walking aw
this entire secti
ptions available
n your Impreza nece
ption
on (Option #2). ‐ Mor
with undercoating.
re.
with vehicle and grou
middle hole is NOT u
lacing the liner (Figu
d a washer/
longer
sc
to aid in aligning the
ow)
ps beyond their limit is
way from the vehicle to c
ion below very c
e before proceed
essitates either:
re secure option
und.
utilized
. In order to
re “F” below). Repla
crew
assembly throu
e mounting hole thro
not recommended.
confirm desired position
carefully and
ding.
allow close/flush mo
ace liner and side skir
ugh the flap, then int
ough the liner if it has
n and then performing th
2
ounting
rt back
to the
s shifted.
he final