Great Plains V-300F Predelivery Manual User Manual
Page 36
V300, V300F
148-057Q
1/2/2006
34
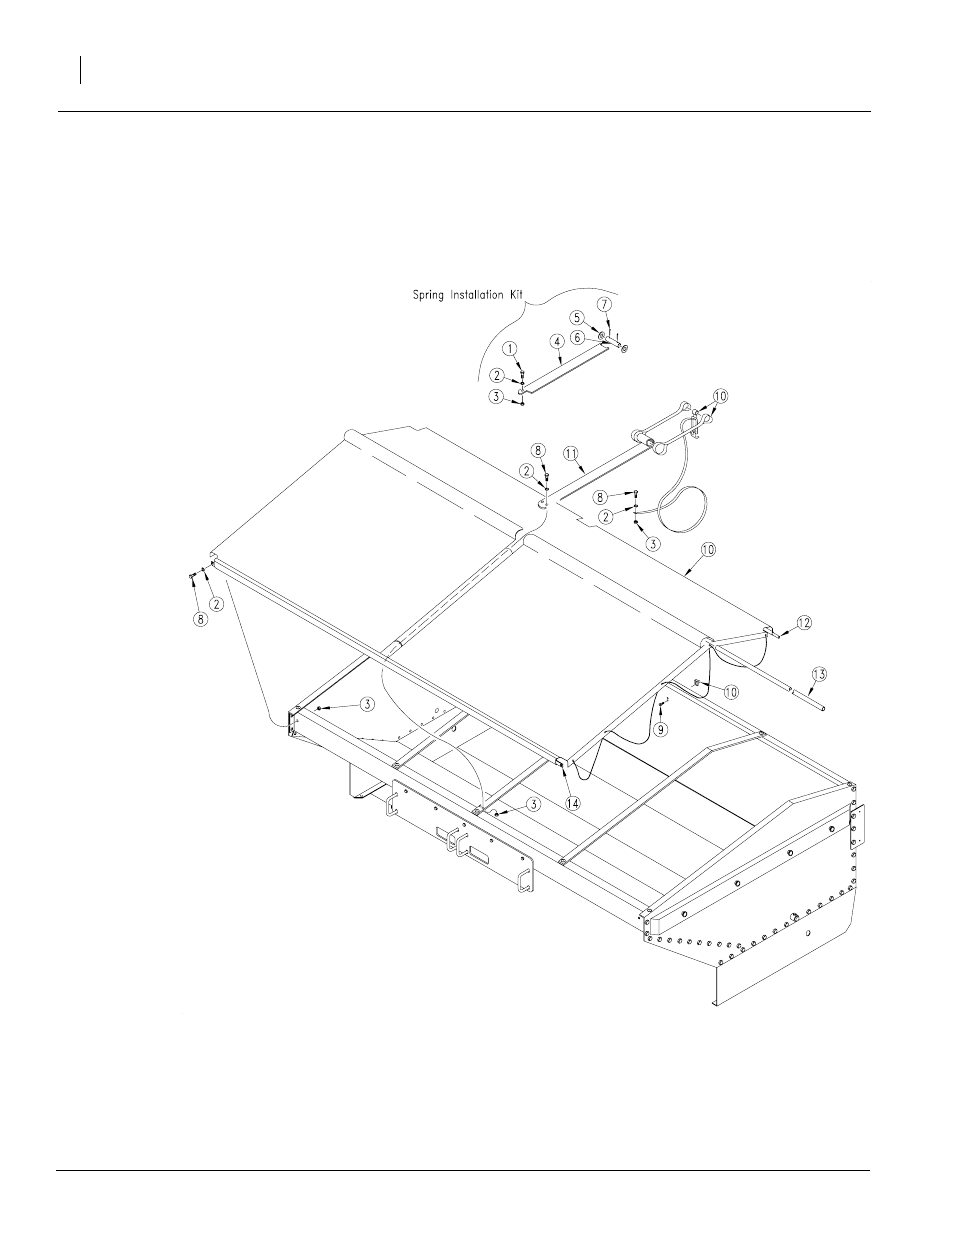
Figure 59
Tarp Cover
Refer to Figure 59
10. Remove spring tool with spring from vise and carefully insert the end with
bolt into the pocket in center of tarp. Start at rear of hopper and push to-
wards the front. NOTE: Be sure to insert the spring as shown in the illus-
tration. Inserting the spring upside down will result in improper installation
of the tarp.
11. Insert rear tarp support tube (12) into rear
pocket of tarp as far as cutout. Place two loop
straps and latch assembly into cutout.
Thread tube through loop straps and latch
assembly with a loop strap on each side of
latch assembly. Push rear tarp support tube
rest of way through pocket.
12. Attach left end of spring to cen-
ter support using 1/4” x 1” bolt
(8), 1/4” flat washer (2), and 1/4”
lock nut (3). Leave bolt loose
and do not remove spring tool
yet.
13. Insert plastic
tarp support
tube (13) into
center pocket
of tarp as far
as the cutout.
Place two
loop straps
into cutout
with one strap
on each side
of spring coil.
Slide support tube into loop
straps and spring coil. Push as-
sembly rest of the way through
pocket.
14. Insert mounting bar (14) in front pocket
and attach to hopper. Secure bar in
place using 1/4” x 1” bolts (8), 1/4” flat
washers (2), and 1/4” lock nuts (3).
15. Pull on latch assembly to unroll tarp.
With tarp fully extended, pull latch as-
sembly down and hook to latch cleat.
Remove bolt and nut that attaches the
spring to insertion tool. Slide insertion
tool out through the front.
16. Unhook latch from cleat. Let tarp roll
forward. Finish attaching end of spring
to center support using 1/4” x 1” bolt (8),
1/4” flat washer (2), and 1/4” lock nut
(3). Tighten bolt and nut.
17. Pull on latch strap to extend cover over
21847
hopper and hook latch over cleat on back of
hopper.
18. Stretch elastic cords over cleats on sides of
hopper to secure.
19. Bolt end of strap to hole in top of center par-
tition with 1/4” x 1” bolt (8), 1/4” flat washer
(2), and 1/4” lock nut (3).