T-armor, Ridge/hip - fixed – Metal Sales T-Armor Series User Manual
Page 68
© Metal Sales Manufacturing Corporation / Subject to change without notice 09/14
T-ARMOR
68
RIDGE/HIP - FIXED
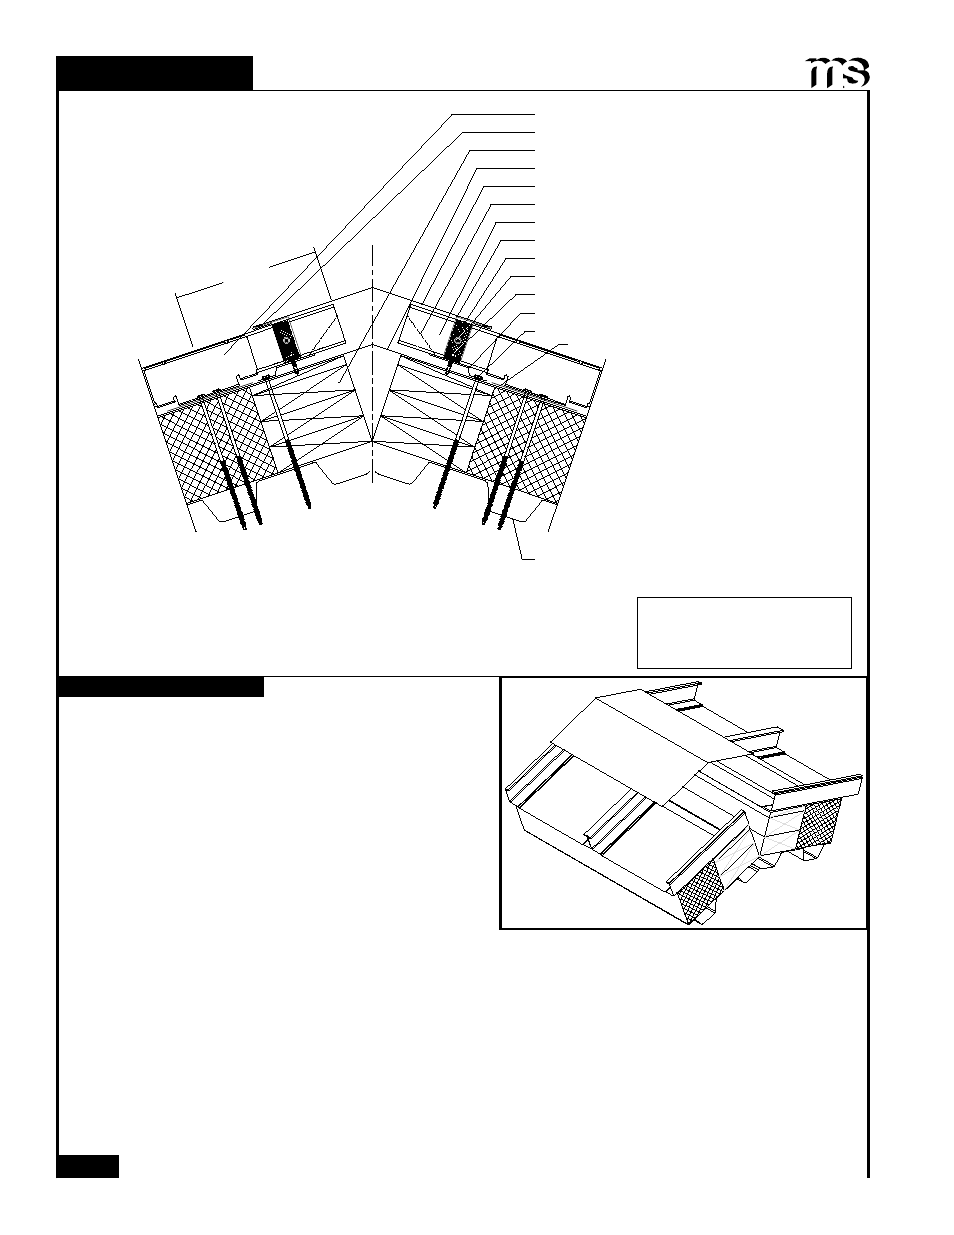
INSTALLATION NOTES
1. Install Eave Plate and fasten through the wood blocking
into the metal deck with #14-13 Deck Screws at 1'-0" oc.
If more than one Eave Plate is required then butt the ends
together.
2. Place panels on to the Eave Plate and apply a row of
Double Bead Tape Sealant across panel, up and over all
ribs approximately 2" to 3" from panel end.
3. Field-cut Z-Closure to fit between the panel ribs, install
Z-Closure over Tape Sealant. Before continuing, make
sure Z-Closure placement will accommodate
7" Ridge/Hip Cover.
4. Once closure is set in Tape Sealant, fasten through
Z-Closure, Tape Sealant, T-Armor panel and into the Eave Plate with #12-14x1" Self Driller N/W screws (see
page 75 for number of fasteners required).
5. Install 7" Ridge/Hip Cover by applying a bead of Tube Sealant to the top of the Z-Closure, setting the flashing
in place by hooking onto the Z-Closure.
6. If two or more flashings are required, lap the flashing over the previously installed flashing by a minimum of
2" placing a bead of Tube Sealant between the flashings and secure with Pop Rivets, 2.5" oc.
Moisture Barrier (by others)
Wood Blocking (by others)
Tube Sealant
Clip w/ (2) #14-13 Deck Screws
7" Ridge/Hip Cover
Panel Turn Up
Double Bead Tape Sealant
#12-14X1" SD N/W (1 per rib)
Z-Closure (see Pg 75)
#14-13 Deck Screws (1'-0" oc)
Bearing Plate
Metal Decking (by others)
Eave Plate
#12-14x1" SD N/W (see Pg 75)
T-Armor Panel
CL
1
/
2
:12 Slope
Minimum
Additional #14-13 Deck
Screws may be required for
areas with large snow loads
*Panel cap not shown for clarity
9" max