Caution, Installation of panel – Metal Sales T-Armor Series User Manual
Page 56
© Metal Sales Manufacturing Corporation / Subject to change without notice 09/14
56
CAUTION
Do not run the seamer off the end of the panel. If the seamer is run off the end of the roof it could
cause injury to personnel and damage the roof or the seamer. (See seamer instructions enclosed
in the case for additional information about the proper handling of the seamer.)
INSTALLATION OF PANEL (
cont
.)
SEAMING PANELS
(CONT.)
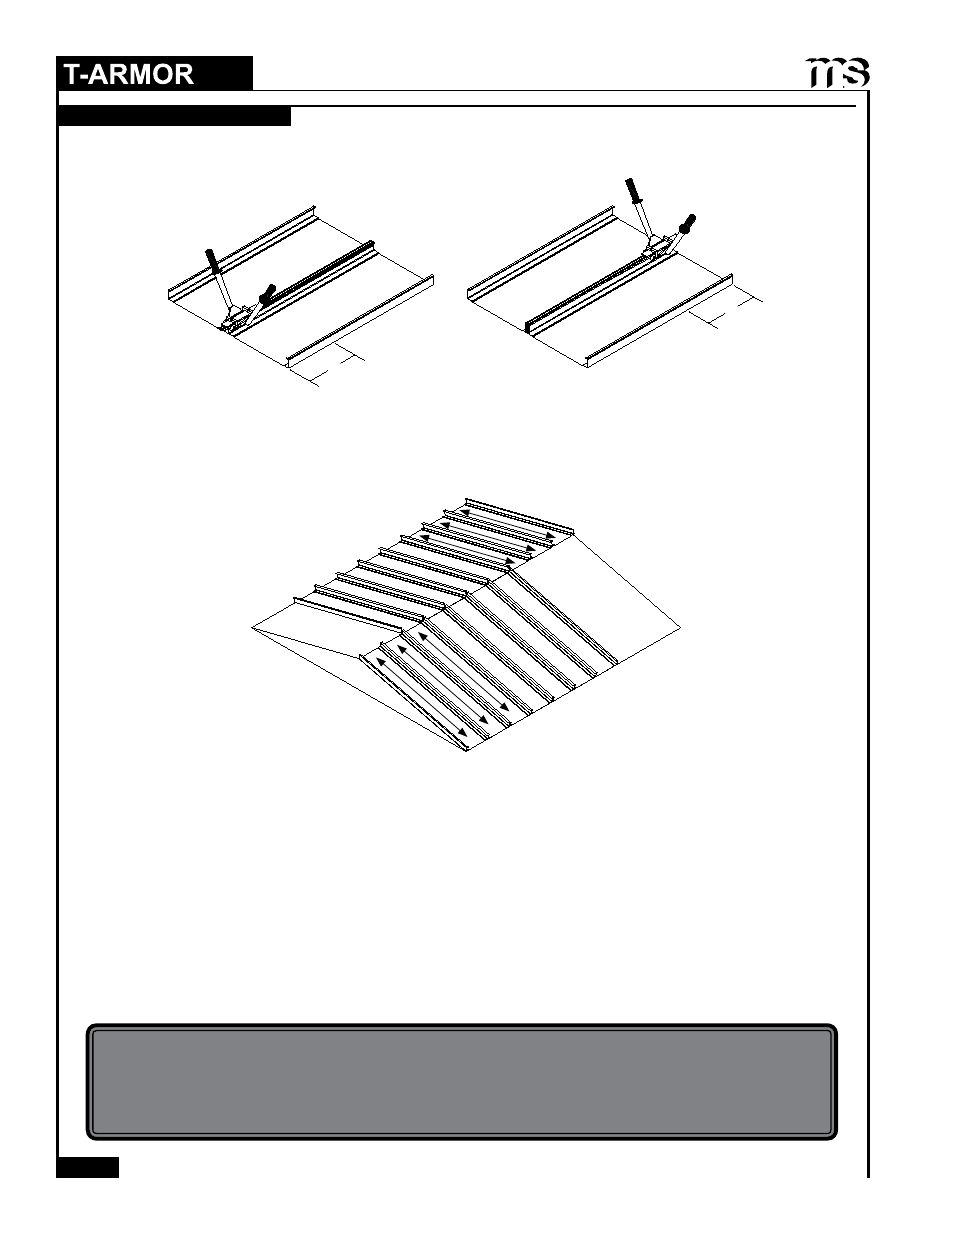
8"
8"
Hand Crimper
Low Side
High Side
Steps:
1. To start seaming, hand crimp the first 8” of seam at eave, the cap endlap, and ridge locations. Other areas such as at clips
may be hand crimped, but this additional hand crimping is not necessary.
2. Position mechanical seamer over hand crimped roof seam at ridge location so that the levers are on the same side of the
seam that is to be crimped by the mechanical seamer.
3. Engage roller levers on both sides of seamer.
4. Prior to running seamer, check to make sure that T-Armor panels are fully engaged along the entire run of the panel.
Small C-Clamps may be required on the horizontal portion of the seam to hold panel seam engaged while seaming.
5. Turn on the power to seamer and walk with the seamer as it seams the panel. Stop the seamer in the first few feet to
ensure proper seam is being achieved. Turn the mechanical seamer off before the hand crimped end portion of the panel.
Remaining seam between hand crimped portion and mechanically seamed portion may have to be hand crimped for
continuous tight seam.
6. At the end of the first run, remove mechanical seamer and return to step #1 for remaining panels.
7. At completion of seaming, repack tool and return to Developmental Industries, 915 Old Highway 45 S, Corinth, MS
38834. Phone No. (662) 287-6744.
NOTE:
Contact your local sales branch (see page 2) for directions concerning proper removal of damaged panels and
installation of replacement panels.
Seaming Either
Direction