Installation instruc tio ns – Poison Spyder JK BFH FRONT BUMPER User Manual
Page 2
INSTALLATION INSTRUC
TIO
NS
©2010 POISON SPYDER CUSTOMS, INC. • 951-849-5911 • WWW.POISONSPYDER.COM
Poison Spyder Customs • JK BFH FRONT BUMPER INSTALL
Page 2
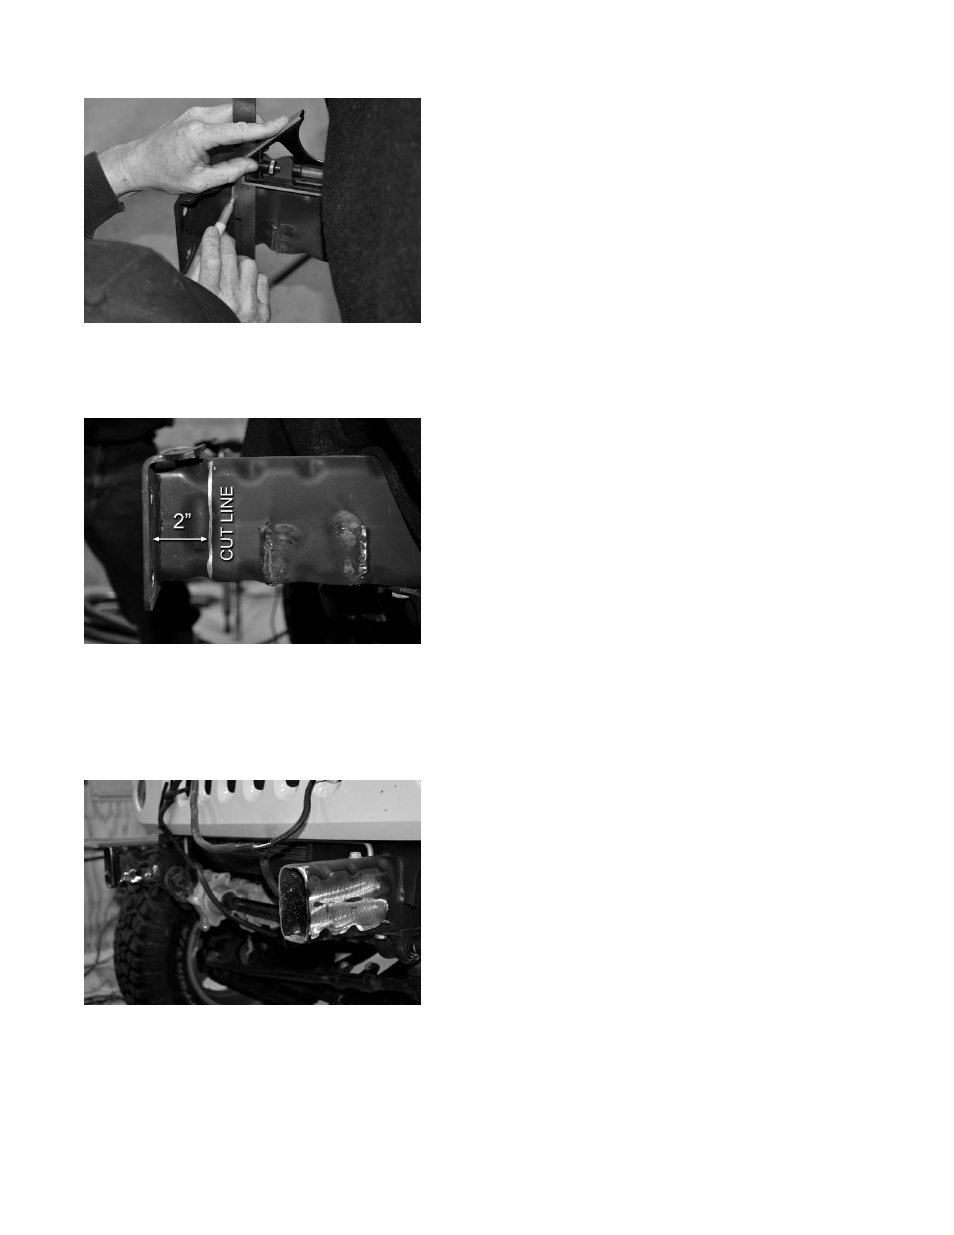
FIGURE 2
5. Use a reciprocating saw or other suitable
cutting device to cut the frame rails off, along
the cut line you marked.
FIGURE 3
6. Use a grinder to de-burr the cut edges and
smooth down the remnants of the crash bar
brackets. You will need to get the outboard
surfaces of the frame rails fairly smooth for
proper fitment of the BFH bumper.
FIGURE 1
7. Apply primer and paint to the bare metal
in the areas where you cut and grinded,
including the cut edges of the frame rails.
Properly coating these areas at this time will
help to prevent rust in the future.
8. Remove the grille by opening the hood and
removing the six (6) Phillips head screws
along the top of the grille. Reach behind the
grille and disconnect the headlight and turn
signal lamp sockets. Remove the grille while
carefully disengaging the snaps along the
bottom edge of the grille.
9. Place the BFH Bumper on to the frame
rails. Visually align the rearward, elongated
bumper mounting slots with the existing
holes in the frame rails. Take measurements
to ensure that the bumper is installed square
to the frame and grill, and centered in
relation to the frame rails. Use a soft dead-
blow hammer, if necessary, to make fine
adjustments. Use C-clamps or bar clamps
to hold the bumper tightly in place.
10. Use a 1/2” drill bit and drill motor to drill the
rearward hole in the bottoms of the frame
rails by slipping the bit through the hole in
the top of the frame rail and using it as your
drill guide. Be careful to hold the drill as
straight and perpendicular to the frame rail as
possible. Install two of the supplied Grade 8
bolts, with lock nuts and flat washers, through
the bumper and frame rails at these rearward
holes.
11. Use the 1/2” drill bit and drill motor to drill
the forward mounting holes through the
frame rails, using the bumper itself as your
drill guide. Drill the upper hole from the top
and the lower hole from underneath. Do not
try to drill both the top and the bottom through
the same hole in the bumper, as you may not
get the holes properly aligned. Install the
remaining two of the supplied Grade 8 bolts,
with lock nuts and flat washers, into these
forward mounting holes.
12. Torque all four cap screws/nuts to 85 ft./lbs.
13. Re-install the grille by reversing the removal
procedure from Step 8.
14. If installing the optional BFH Disco Skid,
follow the instructions that came with the
Disco Skid. If installing a winch with Poison
Spyder Winch Fairlead Mount, follow the
instructions included with the Winch Fairlead
Mount.
Congratulations, you have installed your Poison
Spyder Customs BFH front bumper!