Attach the colour sensor, Preparation 05 – Pioneer KRP-600A User Manual
Page 17
Preparation
05
17
En
E
n
glish
Using a wall for stabilization
1
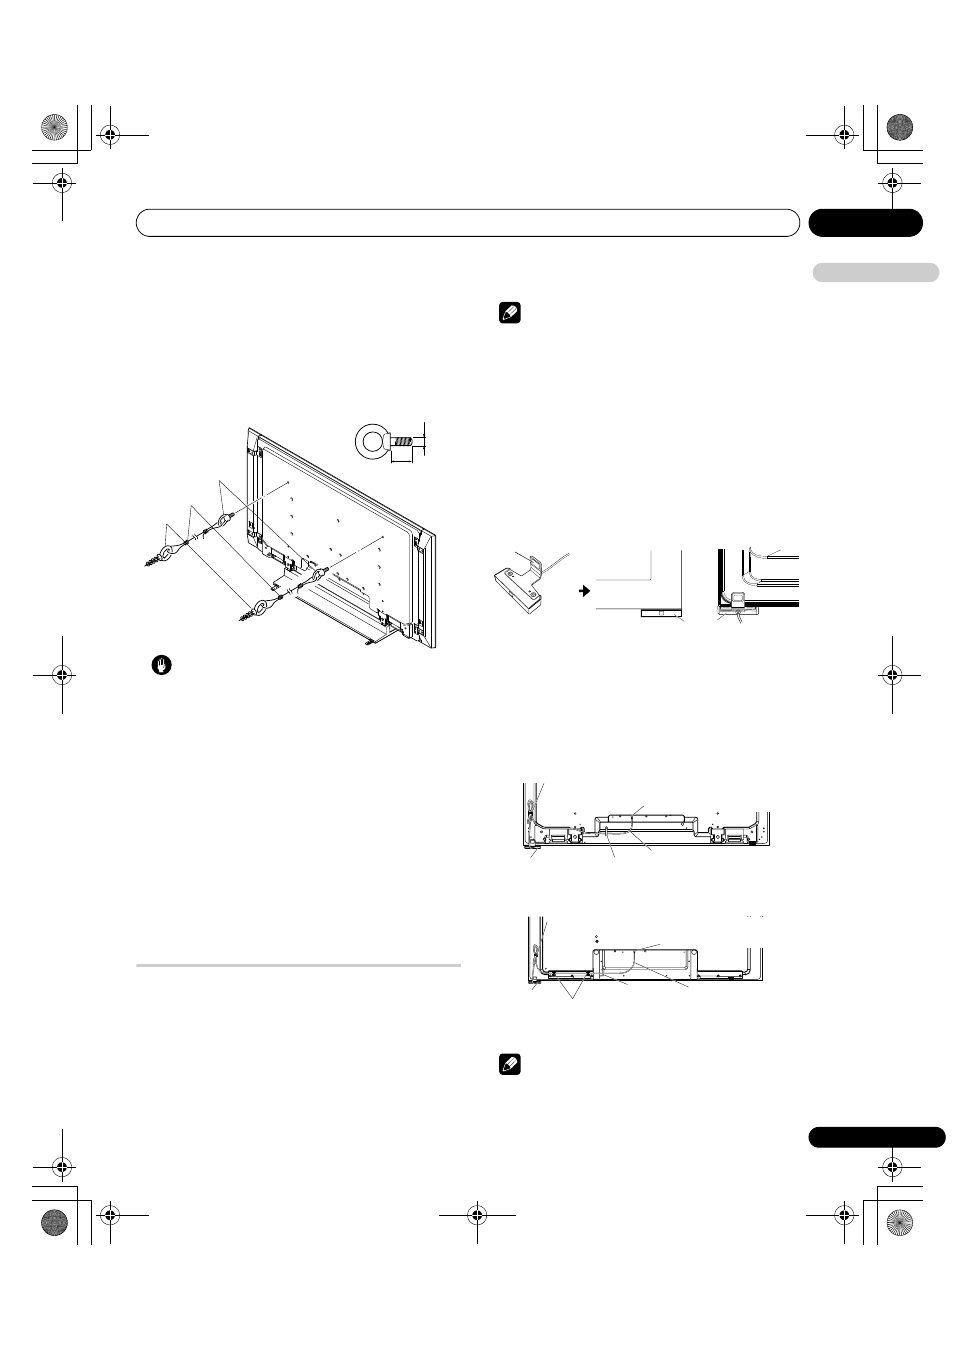
Attach falling prevention bolts (hooks) to the display.
2
Use strong cords to stabilize it appropriately and firmly to a
wall, pillar, or other sturdy element.
Perform this work in the same way on the left and right sides.
Use hooks, cords and fittings that are available on the market.
Recommended hook: Nominal diameter 8 mm, length 12 mm to
18 mm
Caution
• A table or rack with adequate strength should always be used to
support the display. Failure to do so could result in personal
injury and physical damage.
• When installing the display, please take the necessary safety
measures to prevent it from falling or overturning in case of
emergencies, such as earthquakes, or of accidents.
• If you do not take these precautions, the display could fall down
and cause injury.
• The screws, hooks, cords and other fittings that you use to
secure the display to prevent it from overturning will vary
according to the composition and thickness of the surface to
which it will be attached.
• Select the appropriate screws, hooks, cords, and other fittings
after first inspecting the surface carefully to determine its
thickness and composition and after consulting a professional
installer if necessary.
• Do not use bare wires for the cord. If any part of the wire is
introduced into the ventilation port on the back of the display
panel, fire or electrical shock could result.
Attach the colour sensor
When attached to your panel, the colour sensor analyses the
brightness of the environment to automatically optimize the picture
quality according to the viewing condition. To activate this function,
select OPTIMUM on the AV Selection menu, Mode 1 or Mode 2 on
the Room Light Sensor menu (page 62).
We strongly suggest you attach the colour sensor to the bottom
right of the front panel. It can be attached to the rear of the panel,
but the colour sensor may not operate properly depending on the
conditions (refer to the Important bullets on page 19). For the actual
procedure, follow the directions below.
Note
• Do not connect any other external device to the colour sensor
terminal.
• Do not connect the colour sensor cable to any devices other
than specified.
• To clean the sensor window, gently wipe with the cleaning cloth
supplied with the panel.
• Do not use extension cables for the colour sensor.
• Do not disassemble or modify the colour sensor.
Attach the colour sensor to the front panel
(recommended)
This is a simple and easy-to-attach method using a magnet.
1
Attach the colour sensor at the bottom right of the front panel
using a magnet.
2
Attach the colour sensor along the bottom edge of the front
panel flush with the right side.
When the colour sensor is properly attached, the front of the colour
sensor is set back a small amount from the front of the display.
3
Connect the cable to the colour sensor terminal on the rear
upper bank but do NOT plug in to the power outlet.
Note
• Use the cable clamps as necessary.
• Remove the sheet of the double-sided adhesive tape when
attaching the cable guide to the panel.
1. Hook
Fitting
12 mm to 18 mm
M 8
2. Cord
Magnet
(Front)
(Rear)
Display
Colour
sensor
Colour sensor cable
Cable clamp
Colour sensor terminal
(upper bank)
Colour sensor
Cable guide (supplied with the colour sensor)
(KRP-600P)
Colour sensor cable
Cable clamp
Colour sensor terminal
(upper bank)
Colour sensor
Cable guide (supplied with the colour sensor)
(KRP-500P)
Cable guide (supplied with the flat screen TV)
Attach the cable guides here to bundle the
colour sensor cable.
KRP-600A_500A.book Page 17 Monday, September 8, 2008 10:31 AM