English – Ferguson RW-770 HD User Manual
Page 39
- 39 -
RECORDING
SET RECORDING QUALITY
Six different record qualities can be set for
recording. Higher quality will consume more space
on HDD or DVD disc, reducing the overall time that
can be recorded.
To set the recording quality please carry out the
following:
1. Press the MENU button on the remote control to
access the SETUP MENU
2. Use the Navigation buttons to highlight the
Recording icon, and press the Play/OK button.
3. Use the
buttons to highlight the Record
Quality item and press the Play/OK button.
4. Use the
buttons to highlight the quality
setting you want and press the Play/OK button to
confirm.
Choose the record quality carefully to ensure that
there will be enough space available for your
recording on the HDD orDVD.
RECORD TO DVD
1. Insert a recordable DVD into the unit and switch
to DVD mode by pressing the DVD button.
2. Press the Source button repeatedly to select the
signal source for recording.
3. Press the Record/OTR button to start recording, a
status bar is displayed at the bottom of the screen
to show the current recording status.
4. Press Stop to stop the recording.
5. Press the DVD button to switch to DVD mode to
find the segment just recorded.
It may take a few seconds to completely stop the
recording process, please wait until Stop is
displayed on the status bar to switch to DVD mode.
When recording from a DVD in this manner, the
recorder will stop any recording to the HDD. Once
the DVD recording is finished, press the TV-HDD
button to restart the Time Shifting mechanism.
The recorder will continue to record until the
disc is full or when the Stop button is
pressed. To set the recorder to record for 30
minutes only, press the Record/OTR button
after recording has started. Each time the
Record/OTR button is pressed, an additional
30 minutes will be added to the record time. To
pause the recording, press the Pause button on the
remote control, press the Play/OK button again to
resume recording.
If TV tuner is selected, use the
buttons to
select the desired channel.
RECORD TO HDD
1. Press the Source button until the desired source
is selected.
• The following video sources are available:
> DV (Digital Video)
> SCART2
> CHXX (TV Tuner)
> F-COMP (Front Composite Video)
> F-SV (Front S-Video)
2. If you are in Time Shifting mode, press Record.
3. If you are in Recording mode, make sure Hard
Disc (see onscreen status bar) is selected.
4. If not, press the TV-HDD button to select the
HDD and press Record.
5. Press Stop to stop recording.
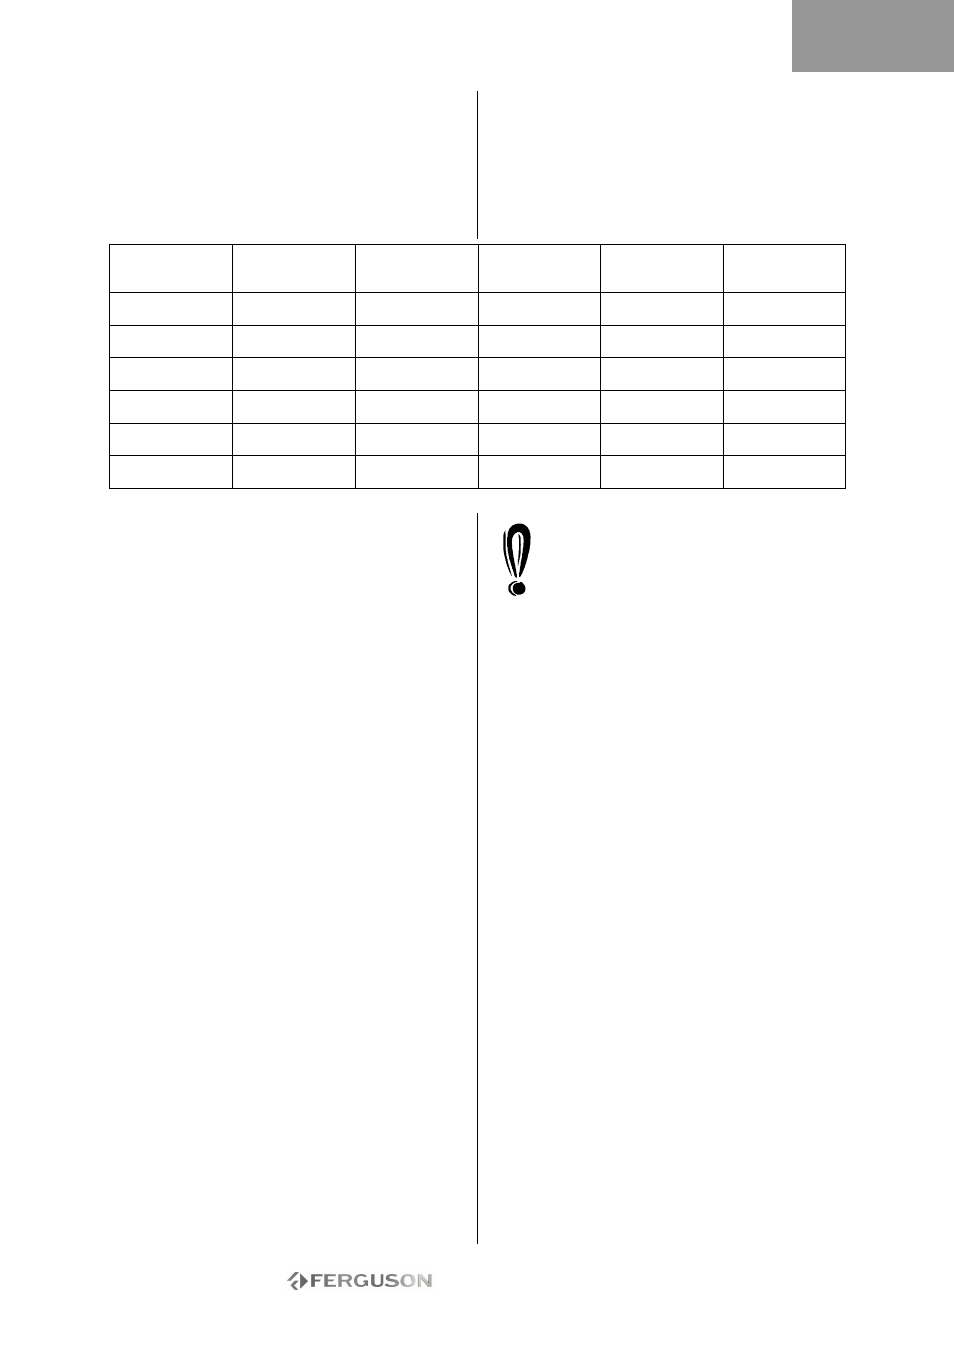
Record Quality
Recording
Time (4.7GB,
DVD)
Recording
Time (80GB,
HDD)
Recording
Time (160GB,
HDD)
Recording
Time (250GB,
HDD)
Recording
Time (400GB,
HDD)
HQ (High
Quality)
1 hour
17 hours
35 hours
53 hours
85 hours
SP (Standard
Play)
2 hours
34 hours
68 hours
106 hours
170 hours
SP+ (Standard
Play +)
3 hours
51 hours
102 hours
159 hours
255 hours
EP (Extended
Play)
4 hours
68 hours
136 hours
212 hours
340 hours
LP (Long Play)
5 hours
85 hours
170 hours
265 hours
425 hours
SLP (Super Long
Play)
6 hours
96 hours
192 hours
300 hours
480 hours
ENGLISH