Baron Air & Fuel_BIG AIR KIT STEALTH Road_Stratoliner & Raider User Manual
Page 6
Page: 6
BA-2021-00
STEALTH BIG AIR KIT - Yamaha Roadliner/Stratoliner and
Raider
10. Reinstall the left motor mount attaching it to the cylinder heads first by threading the m14 Hex bolts (removed earlier) back into the cylinder
heads. Using (1) m10 x 1.25 x 35mm cap head bolt and one m10 flat washer (supplied) insert into the rear upper motor mount and tighten. A
portion of this bolt will protrude through the frame rail once it is properly tightened.
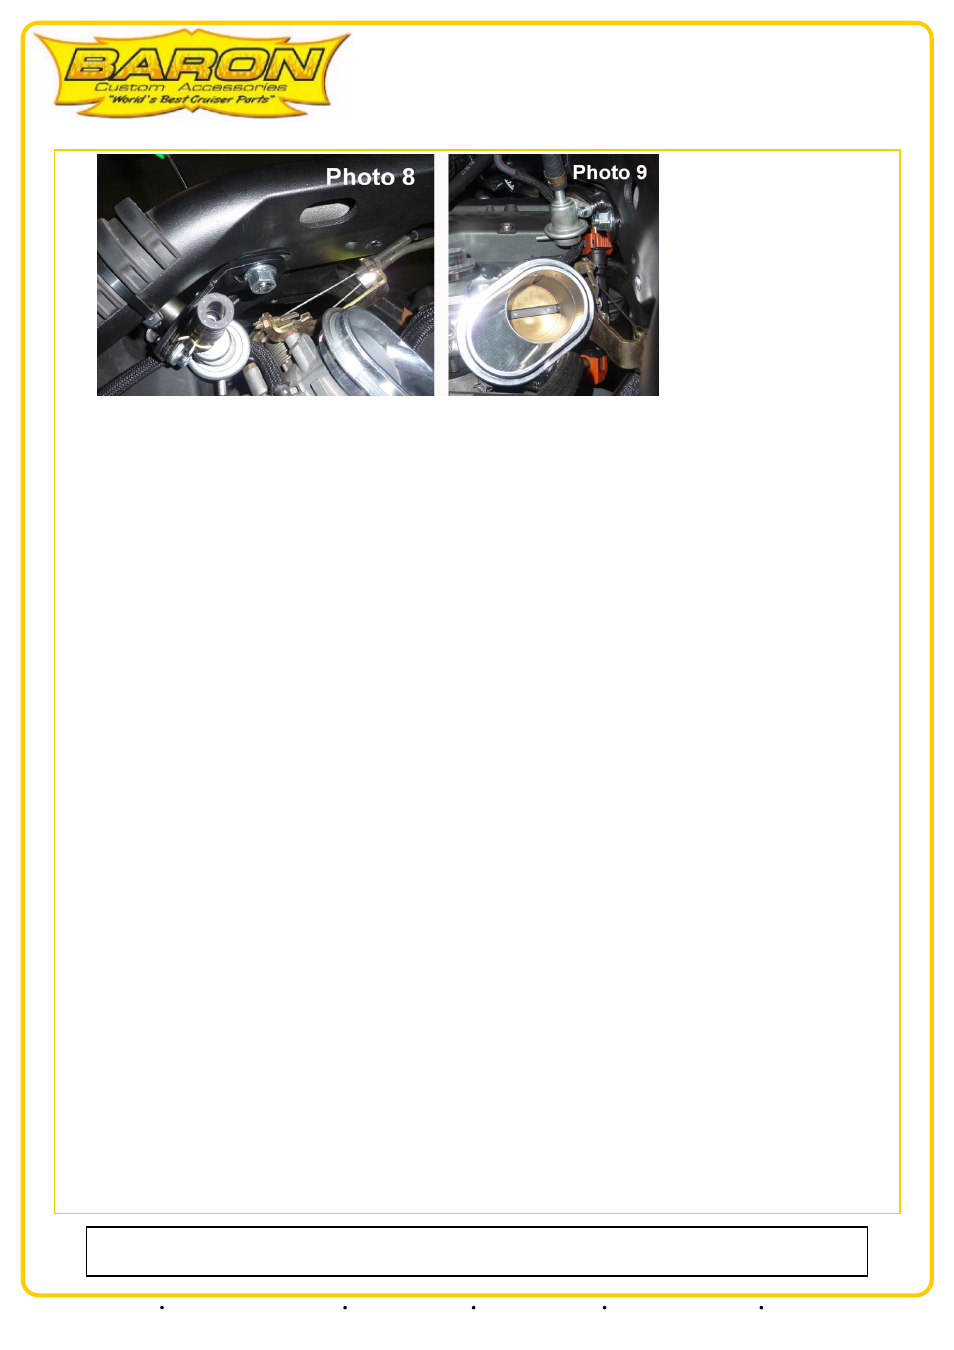
11. Place the bracket with the pressurized fuel return valve attached on the inside on the frame over the left rear cylinder. Insert the open end of
the pressurized fuel return valve line onto the male fitting of the pressurized fuel return valve until the fitting seats firmly then snap the safety
connector closed. (You should hear a click or snap) See photo 9 above:
12. Place the oval mount hole of the new bracket with pressurized fuel return valve attached over the m10 bolt that now protrudes inside the
frame rail and thread the m10 Flange nut (supplied) then slide/adjust this bracket as needed to be sure the pressurized fuel return valve line is
not touching throttle linkage or the cylinder head. Be sure to manipulate the throttle fully while watching to be sure you have adjusted the line to
clear the linkage fully. Photo 8 above:
13. Take the new hard fuel line (supplied) and insert the longer end into the long rubber fuel hose leading to the secondary fuel tank and install a
screw clamp (supplied) over the hose at the junction and tighten.
14. Place a screw clamp over the short rubber hose at the top of the pressurized fuel return valve and insert the curved end of the new hard fuel
line into the hose and align the screw clamp with the junction and tighten firmly.
AIR SENSOR:
15. Take the black coil mount plate and attach the air sensors you removed from the stock air box earlier and attach them as follows. REAR
SENSOR: Using the supplied m6-1.0 x 16mm cap head allen bolts and m6 Flange nut attach sensor to the very rear of the coil mount plate to the
two holes located in the 90 degree bend in the rear tail section. The air nozzle/spout will point down towards the engine. See photo 4 above:
NOTE: It will be necessary to trim appox. 2" of the wiring sheath away from the wiring loom at the front of the bike in order to release the air
sensor electrical lead so it can properly connect to the sensor.
FRONT AIR SENSOR ATTACHMENT: Using the supplied m6-1.0 x 16mm cap head allen bolts and m6 flange nut attach as described below:
RAIDER: Attach sensor to the foremost two parallel 6mm holes just behind the center front 8mm mount hole. The electrical connection points
towards the engine and the nozzle/spout points towards the rear of the bike. The bolts should go through the sensor up into the coil mount plate
then thread and tighten the flange nuts firmly. Connect the electrical leads to each sensor and insert the small vacuum line onto the nozzle/spout.
LINERS: Attach sensor to the two parallel 6mm holes located to the right of the coil cutout on the front right of the coil mount plate The
electrical connection points down towards the engine and the nozzle/spout points towards the left frame rail. The bolts should go through the
sensor up into the coil mount plate then thread and tighten the flange nuts firmly. Connect the electrical leads to each sensor and insert the small
vacuum line onto the nozzle/spout.
INSTALL COILS:
16. Using the m6 cap head screws and flange nuts mount the coils to the coil mount plate. All bolts insert through the coil mount and a spacer
washer is placed over the exposed bolt, then insert the bolts through the coil mount plate and tighten an m6 flange nut down firmly against the
top of the coil mount plate. See photo 10:
Our install guides provide a basic outline on the proper installation of our products. Further tuning and/or
fitment may be required. Barons bears no responsibility on installation costs associated with this product.
© 2013 Barons Custom Accessories
5221 Oceanus Drive
Huntington Beach, CA 92649
(925)583-2499 - Ph.
(714)901-0520 - Fax
www.baronscustom.com