Canon REALiS 4K501ST Pro AV 5000-Lumen LCoS Projector User Manual
Page 45
45
Installation Procedure
Bas
ic G
uide
In
st
allation
Pr
ocedu
re
1
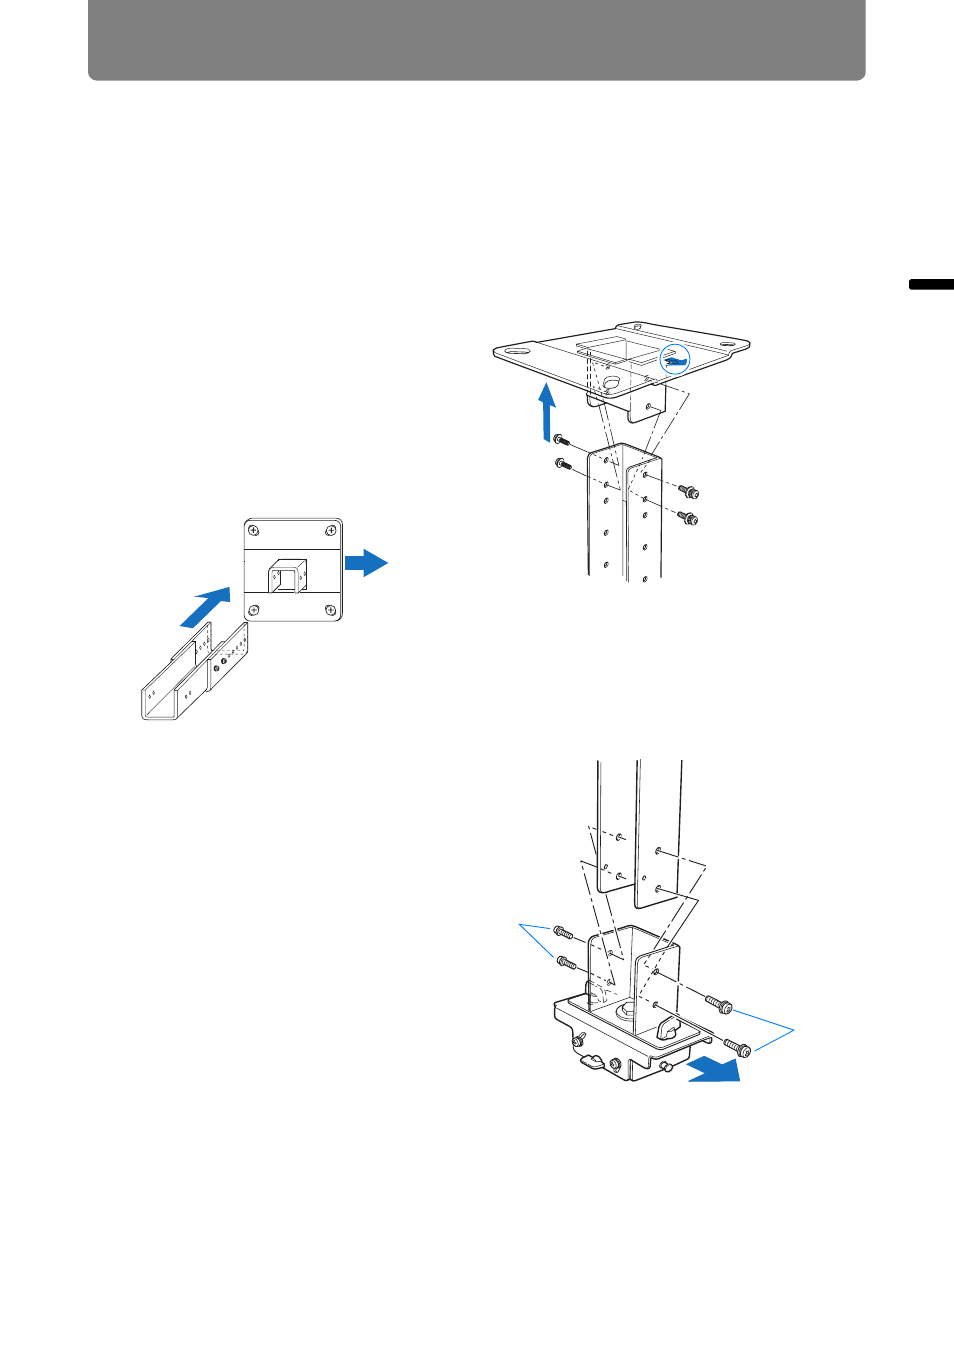
Separate the Joint fitting from the Ceiling-mount bracket temporarily
(Preparation on page
)
2
Make a hole in the ceiling (Step 1 on page
3
Secure the Ceiling-mount bracket to the ceiling (Step 2 on page
4
Attach the Base bracket to the projector (Step 3 on page
)
5
Attach the anti-fall wire (Step 4 on page
6
Attach the top of the extension
pipe to the Ceiling-mount
bracket
Secure to the extension pipe using
the four supplied M5 screws.
•
The open end of the pipe should
face the open end of the Ceiling-
mount bracket as shown.
7
Attach the Joint fitting to the
bottom of the extension pipe
Use the four M5 screws (A)
removed initially to secure it.
Direction to the
screen
Direction to the
screen
A
A
Direction to the screen
- LV-5110 (2 pages)
- LV-5200 (2 pages)
- LV-7105 (2 pages)
- LV-7215 (56 pages)
- RE-455X (6 pages)
- LV-7245 (71 pages)
- LV-8310 (12 pages)
- LV-7340 (6 pages)
- LV-7345 (44 pages)
- LV-7350 (2 pages)
- LV-7545 (44 pages)
- LV-7575 (63 pages)
- LV-7585 (81 pages)
- LV-8320 (26 pages)
- LV-8320 (62 pages)
- LV-8320 (81 pages)
- LV-S1 (44 pages)
- LV-X1 (44 pages)
- LV-X2 (44 pages)
- LV-X4 (64 pages)
- REALiS SX6000 Pro AV (240 pages)
- SX 50 (244 pages)
- X700 (146 pages)
- HDMI SX80 (154 pages)
- LV-7325U (48 pages)
- REALiS WUX4000 D (12 pages)
- REALiS SX60 (146 pages)
- DC-5384 (40 pages)
- REALiS WUX4000 (13 pages)
- REALiS WUX10 (2 pages)
- Multimedia Projector LV-8215 (2 pages)
- LV 5100 (40 pages)
- REALiS SX6 (190 pages)
- RE-350 (23 pages)
- REALIS SX80 MARK II (168 pages)
- REALIS WUX10 MARK II D (25 pages)
- T2000 (65 pages)
- X600 (133 pages)
- LV-7320U (40 pages)
- LV-7355 LV-7350 (48 pages)
- REALIS WUX10 MARK II D (146 pages)
- Projectors (12 pages)
- REALiS SX7 (141 pages)
- REALiS SX7 Mark II D (1 page)
- compact XGA projector LV-7385 (2 pages)