Rear panel (connecting your equipment), Turning the power on/off, Rear panel – Roland VERSELAB MV1 Music Production Workstation User Manual
Page 7: Connecting your equipment), Turning the power on, Turning off the power
7
Panel Descriptions
Rear Panel
(Connecting Your Equipment)
* To prevent malfunction and equipment failure, always turn down the volume, and turn off all the units before making any connections.
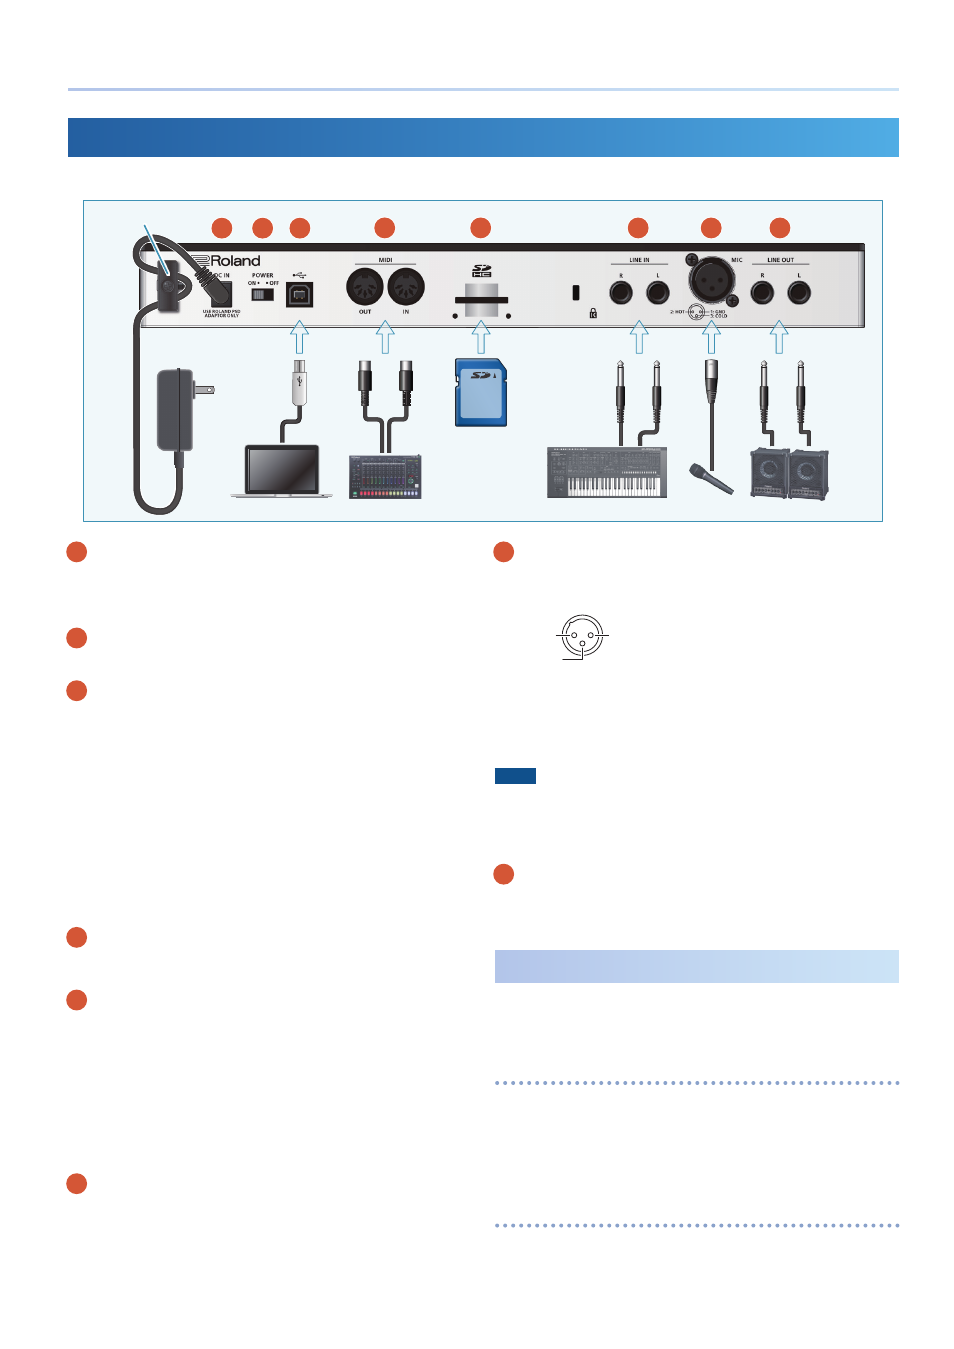
A
DC IN jack
Connect the included AC adaptor to this jack.
* Use the cord hook to secure the cord of the AC adaptor as shown in the
illustration.
B
[POWER] switch
Turns the power on/off.
C
USB (
O
) port
Use a commercially available USB 2.0 cable (type B) to connect this
port to your computer or smartphone. This is used to transfer USB
MIDI and USB audio data.
* A USB driver is not required when connecting to this unit.
* This unit also supports USB bus power. The following functions are limited
when the unit operates via USB bus power.
5
Phantom power cannot be used.
5
The headphone volume is lowered.
5
The LEDs are dimmer.
To use USB bus power without limiting functionality, hold down the [VALUE]
dial while powering up this unit. Note that this unit may not start up,
depending on the amount of USB bus power supplied.
D
MIDI connectors
Connect these to an external MIDI device to transmit and receive
MIDI messages.
E
SD card slot
Insert an SD card here. The SD card contains various data (such as
projects, settings, tones and samples) for this unit.
* You can install the included SD card protector to prevent the SD card from
being accidentally pulled out. Use the two included screws to fasten the
card protector in place.
* Never turn off the power or remove the SD card while the SD card is being
accessed.
* Some SD card types or SD cards from some manufacturers may not record
or play back properly on the unit.
F
LINE IN jacks
These are the audio input jacks. Connect your musical instrument
or other equipment to these jacks.
G
MIC connector
Connect your dynamic mic or condenser mic to this connector.
* Pin assignment of MIC connector
1: GND
2: HOT
TIP: HOT
RING: COLD
SLEEVE: GND
3: COLD
2: HOT
1: GND
3: COLD
*
About phantom power
You can supply phantom power (+48 V) from the MIC connector. Turn on
phantom power when you’re using a condenser microphone that requires
phantom power.
Use the [INPUT] button
0
set “Phantom Sw” to “ON.”
NOTE
5
If you don’t need phantom power, be sure to turn phantom power off. You
risk causing damage if you mistakenly supply phantom power to dynamic
microphones or other devices that don’t require such power.
5
Phantom power cannot be used when this unit operates on USB bus power.
H
LINE OUT jacks
These are jacks for outputting the audio signal. Connect these to
your amp or monitor speakers.
Turning the Power On/Off
* Before turning the unit on/off, always be sure to turn the volume down. Even
with the volume turned down, you might hear some sound when switching
the unit on/off. However, this is normal and does not indicate a malfunction.
Turning the power on
1 .
Power-on your equipment in the order of this unit
0
connected equipment.
2 .
Raise the volume to an appropriate level.
Turning Off the Power
1 .
Power-off your equipment in the order of connected
equipment
0
this unit.
Cord hook
AC adaptor
A
B
F
E
D
C
G
H