Zigzag stitches (continued), Points zigmgs (suite) – Sears 385.1883 User Manual
Page 88
Attention! The text in this document has been recognized automatically. To view the original document, you can use the "Original mode".
Set the Machine
Réglages
Ajustes
Slitch
Width
controf S to В
Largeur du ртт,
5 áh
Control del ancho
de la puntada 5 a 6
IMDTO
I
Top ihteacf tension
control 2 io 6
Тетшп ílttfil
d'mgaiUe, 2 Ú6
Control de tensÍDíi
del hilo superior
de2 aó
Stitch length
control 0,5 to 1
Longueur till pomt,
O J a )
Control del largo
do pumada dc
0.5 a i
LENGTH
_______ A: Zigzag toot
A:Àpamnigzag
A: Fie para Zigzag
Zigzag Stitches (Continued)
o Three-Step Zigzag
The Stitch and Us Uses
The three-step zigzag is a combination
zigzag and straight stitch. You may use
the three-step zigzag everywhere you
would use the basic zigzag stitch.
It has more strength, elasticity, and is
flatter than a regular zigzag.
The three-step zigzag stitch rs especiaily
useful for:
— mending
— sewing patches smoothly and securely
— repairing straight tears
—• finishing seams
80
Points zigmgs (Suite)
•
Zigzag trois temps
Utilisation dll point
Le zigzag trois temps est fait de points
zigzags et droits. II peut remplacer
partout le point zigzag simple. Il est pins
solide, élastique et reste plus plat.
Le zigzag trois temps convient parti
culièrement bien pour:
—
raccommoder.
—-
coudre des pièces à plat et tenant
bien.
—
réparer une déchirure.
—
la finition des coutures.
Puntadas en Zigzag fContinuación)
e Zigzag en Tres pasos
La puntada y sus Usos
El zigzag en tres pasos es ana
combinación de zigzag y puntada recta.
Podrá utilizar el zigzag en tres pasos en
todas aquellas partes donde utilizaría e!
zigzag básico.
Cuenta con mas ñierza, elasticidad y es
más plano que el zigzag normal.
Esta
puntada
dc
Zigzag en tres pasos es
especialmente útil para:
— Remendar
— Coser parches en forma lisa y segura.
— Para restaurar razgados rectos.
— Para icnnmar costuras.
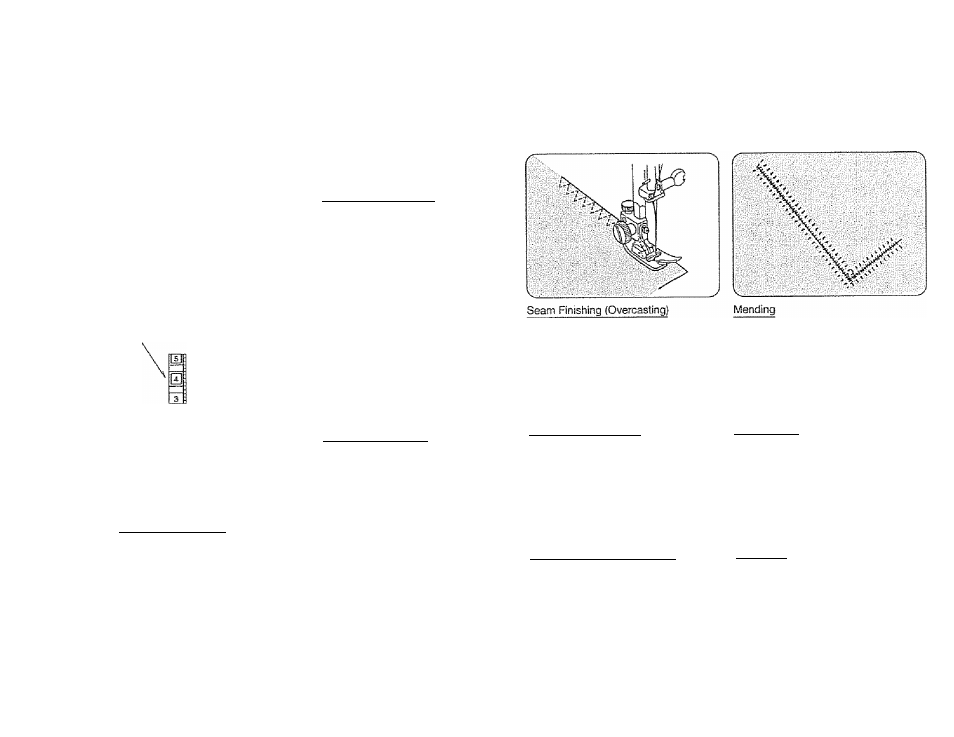
Place the fabric under the pressor toot so
that the edge will be slightly inside the
right hand side of the presser loot.
Guide the work so sthe right-hand
stitches tail at the edge of the tabirc.
Finitjon des coutures
Placez ¡'ouvrage sbus le pied-de-biche de
sorte que le bord de ta ressource soif un
peu en retrait sous le pied.
Piquez en veillant à ce que l'aiguille
arrive juste au bord du tissu.
Acabado de Costura (Fileteado)
Coloque la tela debajo del pie prénsatelas
en forma tal que eí orillo esté ligeramente
hacia adentro del lado derecho del pie
prénsatelas.
Guíe el trabajo para que las puntadas del
lado derecho caigan en el borde de la tela.
Position the tear under the needle so that
the stitching will catch both sides.
Raccommodage
Rapprochez les bords et centrez le point
pour piquer également des deux cotes.
Remiendos
Coloque el razgado debajo de la aguja de
modo que la aguja agarre los dos lados.