Get your model ready to fly – Top Flite TOPA0305 Part 2 User Manual
Page 30
2.
Trim the clear plastic tail lens
to fit
the tail
cone.
MAKE DOOR AND HATCH OUTLINES
Use a Top Flite Panel Line Pen to draw the door
and baggage compartment hatch outlines or use a
Smart Stripe
TM
to cut narrow strips of MonoKote
Film and iron them on.
If
you use the Panel Line
Pen, use a straightedge with a few pieces of
masking tape stuck to the underside of the
straightedge to keep the ink from wicking
underneath it. Use the Top Flite Scale Template for
rivets, hatches, fuel caps and other details. Some
cleaners will remove the ink lines
so test your
cleaner before you spray it on your model. You can
remove mistakes with alcohol. You'll need to touch
up some of the lines from time to time because
they fade with lots of handling and fuel spillage.
Use the plans to make templates of the doors and the
luggage hatch from a clear butyrate plastic sheet.
Sand the edges of the templates with 320-grit
sandpaper. Stick a few layers of masking tape to the
bottom of the templates near the edges to raise it off
the surface. This will prevent the ink from wicking
underneath. Cut
a
hole in the center of the templates
so
you can tape them in position without the tape
extending over the edges. Position the templates on
the fuse. Trace the outlines with a Top Flite Panel
Line Pen.
APPLY THE DECALS
The decal sheet does not give you everything you need
to completely trim your model, but it does provide most
of the intricate detailing and difficult items.
1.
Study your documentation package and the
photos on the box to decide where to place
the decals.
2. Thoroughly clean your airplane before applying
decals.
3.
Cut out the decals and carefully apply them to
your model. You can
float
the decals into position
by first applying soapy water (just a teaspoon of
dish detergent to a quart of water) to the model's
surface. Squeegy
out
the water and soap with a
piece of soft balsa or a credit card wrapped with a
tissue. Blot the surface dry and let the decal cure
for at least 12 hours before running the engine.
GET YOUR MODEL
READY TO FLY
BALANCE YOUR MODEL
NOTE: This section is VERY important and
must NOT be omitted!
A
model that is not
properly balanced will be unstable and possibly
unflyable.
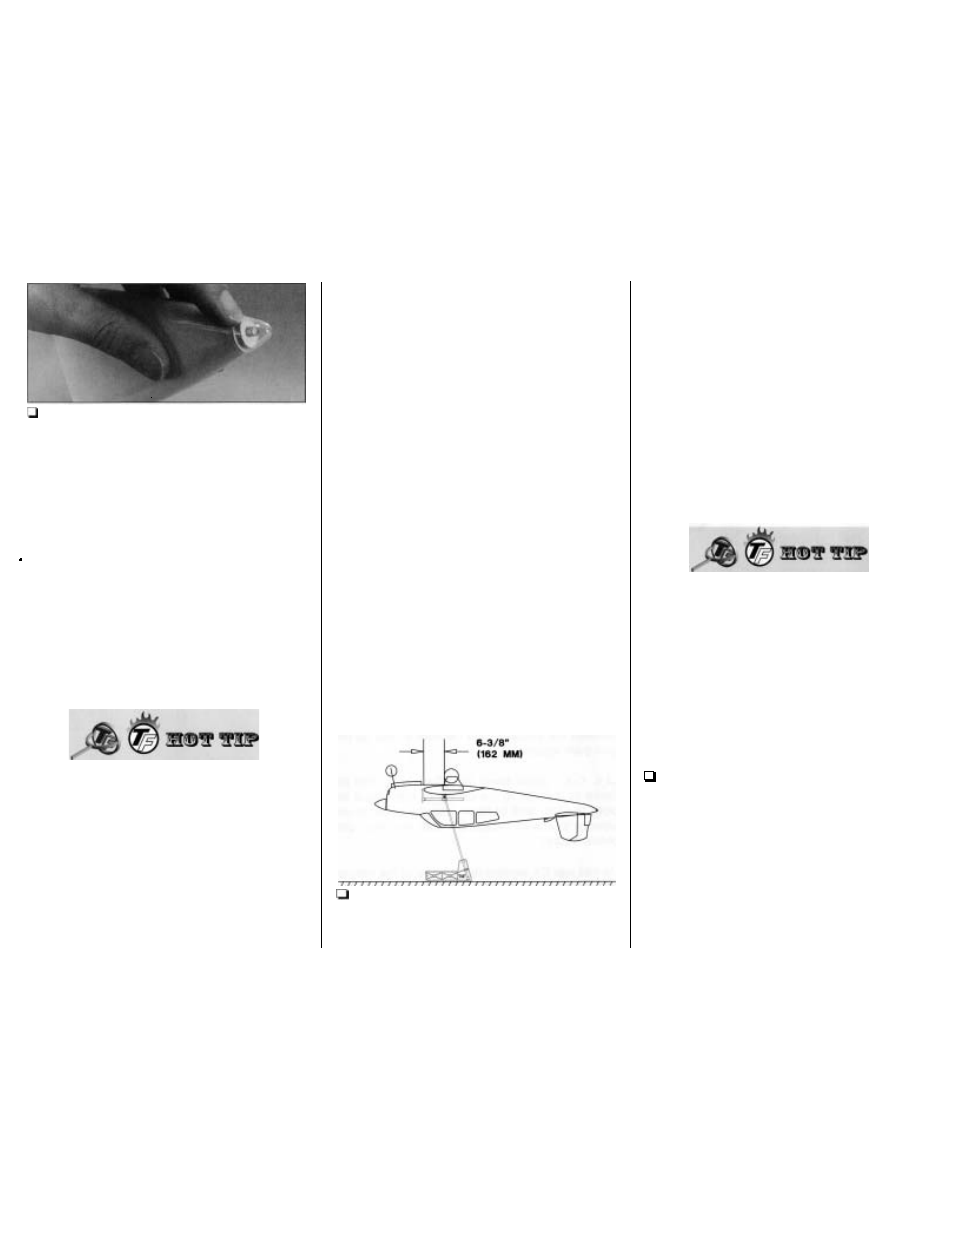
1. See the Hot Tip that follows to accurately
mark the balance point on the top of the wing on
both sides of the fuselage. The balance point is
shown on the plan
( C G ) ,
and is located
-
66
-
6-3/8"
(162
mm) back from the leading edge at
the wing root
as shown in the sketch and on the
plans. This is the balance point at which your
model should be balanced for your first flights.
Later, you may experiment by shifting the balance
up to 1/2" forward or 1/4" back to change the flying
characteristics.
If
you move the balance point
forward it may improve the smoothness and
tracking, but your Bonanza may then require more
speed for takeoff and become more difficult to slow
down for landing. If you move the balance aft it
may make the Bonanza more agile with a lighter
feel
and allow you to slow the model more for
landing. In any case, please start at the location
we recommend and do not at any time balance
your model outside the recommended range.
How to mark the balance point.
The balance
point is measured from the center leading edge.
Since the center section of the wing is not visible
when the wing is on the fuse, you need to mark
the balance point outward a few inches
so you
can see where to lift the wing when it's bolted to
the fuse. To do this, mark the balance point with
a felt-tip pen or tape on both ends of the center
section. Place a straightedge across the marks.
Mark the balance point along the straightedge
further out on the wing. Mount the wing to the
fuselage.
2. Temporarily place your receiver and battery
pack inside the fuselage where you plan to mount
them, or lay them on the fuselage over the location
you plan to mount them. This is
so you can change
the mounting location of the battery pack or
receiver to change the C.G. without adding any
additional nose or tail weight. You can do the same
with lighting system components as well (if you are
installing the lighting package). Otherwise, all other
components should be in the model and it should
be in a ready-to-fly condition with the fuel tank
empty.