Troubleshooting and repair 5.0, Troubleshooting a problem, Troubleshooting and repair tools required – Proheat X45–School Bus User Manual
Page 58: 1 notice
SECTION 5. TROUBLESHOOTING & REPAIR
TROUBLESHOOTING
AND REPAIR
5.0
Problems with the PROHEAT and its operation will be indicated in two ways:
1.
PROHEAT Diagnostic Faults indicated by means of a flashing diagnostic code
on an indicator light on the switch, Timer red manual light or OEM indicator
light (installation options). See Example Proheat Behavior Error on page 5-2.
2.
Operational problems may not be identified with a flashing diagnostic code
(e.g. blown fuse, smoking exhaust, backfiring or low heat output. Go to
page 5-34 to page 5-37.)
TROUBLESHOOTING A PROBLEM
Locate the PROHEAT, remove the enclosure lid if equipped and visually check
for any problems with wiring harnesses, fuel leaks, coolant leaks, exhaust
pipe damage and environmental conditions.
Inspect Proheat Control Module (PCM) display for error code. If PCM display is
difficult to view, determine the blink code on the switch, Timer red manual
light or OEM indicator light (installation options).
If no code is indicated, turn the PROHEAT off and then on again using the
existing operational switches, timer or a PROHEAT remote start switch
(PROHEAT P/N 952925K).
Let the PROHEAT attempt to start and/or operate. Observe the operation.
NOTE: The PROHEAT will always attempt to start twice, as long as the coolant
temperature is below 150°F (65°C). If a fault is detected it will shut down, go
through a Cool Down (Purge) and attempt a second start. After both attempts
to start or operate, the PCM will display a code and the switch, Timer red
manual light or OEM indicator (installation options) will blink the same code.
•
After two consecutive start attempts, the PROHEAT will not attempt to
start again and goes into a hold state. In the hold state the switch, Timer
red manual light or OEM indicator light (installation options) will blink the
error code(s) continuously. The PROHEAT will try again once the switch is
turned "OFF" and then "ON" again.
•
If the indicator light flashes, count the number of flashes and refer to
the troubleshooting diagnostic code description for that number on the
following pages.
•
If the PROHEAT runs but is not performing or operating correctly, consult
the Operational Problems, Section 5.3 on page 5-37.
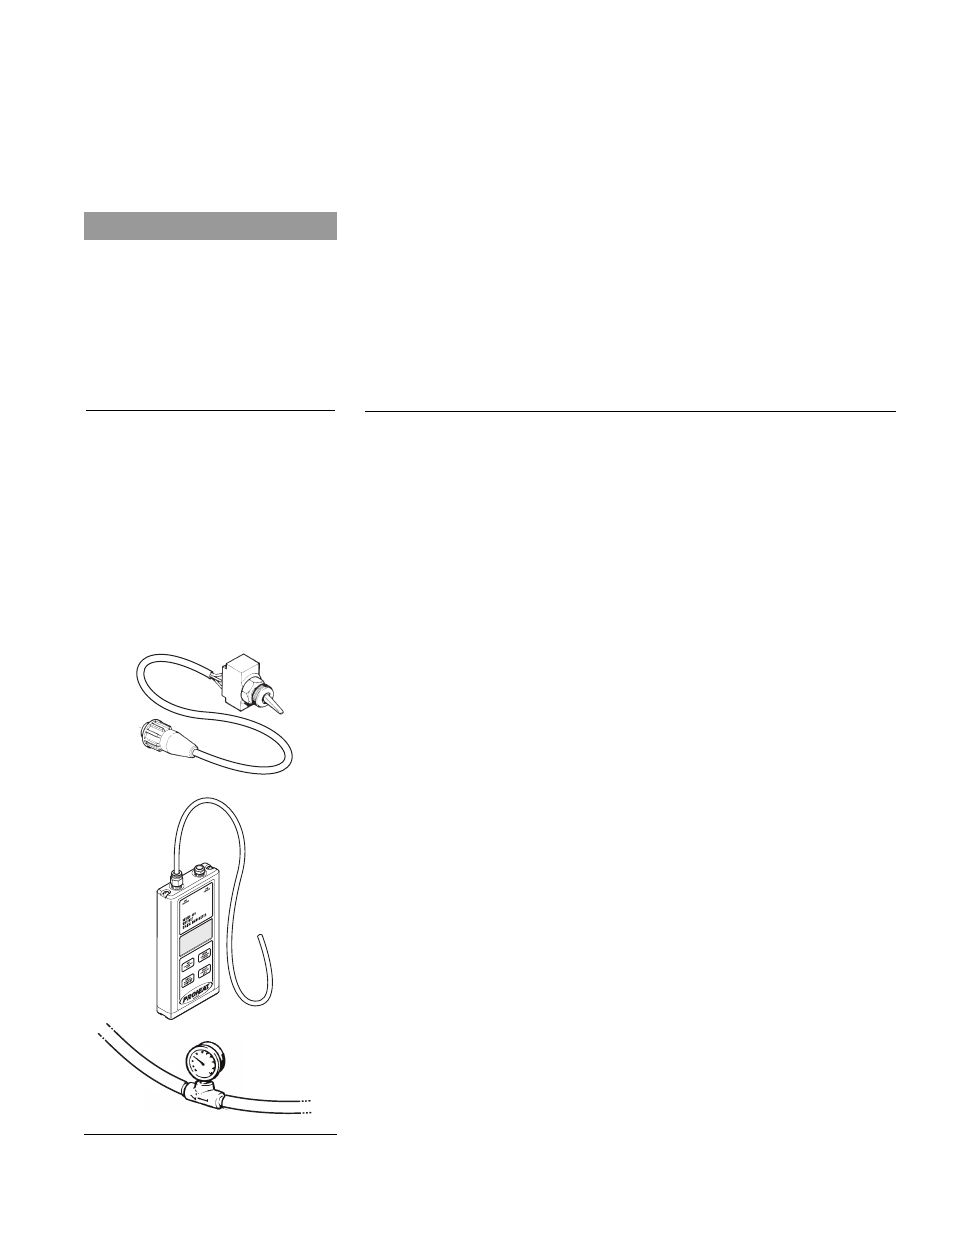
Troubleshooting and Repair Tools Required
•
Remote Start Switch (PROHEAT P/N 952925K)
Allows the service technician to work at the PROHEAT. Isolates the PROHEAT
from the existing vehicle system controls and comes with a built-in indicator light.
•
Digital Air Compressor Test Gauge (PROHEAT P/N PK0037)
Allows the service technician to check compressor pressure in order to
ensure for correct fuel delivery. (Note The analog Air pressure gauge
PK0060 can also be used.)
STEP 1
STEP 2
STEP 3
STEP 4
5-1
5.0.1
NOTICE
Troubleshooting and repair is to be
performed by Authorized Proheat
Dealers.
Figure 5-1
Troubleshooting Tools.