Sport wing assembly, Build the inner wing panel – Great Planes Spirit 100 Sailplane Kit - GPMA0550 User Manual
Page 9
SPORT WING ASSEMBLY
D 1. Tape the plan to your flat work surface and cover the
wing drawing with waxed paper. NOTE: If your work space
is limited, you may cut the wing drawings apart from the rest of
the plans.
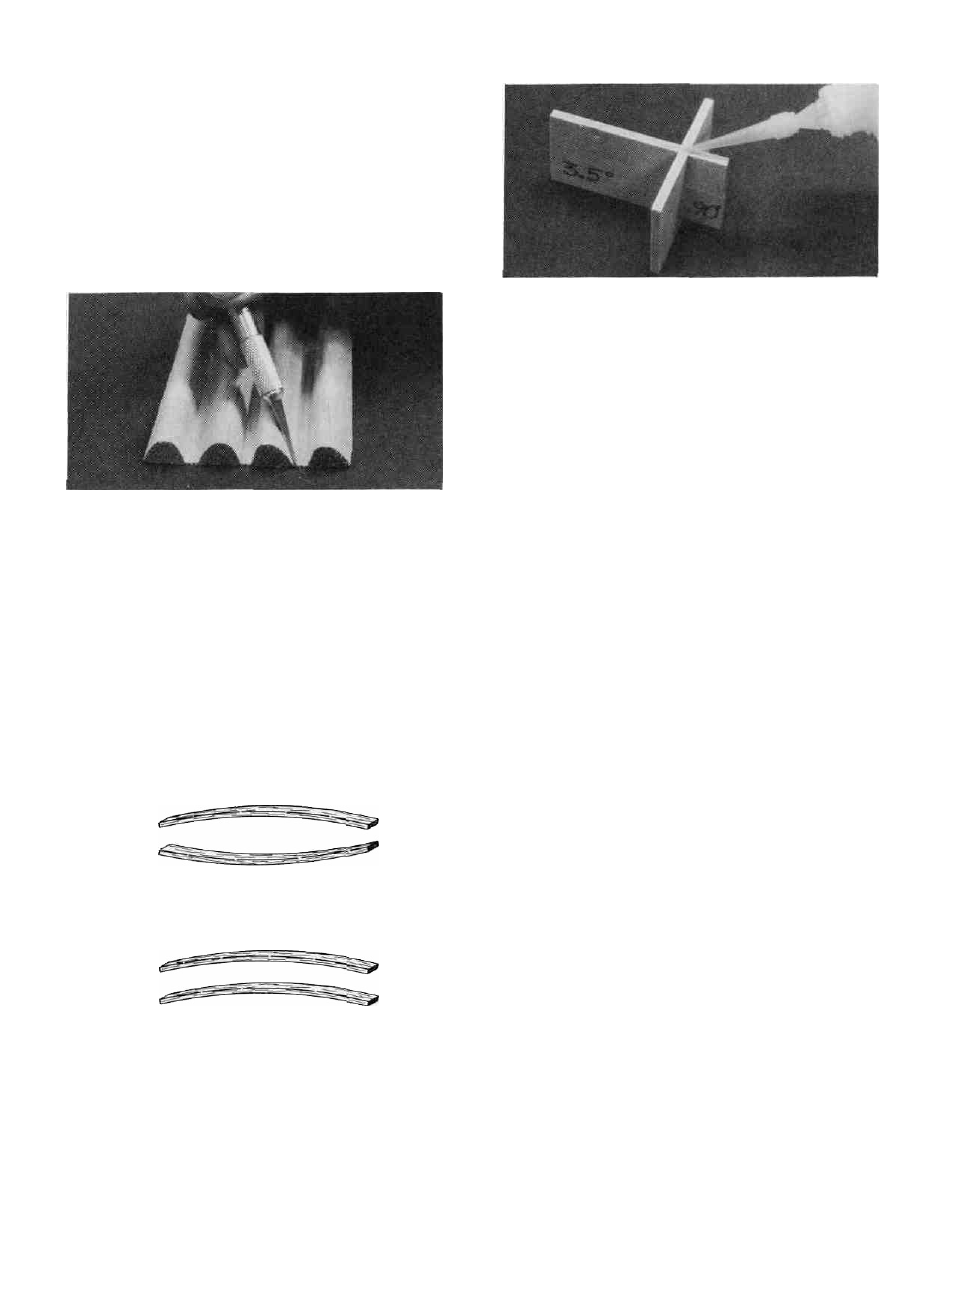
D 2. The Shaped Wing Leading Edges (SPT1W14) are fas-
tened together by thin strips of balsa. Separate them by carefully
cutting between the LE'S, with the knife resting against the LE
as a guide. Do not cut vertically at the edge of the LE or it will end
up too narrow. Allow the cut to follow the cross sectional shape
of the LE. Sand away any excess balsa that remains along the
edges using a sanding block with 100-grit sandpaper, but do not
"square off the edges.
TWO WARPED SPARS INSTALLED
THIS WILL WILL RESULT IN A
STRAIGHT WING
D 4. Punch out the two Rib Gauge Pieces (SPT1W22) and
assemble them using CA. Notice that one end of the gauge is
slanted at a 3-1/2 degree angle for positioning the end ribs. The
other 3 ends are perpendicular and can be used to keep parts 90
degrees to the work surface.
BUILD THE INNER WING PANEL
You'll need the following parts:
SPT1W01 1/16" Balsa DC Wing Ribs - W2S, W2SS
SPT1W02 1/8" Balsa DC Wing Ribs - W1S, W3S
SPT1W03 1/16" Balsa DC Wing Ribs - W4S, W6S,
W7S, W9S
SPT1W04 1/16" Balsa DC Wing Ribs - W2SA & B,
W5S,W8S,W10S
SPT1W12 1/8" x 3/8" x 30" Basswood Inner Spars
SPT1W14 Shaped Balsa Leading Edge
SPT1W15 11/32" Balsa Notched Inner TE/Flap
SPT1W20 1/16" x 3" x 30 Balsa Wing Bottom Sheet
SPT1W22 1/8" Ply DC Clamps and Gauges
SPT1W24 1/16" Balsa Shear Web Pack (26)
D 1. Locate all the SPT1W01, SPT1W02, SPT1W03, and
SPT1W04 die-cut rib sheets. Check to make sure you can read
the embossing on each rib. If you can not, use the die patterns on
page 5 to determine the rib #'s and mark the #'s on the ribs.
Carefully punch out all the die-cut balsa wing ribs. Sand the
edges slightly to remove any die-cutting irregularities.
TWO WARPED SPARS INSTALLED
THIS WAY WILL RESULT IN A
WARPED WING
D 3. Before using the 1/8" x 3/8" Basswood Spars, examine
them carefully for possible imperfections. Look for knots, soft
spots, diagonal grain and any other imperfections. If possible,
position each spar so the imperfections are on the outer half of the
wing panel (toward the lip), where they will be least affected by
high stress. If the spars are warped slightly, "balance them out"
by installing the warped spars in opposite directions (see sketch).
NOTE: If you are installing spoilers, cut out the
embossed area on the two W2SS ribs and make sure
you install these ribs in the proper locations. You can
also refer to the plans and mark on each rib where the
spoiler tube will be. Drill a 1/8" hole in the proper
ribs and make sure they get installed in the correct
places.
9