Great Planes Spirit 100 Sailplane Kit - GPMA0550 User Manual
Page 12
the work surface and tightly against the spars. It is important to
do a good job of gluing these in place as they are responsible for
most of the wing's strength. Also glue a shear web to the front of
the spars. Because of the 1/16" bottom sheeting, the front shear
webs will extend above the top spar, but just trim them off after
you have installed all the webs. C-1 and C-2 Clamps (SFT1W22)
can be used to help hold the webs in place while the glue cures.
Install the remaining balsa shear webs. They continue on both the
front and the back of the spar all the way to the last W2S Rib.
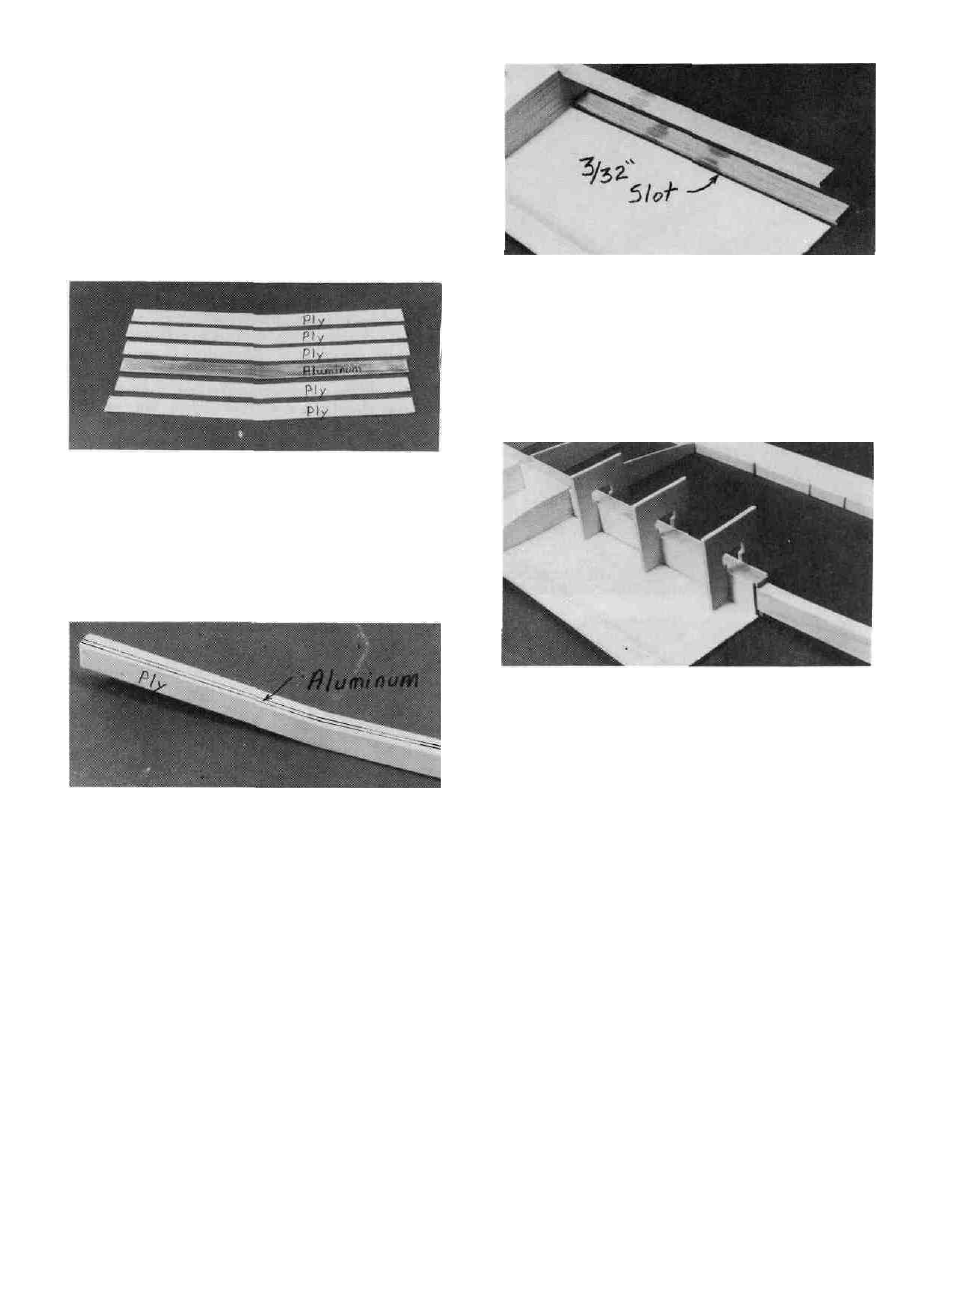
DD 13. Punch out the five 1/16" Ply Wing Joiner Lamina-
tions (SPT1W09) and lightly sand the edges to remove any rough
spots. Locate the 1/16" Aluminum Wing Joiner Blade
(ALUM008). Clean the aluminum joiner with alcohol to remove
any oily residue and sand each side with coarse sandpaper to
scratch the surface and help the glue stick.
I—II—I 14. Use either epoxy or med. or thick CA to glue one of
the 1/16" ply laminations to the 1/16" aluminum blade. Apply as
much pressure (clamps, clothespins, weights, etc.) as possible
while the glue is curing and be sure to accurately line up the two
pieces. Glue two more 1/16" ply laminations to each side of the
now 1/8" thick joiner using the same procedure.
DD 15. Sand the top edge of the laminated joiner flat and
glue the Die-Cut 1/16" Ply Joiner Shim (SPT 1W09) in place on
top of the joiner. Sand the edges of the finished "wing joiner" to
remove any glue globs and to round off the comers.
the panel and mark approximately 1/32" in front of it. Now cut
along this line and the spar to remove a 3/32" wide strip of wood
from the root of the panel to the first W2S rib. Scrape off any glue
or balsa wood thai may still be on the spar with the back edge of
an Xacto knife. IMPORTANT - Be sure to get the edge of the
spar "clean" as a good glue joint between the spar and the joiner
box side is very important.
DD 17. Test fit the joiner box sides in place. One side
should be installed on the front of the spars and the other on the
back. Notice that one end of the side is slanted at a 3-1/2 degree
angle. This end must be at the wing centerline. The "long" edge
of the side should be at the bottom. Use the C1 Clamps
(SPT 1 W22) to hold the sides in place and test tit the wing joiner
into the box formed. This "box" will be referred to as the "joiner
box". The spars should fit snugly down on the wing joiner, but
make sure the joiner is not holding the spars above their normal
position. If it is remove the joiner and sand it until it fits correctly.
DD 18. Remove the clamps and the joiner and apply a bead
of epoxy along the spar edges. Install the joiner box sides and
hold them in place with the C1 clamps. A good glue joint is
important here but be careful not to get any excess glue inside the
box formed by these sides. Insert the joiner into the box and then
remove it a couple of times to scrape any excess glue out of the
box. Wipe any glue off the joiner before it cures.
DD 16. Locale two of the 1/16" Ply Joiner Box Sides
(SPT 1 W 11) that have an "S" embossed on them. Hold one of the
sides in place on the front of the spars at the "root" (inner) end of
DD 19. Sand the edges of the joiner sides to remove any
sharp comers or glue globs. Wrap the entire joiner box with a
strong thread (2 - 4 lb. fishing line works well). The thread should
12