Install aileron servos – Great Planes Spirit 100 Sailplane Kit - GPMA0550 User Manual
Page 30
be a big help when trying to hold the sheeting down evenly. You
can put weights on the strip of wood if needed. CAUTION - It
is important to keep the wing flat and warp-free during this
step!
D D 13. Apply thin CA between the pieces of masking tape
along the leading edge. Remove the tape and apply thin CA
where the tape was.
DD 14. Drill a 13/64" hole up through the hole in the wing
bolt plate and through the 1/16" top sheeting. Enlarge the hole in
the top sheeting to approx. 5/8" diameter so the head of the wing
boll will pass through.
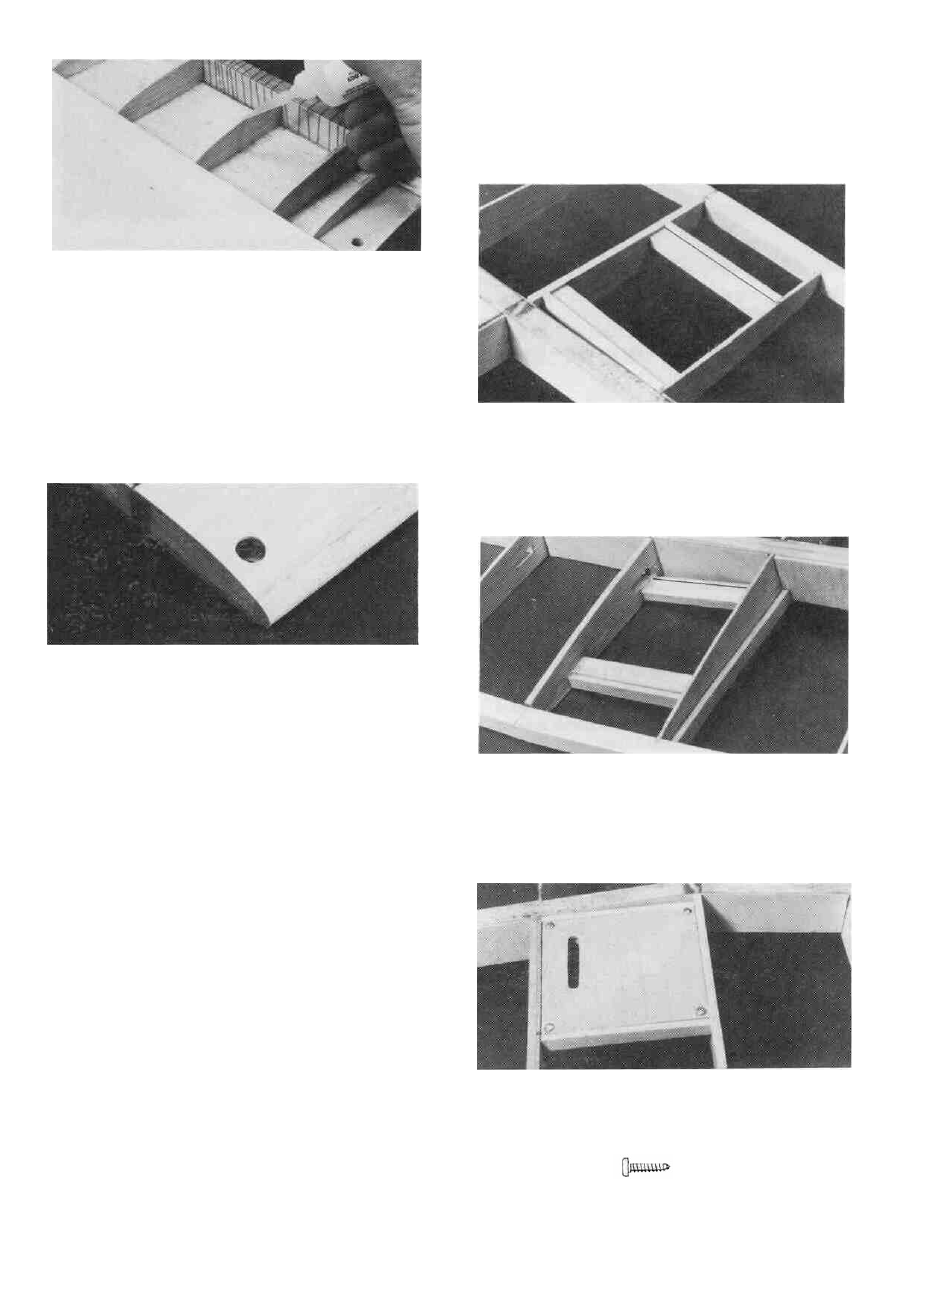
1/32" past the edge of the hatch. This will allow space for the
covering to wrap around these edges. Check your aileron servo
to make sure it will fit between the rails. If not, carve a notch in
the rails to clear the servo or space the rails farther apart and cut
a new hatch to fit. Glue the second rail in place.
D D 3. Glue the second 1/8" x 1/4" Balsa Strip in place on
the back edge of the second rail. It should be flush with the bottom
of the ribs. When completed, you should have assembled a box
to hold the 1/16" hatch flush with the bottom of the ribs, with
about a 1/64" gap all the way around.
INSTALL AILERON SERVOS
D D 1. Cut two pieces of 1/8" x 1/4" Balsa (SPT1 S04) to fit
between Ribs W3B and W4. Also cut two pieces of 3/16" x 3/8"
Basswood Servo Rail (SPT1F14) to Fit between the same ribs.
Glue one of the 1/8" x 1/4" balsa pieces in place between the two
ribs so it is touching the spar near W4, flush with the bottom of
the rib and parallel to the sub TE. (See photo at step 3)
D D 2. Use the 1/16" Die-Cut Ply Aileron Servo Bay
Hatch (SPT1W11) to space and align things. Glue one of the
3/16" x 3/8" servo rails to the back of the balsa piece you just
glued in. It should be recessed 1/16" above the bottom of the ribs
to allow for the hatch cover. Trial fit the other 3/16" x 3/8"
basswood rail into place on the back edge of the hatch. The
second rail should be positioned so the back edge extends approx.
D D 4. Cut another piece of 1/8" x 1/4" Balsa (SPT1S04)
approx 3-3/4" long and glue it to the outside of W4. It should be
flush with the bottom edge of the rib and will keep this rib from
bowing when the covering is applied. Add thick Ca to the top of
each basswood rail to help hold them in place.
D D 5. Center the hatch in the servo bay and drill a 1/16"
hole in each comer where the punch marks arc. Remove the hatch
and enlarge the holes in the hatch only to 3/32". Use four #2 x
3/8" Sheet Metal Screws (SCRW024) to temporarily install the
hatch,
30