Great Planes Spirit 100 Sailplane Kit - GPMA0550 User Manual
Page 32
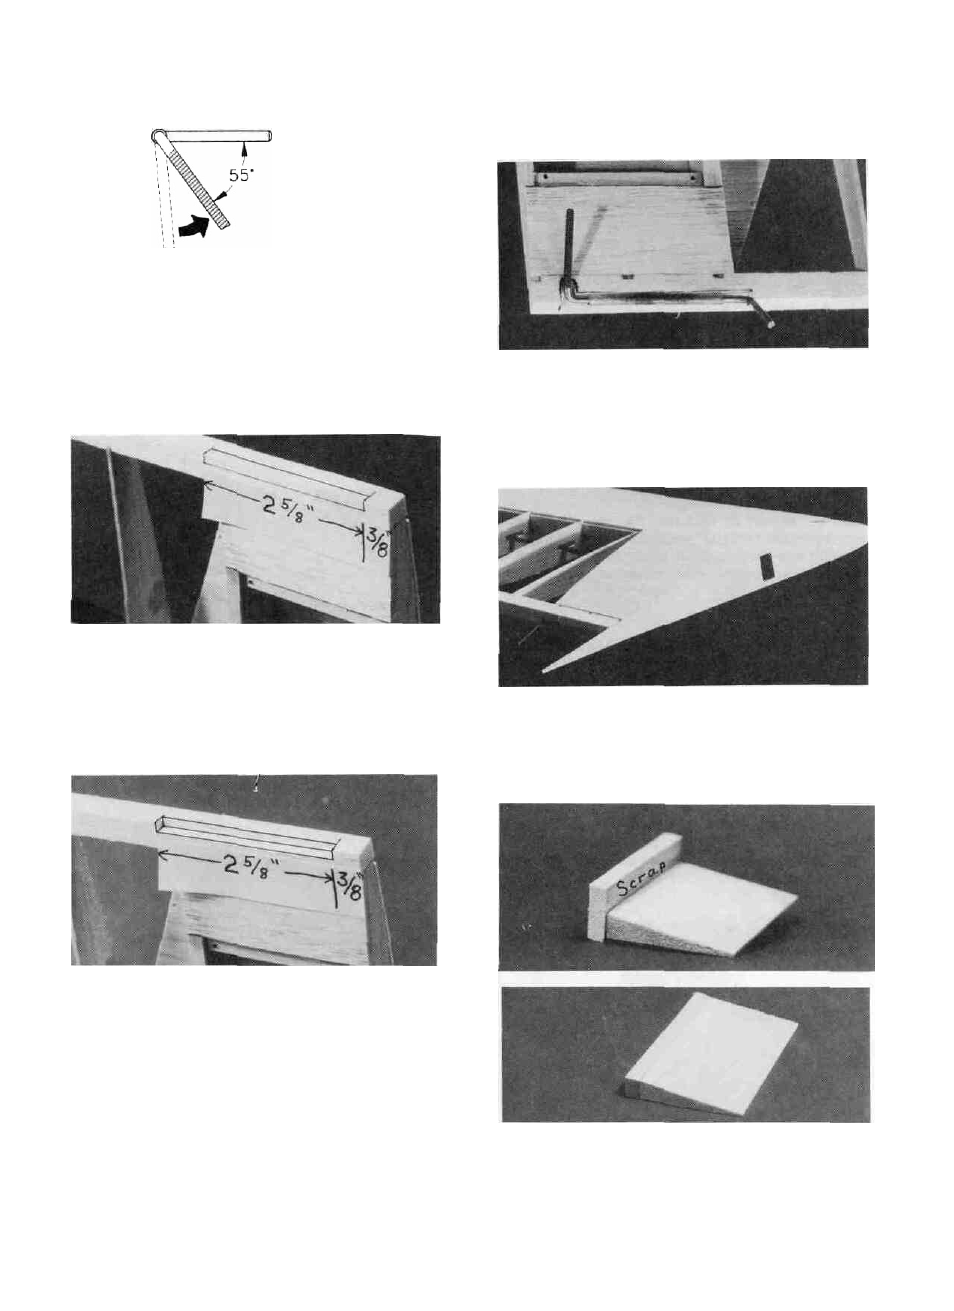
INSTALL FLAP TORQUE RODS
torque rod will exit the bottom Cut a notch in the sub TE to allow
the torque rod to rotate forward
Chamfer end
Twist to here
Original Position
DD 1 Notice there is a "right" and a "left" torque rod Twist
each rod to match the sketch above (to allow the correct flap
movement) Use a small file or very fine sandpaper to de-burr the
very tip of the unthreaded end of each torque rod
D D 2 Starting 3/8 from the root of one wing panel, draw a
line on the back edge of the sub TE is 5/32 away from the
bottom edge of the sub TE and 2-5/8" long Draw a line using the
same procedure on the bottom of the sub TE Both of these lines
should be 5/32 away from the back - bottom edge of the sub TE
D D 3 Cut a 5/32 square strip out of the sub TE using the
lines you just drew Test fit the torque rod into this groove to make
sure the groove is long and deep enough The torque rod nylon
bearing should be flush with both the back and the bottom edge
of the sub TE You can make the slot longer or deeper if needed
to allow the torque rod to operate freely
D D 5 Scuff up the outer surface of the torque rod bearing
with coarse sandpaper Apply a small amount of vaseline around
the ends of the bearing to keep glue from seeping in and glue it
in place Make sure the bearing is centered on the torque rod and
does not extend past the bottom or back surface of the sub TE
DD 6 Glue one of the 1/16" Balsa Root Caps (SPT1W21)
without an "S" to the root of the wing panel It should be aligned
with the sub TE, thc joiner box and the LE as best as possible Due
to building and manufacturing tolerances, it is not unusual for this
root cap to not match the wing shape exactly
D D 4 Make sure you have the correct (right or left) torque
rod with the correct panel and mark on the sub TE where the
DD 7 Cut a piece of 11/32" Balsa Inner TE/Flap (SPT1W15)
2-1/4" long and a scrap piece of 1/4" thick wood 2-1/4" long (from
32