Installation guidelines – Waterworks Ludlow Pressure Balance Control Valve Trim with Metal Lever Handle User Manual
Page 2
LUDLOW
Pressure Balance Control Valve Trim
INSTALLATION GUIDELINES
Page 2 of 3
10.30.2013
These guidelines have been prepared for the professional contractor to aid in the installation of:
LUDLOW PRESSURE BALANCE TRIM WITH LEVER HANDLE (STYLE# LDPB10)
All dimensions are based on original specification and are subject to change and variation.
Please consult your Design Associate for current specifications.
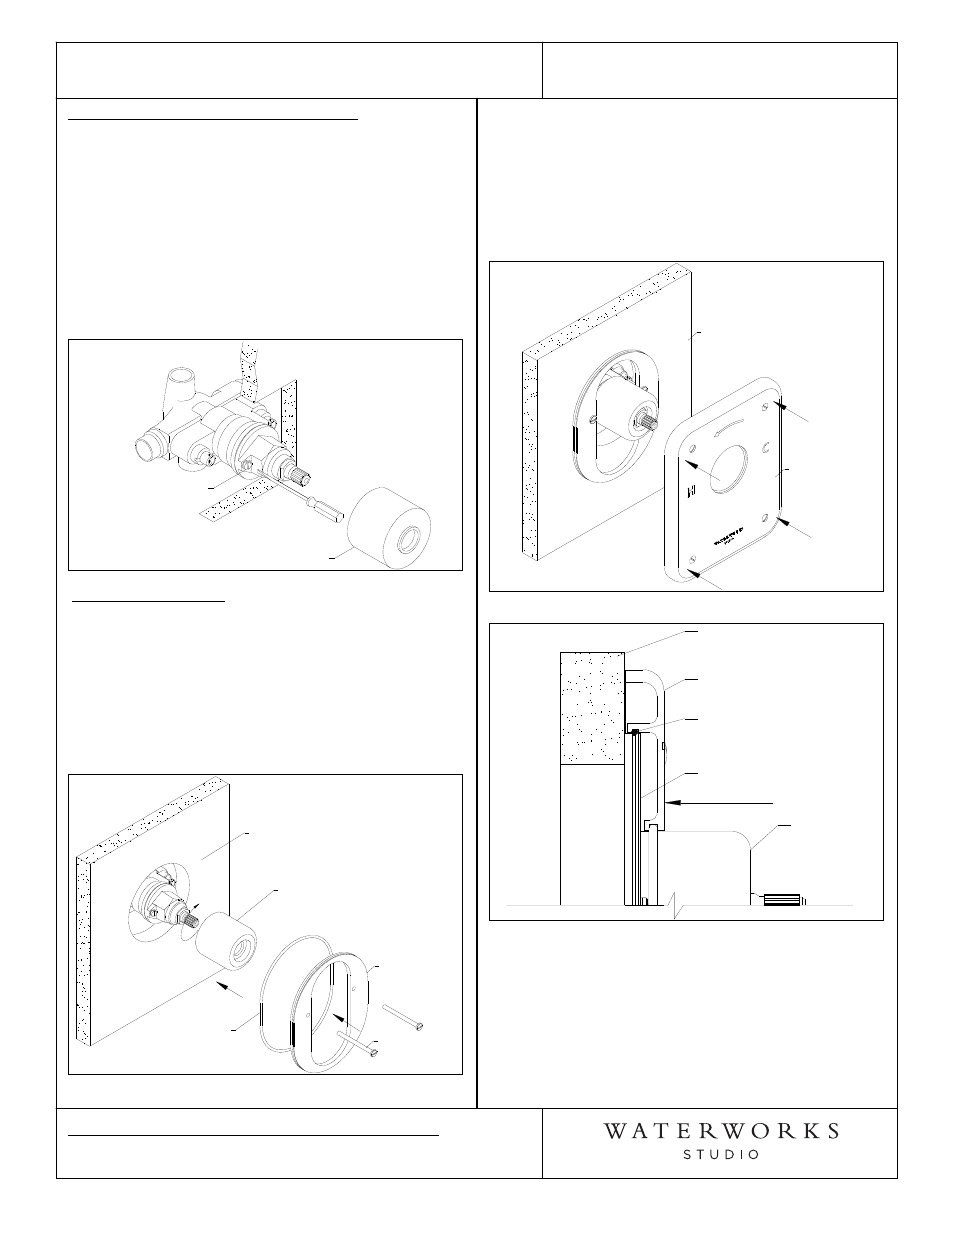
HOT LIMIT SAFETY STOP CALIBRATION:
¾ IMPORTANT: The Pressure Balance Valve is
equipped with a hot limit SAFETY STOP SCREW to
limit the valve handle from being turned to
excessive hot water discharge temperatures.
4. Remove the DOME COVER and open the valve to
the maximum desired temperature verified with a
thermometer and turn the SAFETY STOP SCREW
clockwise until it seats. WARNING: Failure to adjust
the hot limit safety stop screw properly may result
in serious scalding. See Figure 2 for details.
Figure 2
DOME COVER
SAFETY STOP SCREW
TRIM INSTALLATION:
¾ See Figure 3. for Steps 5 & 6.
5. Screw the NOSE CONE onto the packing nut until
fully seated.
6. Attach WALL PLATE to pressure balance valve
using the MOUNTING SCREWS, making sure that O-
RING CHORD makes a tight seal to the wall.
Figure 3
O-RING CHORD
WALL PLATE
MOUNTING
SCREW
NOSE CONE
FINISHED WALL
¾ See Figure 4 & 4a. for Step 7.
7. Slide the TRIM PLATE over the NOSE CONE,
pressing firmly along all the edges of the plate to
make sure TRIM PLATE O-RING snaps into the
groove of the WALL PLATE. Note: Applying grease
to the trim plate o-ring may help slide the trim plate
into groove of wall plate.
Figure 4
TRIM PLATE
FINISHED WALL
Figure 4a
TRIM PLATE
FINISHED WALL
NOSE CONE
TRIM PLATE O-RING
WALL PLATE
¾ IMPORTANT: If the trim plate is not sitting snug to
the wall because of uneven tiles, then shimming of
the wall plate may be necessary.
¾ If there is too much gap between wall and trim
plate: first make sure that the trim plate is fully
seating into wall plate. If the trim plate is fully seated
and there is still too much gap: remove wall plate,
discard the o-ring chord behind wall plate, and fill
the o-ring groove with caulk.