Installation guidelines, Formwork – Waterworks Formwork Low Profile Three Hole Deck Mounted Lavatory Faucet with Metal Lever Handles User Manual
Page 2
PRODUCT SUPPORT 800.927.2120 8am - 6pm EST
FORMWORK
Three Hole Deck Mounted Lavatory
Faucet
INSTALLATION GUIDELINES
Page 2 of 3
4.16.2014
These guidelines have been prepared for the professional contractor to aid in the installation of:
FORMWORK DECK MOUNTED LAVATORY FAUCET WITH METAL KNOB HANDLES (STYLE#
FMLS01) & METAL LEVER HANDLES (STYLE# FMLS10)
All dimensions are based on original specification and are subject to change and variation.
Please consult your Design Associate for current specifications.
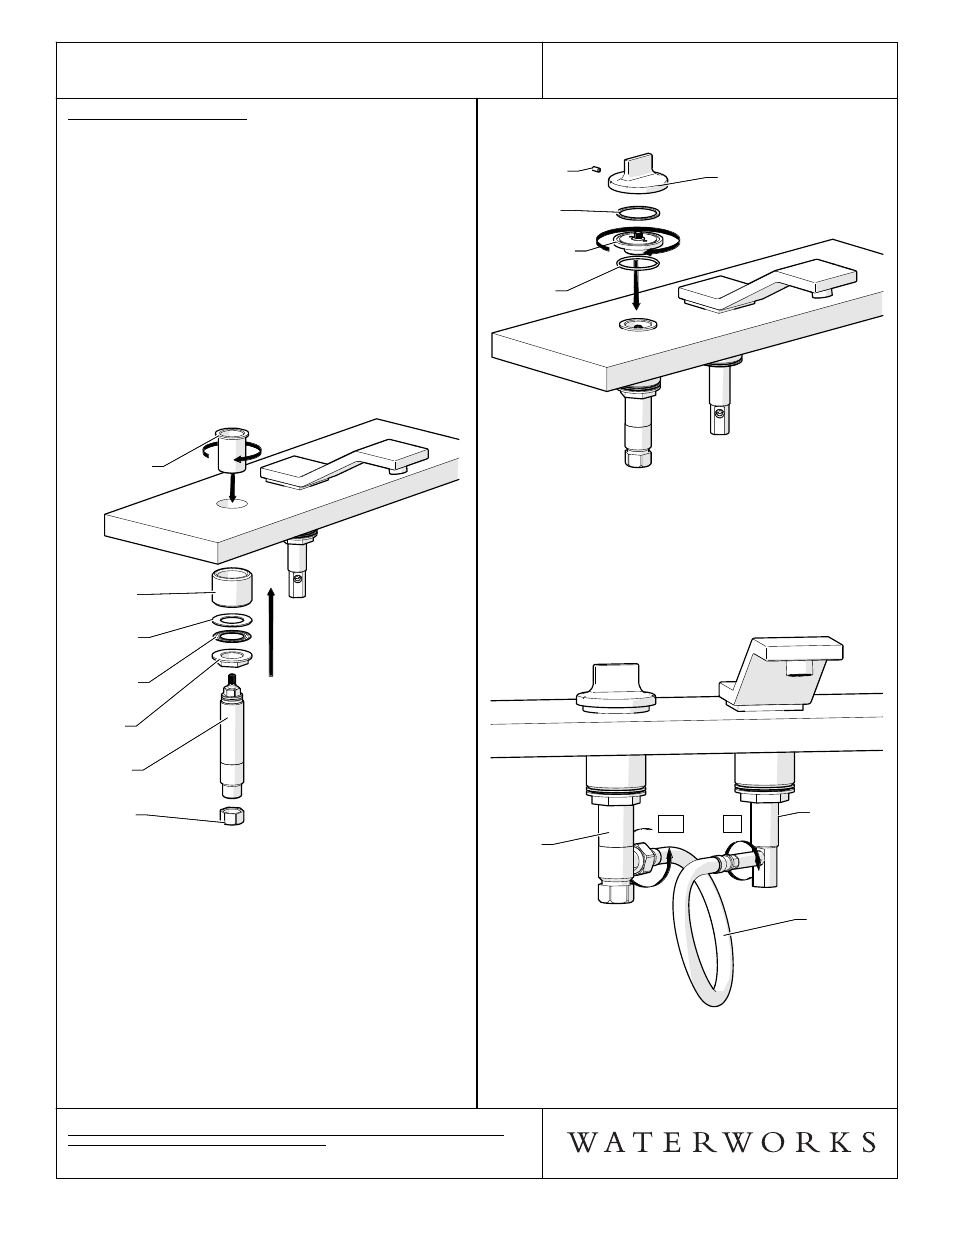
10. Verify the handle alignment and then tighten the
NUT, below the surface, to secure this assembly.
SET SCREW
O-RING
PLASTIC
WASHER
ESCUTCHEON
HANDLE
SET SCREW
O-RING
PLASTIC
WASHER
ESCUTCHEON
HANDLE
FIGURE - 03
¾ See Figure 4. for step 11
11. First, thread the male end of the OUTLET HOSE into
the SPOUT SHANK, then thread the female hex end
of the OUTLET HOSE into the side outlet of the
VALVE BODY.
SPOUT
SHANK
OUTLET
HOSE
VALVE
BODY
SPOUT
SHANK
OUTLET
HOSE
VALVE
BODY
1st
2nd
FIGURE - 04
HANDLE INSTALLATION:
¾ See Figure 2. for Steps 4-7.
4. Remove the TRIM CONNECTOR from the VALVE
BODY.
5. Thread the NUT as far down as possible on the
VALVE BODY, moving the METAL WASHER,
RUBBER WASHER & PLASTIC SPACER along with it.
6. From under the mounting surface, place the VALVE
BODY with mounting hardware through the hole in
the deck. From above the deck, thread the TRIM
ADAPTER down on valve body until it stops.
7. Hand tighten NUT to secure the TRIM CONNECTOR
to the deck. Note: This will allow for handle
alignment.
SUPPLY
NUT
VALVE
BODY
RUBBER
WASHER
METAL
WASHER
NUT
PLASTIC
SPACER
TRIM
CONNECTOR
SUPPLY
NUT
VALVE
BODY
RUBBER
WASHER
METAL
WASHER
NUT
PLASTIC
SPACER
TRIM
CONNECTOR
FIGURE - 02
¾ See Figure 3. for steps 8 - 10.
8. Tighten the ESCUTCHEON into the TRIM
CONNECTOR, making sure the O-RING is between it
and the mounting surface.
9. Make sure the PLASTIC WASHER is fit into the
groove on the top of the ESCUTCHEON, then place
HANDLE onto the base and press firmly until it is
fully seated onto the stem of the handle base.
Tighten SET SCREW to fix the HANDLE onto
HANDLE BASE.