Free design: configuring block form settings – Casio CW-L300 User Manual
Page 27
25
E
FREE DESIGN: Configuring Block Form
Settings
You can use the procedure in this section to configure direction, alignment,
pitch, and block length settings for each individual block.
Important!
• The following procedure applies when you have multiple blocks in a tape
label. If there is only one block (no block markers), use the procedure under
“FREE DESIGN: Configuring Label Form Settings” on page 26.
■ To configure block form settings
1.
In the Free Design Mode, input the text you want, and divide it into blocks
as required.
2.
Move the cursor to the block whose form you want to change.
• The cursor can be located anywhere within the block.
3.
Press FORM.
4.
Use
and
to select BLOCK FORM, and then press SET.
5.
Use
and
to select ONE BLOCK, and then press SET.
• Selecting ALL BLOCKS applies your settings to all of the blocks that
make up the tape label.
6.
Use
and
to select the setting you want to change, and
and
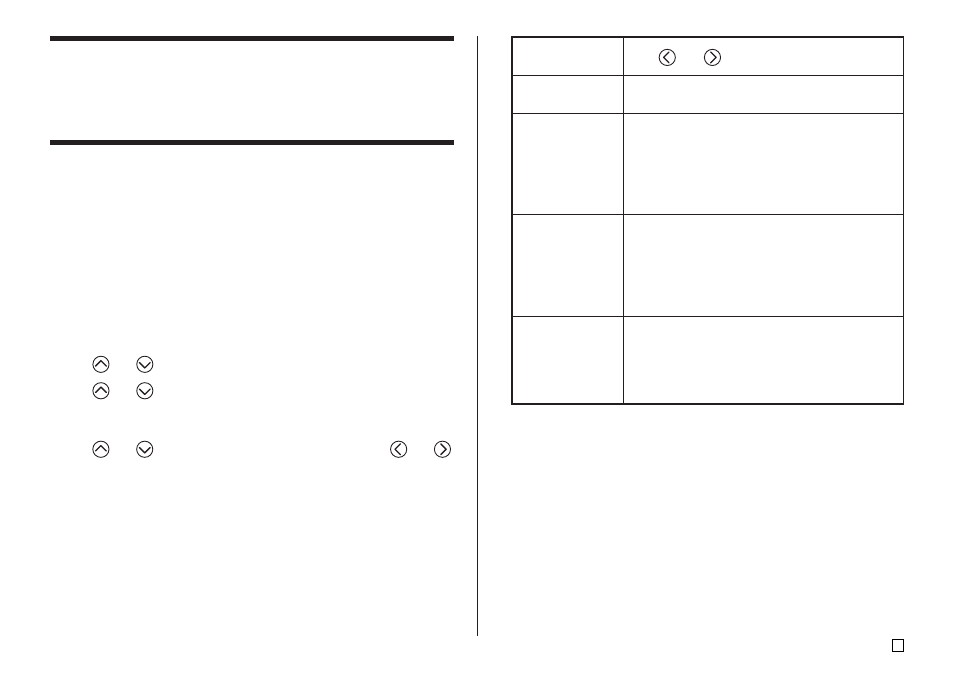
to change the currently selected setting.
When this setting
is selected:
DIRECTION
ALIGN
PITCH
B-LENGTH
Use
and
to select the option you want:
• HORZ: Positions text from left to right
• VERT: Positions text from top to bottom
• LEFT: Aligns text flush left.
• EQUAL: Equally spaces text to fill the entire
space available.
• CENTER: Centers text.
• RIGHT: Aligns text flush right.
• See page 29 for more information.
• Specify a value from 0.0 mm (0") to 31.9mm
(1
1
/
4
"). Changing this setting also causes the
tape length to change accordingly.
• This setting cannot be changed when EQUAL
is selected for the ALIGN setting, and when
FIX is selected for the B-LENGTH setting.
• AUTO: Automatically adjusts block length in
accordance with the number of characters.
• FIX: Maintains a fixed block length in the range
of 0cm (0") to 99.9cm (39
5
/
16
"). See page 27
for more information.
• You can also change the DIRECTION setting when creating a label in
the Numbering Mode (page 17) and the Enlarged Label Mode (page
19).
7.
After all the block form settings are the way you want, press SET.