Front mud flap installation, Rear mud flap installation – Rally Armor 98 to 02 Subaru Forester User Manual
Page 2
IMF13
Version 1.1 Release Date 3.25.2010
2
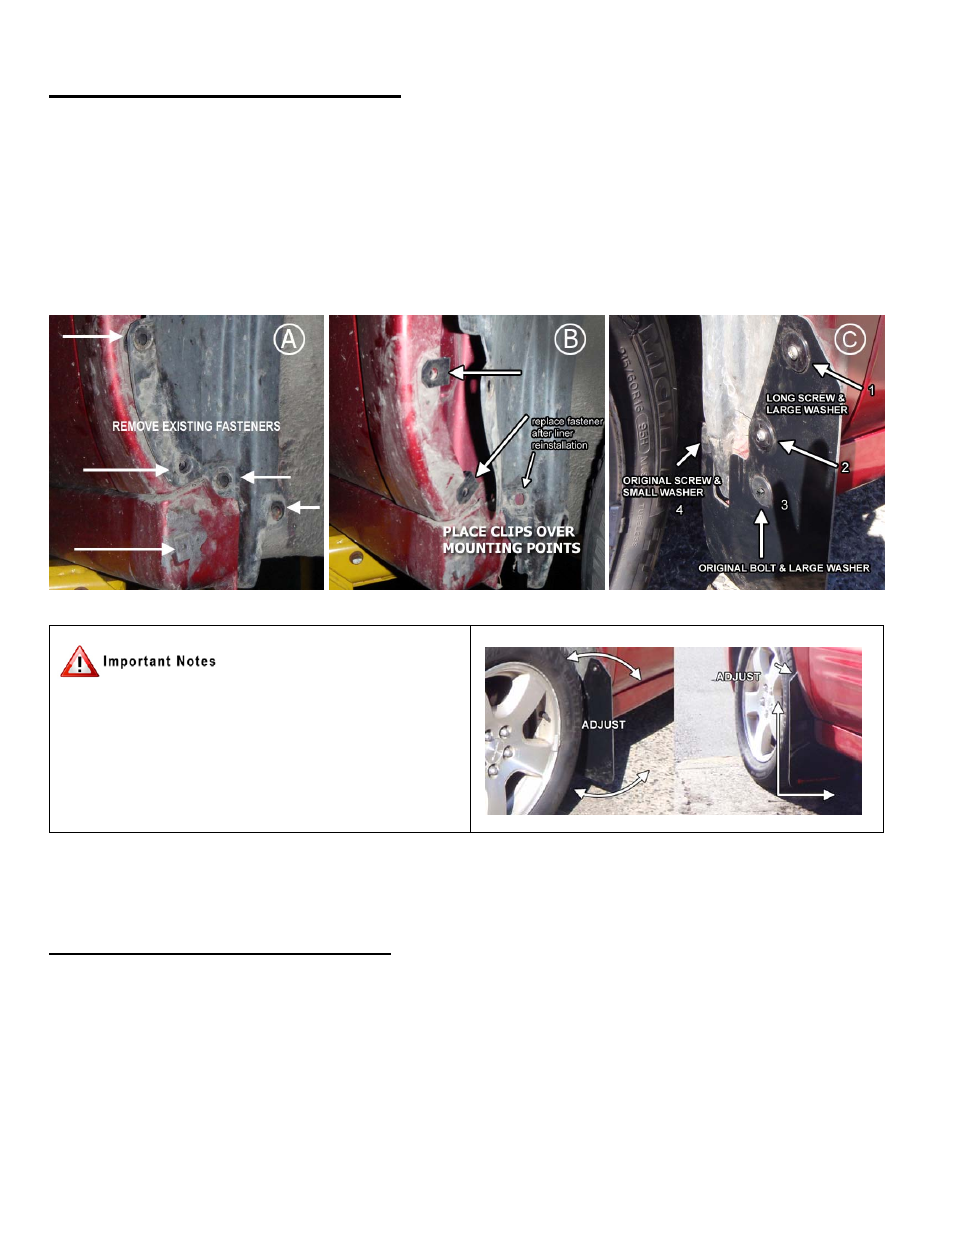
Front Mud Flap Installation
• (Figure A) Park vehicle on an even surface. Turn the steering wheel towards the side you are working on to gain access to the wheel
well area. Remove the 5 OEM fender liner retainer clips/screw/bolts. Retain this hardware as some of it will be re‐used.
• (Figure B) Pull liner away to gain access to inner fender and place a Polygon clip over each of the two mounting points as shown.
Replace liner, and replace inner OEM fastener.
• (Figure C) Position the front mud flap with logo facing the rear of the vehicle. Using a long screw (1.5SS) and a large washer (Wash),
loosely bolt the mud flap to each two upper mounting points (1 & 2). For the side skirt mounting point (3) use the original bolt,
replacing the metal washer with a large plastic washer. For inner point (4) utilize the original screw with a small washer. Do not
tighten mounting points. Adjust mud flap before tightening down for proper alignment.
Align outer edge of the flap by incrementally adjusting the
side to side, lower/upper portion of the flap and walking
away from the vehicle until the flap is perpendicular to even
ground. Tighten all mounting screws only until snug against
washer. Do not over tighten.
Rear Mud Flap Installation
• (Figure D) Remove existing rear hardware and plastic shield
• (Figure E) Slide two supplied Round edge “S” clips (SCl) over stock mounting points in bumper. On late SF model bumpers trimming
on the inside of the bumper lip may be required. Existing hardware can also be utilized to mount flap. Place supplied Polygon clip
(PolCl) on inner mounting point.
• (Figure F) Loosely secure bracket to vehicle by placing a short screw (.75SS) and small washer (SmWash) through the smaller
mounting hole on the bracket and in to the clip as shown. Slide polygon clip over large slotted portion of the bracket.