Rally Armor 07-13 Mitsubishi Lancer User Manual
Page 2
away
ali
Tip:
To properly align the flaps, walk towards the rear of the vehicle to view mud flap. Confirm the edge of the flap is perpendicular to the
ground. If needed, incrementally shift the upper or lower portions of the flap. Always check each alignment you have performed by walking
from the vehicle and looking at the mud flap directly behind it in relation to the ground and the body of the vehicle. When flap is correctly
gned, fully tighten hardware
only until snug
. (Figure F).
Tip: The hardware is quite strong and self threading but over‐tightening the clips beyond their limit is not recommended.
Tip: To check any non standard wheel clearance, turn the steering wheel from lock to lock while viewing the wheel well area at different
intervals. Remove the spacer if additional clearance is required and mount mud flap into mounting point #4 ‐ directly into vehicle.
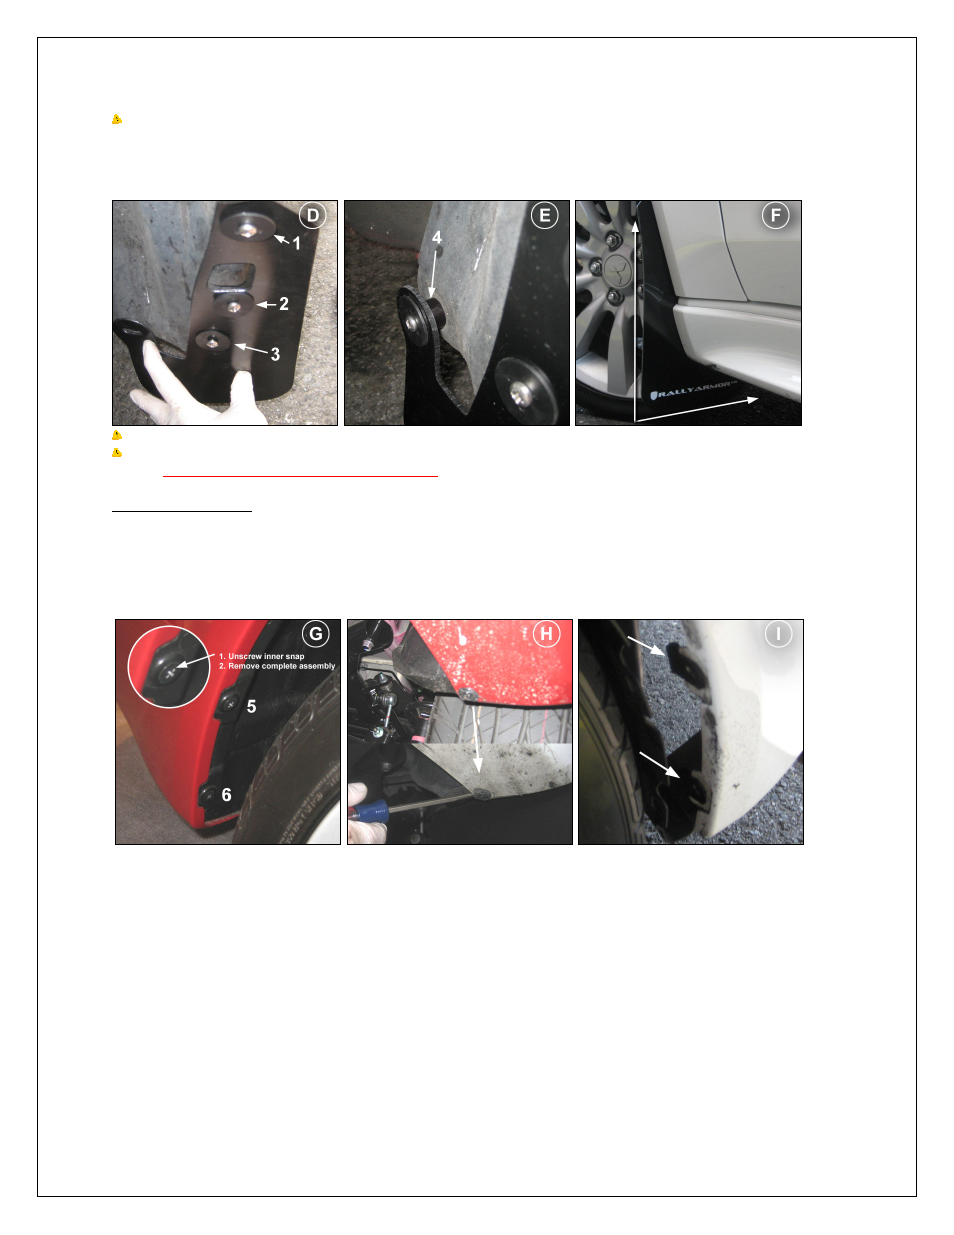
Rear Mud Flap Installation
1) The rear installation can be performed without tire removal using an offset screwdriver. Some users may find removal of tires eases
installation. To avoid tire removal, you may also jack up the vehicle to lower the wheels allowing for better access to the inner wheel well area.
2) Remove factory clips #5 and #6 by unscre ing the inner snap and prying the outer asse
off the bumper (Figure G). Working from the
re
3)
w
mbly
ar of the vehicle, remove the clip that connects the lower portion of the liner to the rear of the bumper (Figure H).
Place polygon clips over the rear two mounting points and replace liner (Figure I).
2
4) Place rear mud flap (has 3 holes) against the mounting points #5 and #6 with Rallyarmor logo facing the rear of the vehicle. Place 1 short
screw (1SS) through a washer (FenWash) then through mud flap mounting points #5 and #6 on the vehicle. Thread these points loosely.
*Do
not fully tighten*
(Figure J).
5) Place a polygon clip (PolCl) over rear fender liner cover behind the bumper portion (Figure K). This will serve as a mounting point for the rear
L bracket – mounting point #7.
6) Place a short screw (1SS) through a washer (FenWash) then through L bracket mounting hole A (RBRKT1) and polygon clip (PolCl ) over the
slotted hole B (Figure L). Mount bracket assembly to bumper placing the portion with the polygon clip between the fender liner and the mud
in order to create the final mounting poi
#8.
flap
nt