Rally Armor 08-13 Mitsubishi EVO X User Manual
Page 3
3
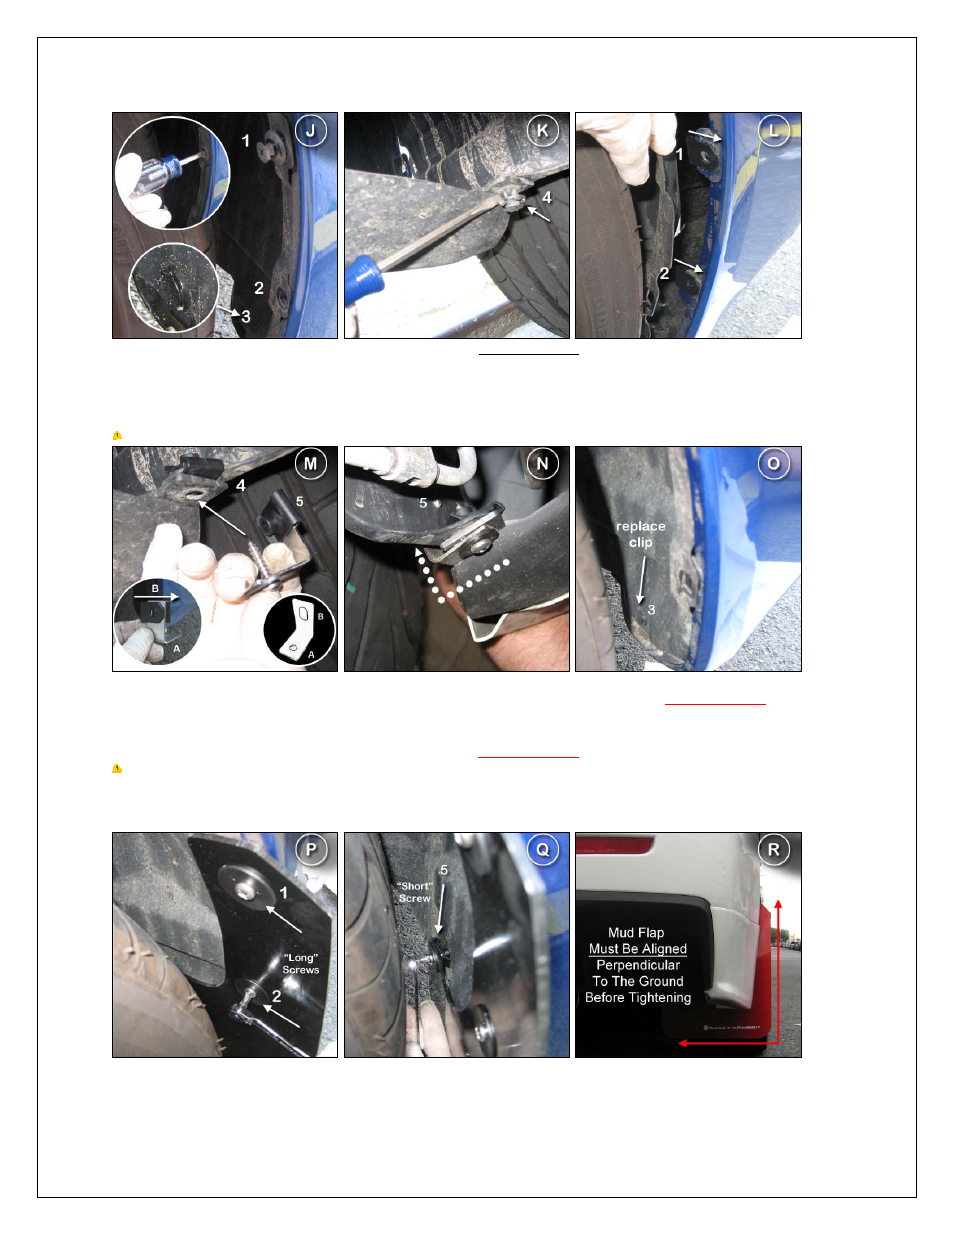
4. Working from under the rear of the vehicle, place a polygon clip over fender liner portion of mounting point #4. Position polygon clip over
slotted mounting point B on rear L bracket to create mounting point #5.
5. Place a short screw (1SS) through a washer (Wash) through hole A on rear L bracket (Figure M) then mount rear L bracket assembly to
vehicle leaving it slightly loose in order to align the bracket with mud flap later on in the rear installation (Figure N).
6. Reinstall factory fastener #3 (Figure O).
Tip: The hardware is quite strong and self threading but over‐tightening the clips beyond their limit is not recommended.
7. Place rear mud flap with logo facing the rear of the vehicle with the outer mounting holes on the mud flap aligned to the corresponding
points on the vehicle. Thread long screws (1.5SS) through washers through rear mounting points #1 and #2.
*Do not fully tighten.*
Adjust the
mud flap before tightening the screws (Figure P).
8. Mount the final inner mounting point #5 to L bracket by threading 1 short screw (1SS) through a washer (Wash) through the polygon clip
that was placed on point B on L bracket (tip may also thread into liner)
*Do not fully tighten.*
Tip: You may need to apply pressure or loosen the clip to adjust the bracket from the rear to complete installation (Figure Q).
9. Confirm the edge of the flap is perpendicular to the ground. If needed, make slight adjustments by shifting the upper or lower portions of
the flap. Check each incremental adjustment by walking away from the vehicle and looking at the mud flap directly behind in relation to the
ground and the body of the vehicle. When flap is correctly aligned, tighten hardware
only until snug
(Figure R).
10. Repeat the instructions for the other side of the vehicle to complete rear mud flap installation.
Evo X installation P. Version 1.0‐ 8.3.2008