Clearing plugged vapor tubes, Clearing closed line vapor plugs, Clearing open line vapor plugs – Great Plains NP30A 30-foot Operator Manual User Manual
Page 117: 13 a48
Great Plains Manufacturing, Inc.
Maintenance and Lubrication
113
2014-05-20
407-502M
Clearing Plugged Vapor Tubes
Elevated Ammonia Exposure Hazard:
Follow clearing instructions carefully. Wear your PPE
a
.
Plugged vapor tubes with tubing still attached can contain
significantly greater than normal NH
3
vapor which is not
likely to be mitigated by normal Discharge procedures. Hastily
disconnecting a charged line releases a dangerous amount of
NH
3
vapor. Your PPE is not designed to protect you against
such a release. Burning, respiratory injury, blinding or death
could result.
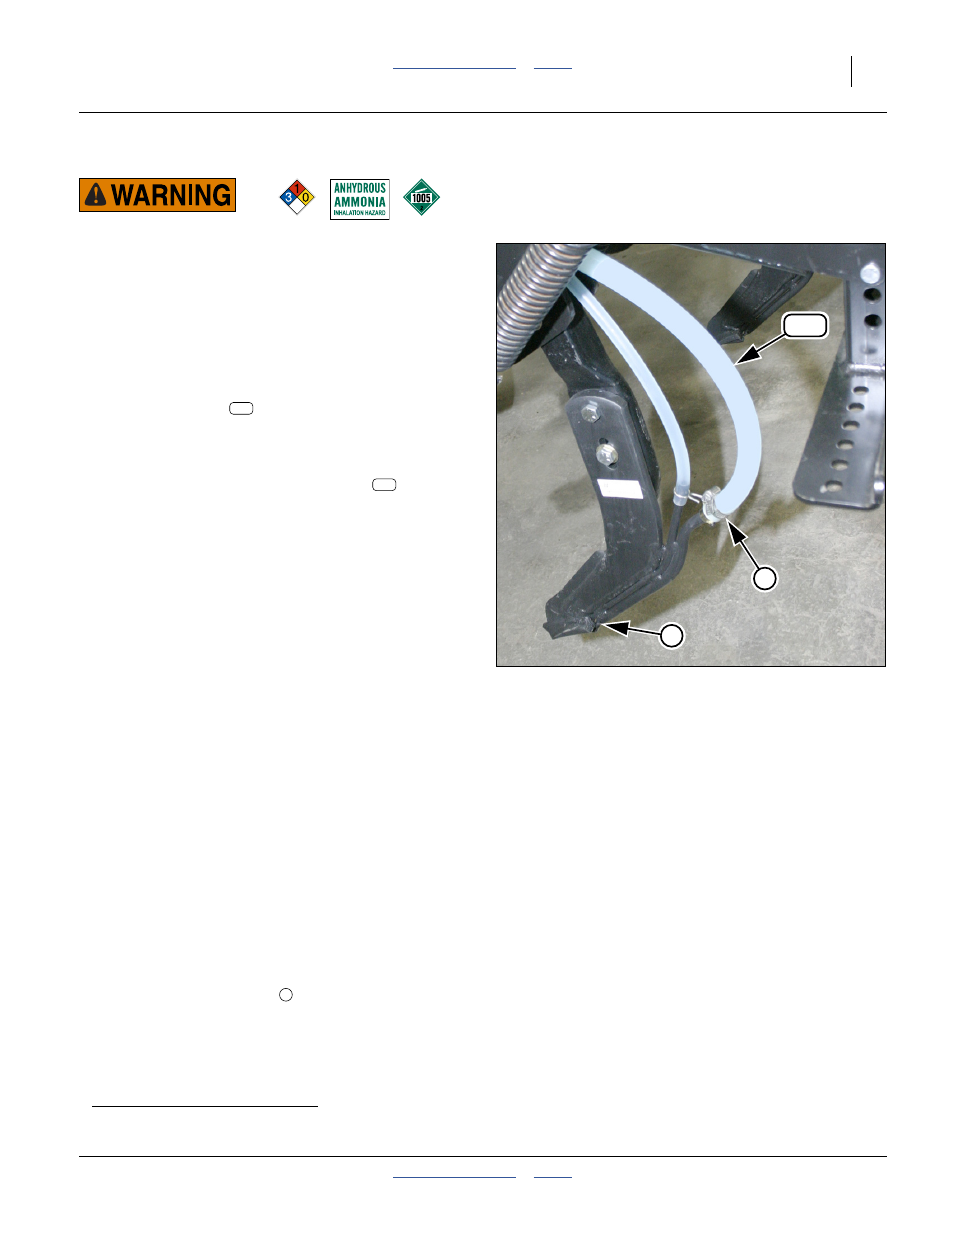
Refer to Figure 89
A plugged vapor tube
often usually does not result in
the vapor tubing lifting off the knife or tine tubing at the
clamp (it is a “closed line plug”).
If only one vapor line is plugged, the symptom may be an
elevated temperature at the cooler gauge (
on
page 21), and possibly a rate alarm if cooling is
insufficient. If both vapor lines at a cooler are plugged (at
moderate or warm ambient temperatures) the
temperature gauge rises higher, and more quickly.
Cooling ceases. Cooler pressure rises. Flow divider
pressure falls. Rate alarm is likely. Normal Discharge
may not clear the line.
If the plugged line disconnects (“open line plug”), you
may see little change from normal operations. Odor is
elevated, if you drive down-wind of application. The
vapor line may not cause a cloud. The change in cooler
pressure may be minor. You are most likely to detect an
open line plugging of a vapor line during routine row
inspection at re-hitch.
Clearing Closed Line Vapor Plugs
1.
Review the WARNING at the top of this page.
2.
Stop operation (page 76).
3.
Discharge the system (page 110). The standard
discharge is not likely to adequately discharge any
plugged, closed, vapor lines. Expect continuing
vapor release at non-plugged rows. The plugged line
discharges back through the cooler, then through the
flow divider and out the other rows.
4.
Wait until the plugged knife or tine has warmed to
ambient temperature, and there is no liquid in the
vapor line.
5.
Loosen the screw clamp
tubing. Pull the vapor tubing off the knife or tine
tubing.
6.
Use a thin flexible tool (a coat hanger wire may
suffice) to clear the knife or tine tube from above or
below.
7.
Reconnect the vapor tubing. Push the vapor tubing
onto the knife or tine tube about
3
⁄
4
inch (19 mm).
Slide the screw clamp to centered in the overlap and
secure.
Clearing Open Line Vapor Plugs
1.
Stop operation (page 76).
2.
Discharge the system (page 110).
3.
If the knife or tine tubing is cold, wait for it to warm to
ambient temperature (and vaporize any liquid NH
3
inside).
4.
Use a thin flexible tool (a coat hanger may suffice) to
clear the knife or tine tube from above or below.
5.
Reconnect the vapor tubing. Push the vapor tubing
onto the knife or tine tube about
3
⁄
4
inch (19mm).
Slide the screw clamp to centered in the overlap and
secure.
a. PPE: Personal Protective Equipment
Figure 89
Dual Knife Vapor Tube
31634
3
3