Air-pro® meter operation, Meter operation, Air-pro – Great Plains YP3025A Operator Manual User Manual
Page 50
46
YP3025A
Great Plains Manufacturing, Inc.
401-705M
02/16/2012
Air-Pro
®
Meter Operation
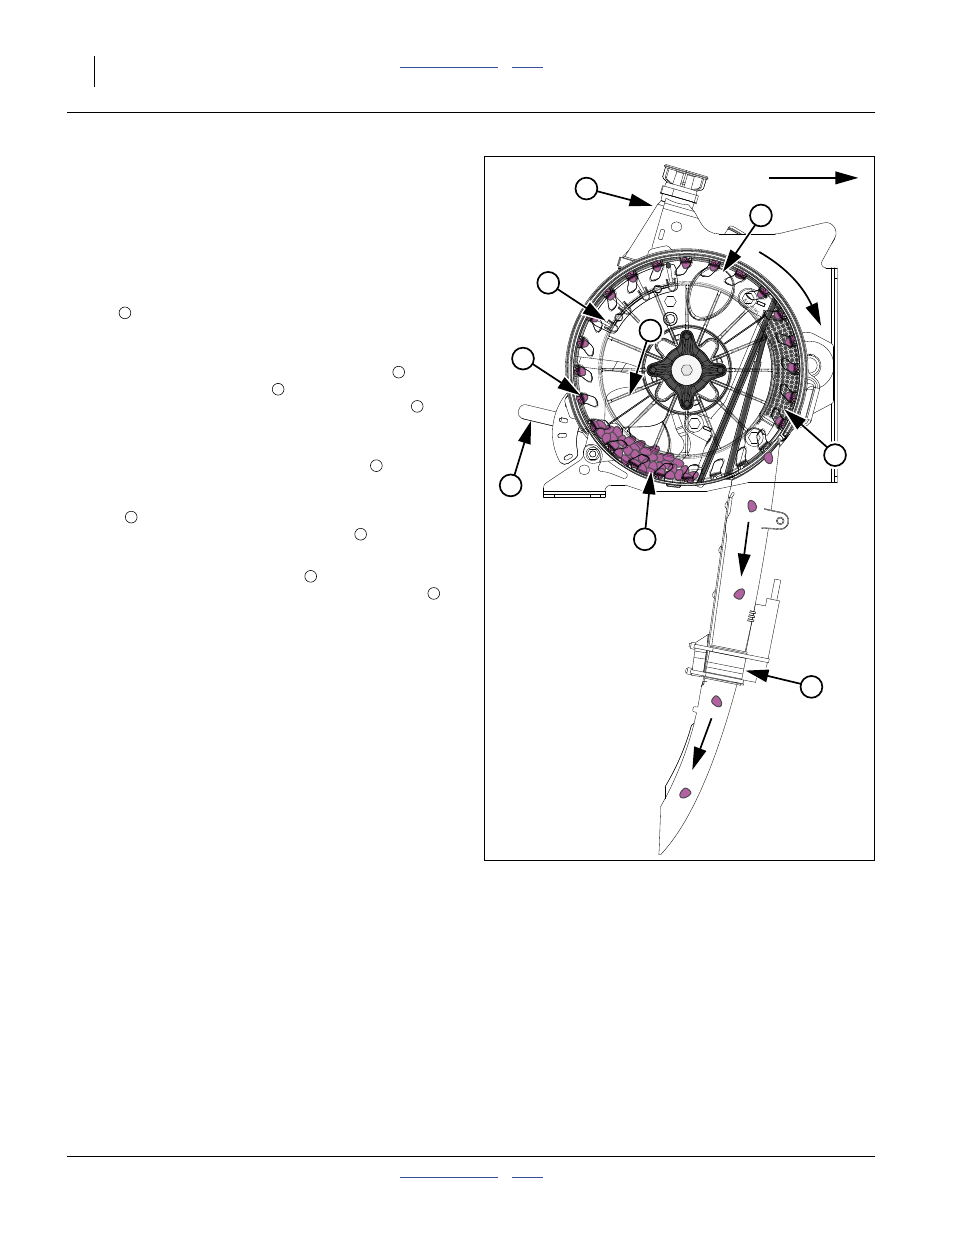
Refer to Figure 48
The meter disk is driven, top forward, by a chain drive
(not shown) always connected to the section drive shaft
(or optional Row-Pro™ clutch). At non-planting rows,
always use a blank disk (page 78).
Seed is air-delivered to the inlet above the air release
screen
. Seed customarily fills to the top of the screen,
blocking further air flow from the seed delivery system,
until the seed level falls below the screen.
Seed enters the meter at the seed inlet shutter
open), and forms a seed pool
at the base of the meter.
Seed pool size is controlled by the shutter handle
ting (which is the only user adjustment at the meter). Ini-
tial shutter settings are given in the seed rate charts.
Meter pressurization air enters the meter at
, and exits
the meter primarily at the seed pockets in the seed disk.
The pressure differential holds seed in the disk
pockets
rising from the seed pool. Excess seed at a
pocket is picked off by the tickler brushes
The strip and drop brushes block meter pressurization
air. Seeds passing the drop brush
are free to fall into
the seed tube, and are detected by the seed sensor
Meter Operation
1.
Install disks for your crop/population range per the
Seed Rate manual and the instructions beginning on
page 76 of this manual.
2.
Open the shutter at planting rows to the recom-
mended initial setting (from the Seed Rate charts).
At unused rows, close Y-tube leg (page 96), install a
blank disk (page 78) and close shutter.
3.
Set sprocket indexing if staggering a twin-row crop
(see Seed Rate manual for details).
4.
Operate the fan at normal field rpm (page 44).
5.
On the seed monitor, perform a “FILL METER” oper-
ation.
6.
With all rows primed, rotate meters one turn to fill
pockets to edge of drop brush.
For hydraulic drive, engage all clutches, and use a
“FILL DISK” seed monitor operation.
For ground drive, either disengage all clutches and
rotate the section drive shafts (top forward) with a
7
⁄
8
in (23mm) wrench, or raise planter, engage
clutches and rotate ground drive tires (top forward).
7.
Leave fan running (to keep seed in top pockets).
Re-install rain covers. Commence planting.
Meter operation is automatic from this point on.
For hydraulic drive planters, an optional Remote Test
Switch is available from DICKEY-john
®
which allows at-
row control of meter rotation for meter fill and seed pool
recovery operations.
See also:
“Seed Pool Troubleshooting” on page 84,
“Seed Pool Recovery” on page 85,
“Meter Clean-Out” on page 96, and
“Meter Brush Maintenance” on page 98.
Null4:
Figure 48
Air-Pro
®
Seed Meter at Row
29825
3
2
1
5
6
4
7
8
9
2
7
9