1 the remote control, 2 power on the remote control, 3 remote control power led status information – DJI Phantom 2 Vision Plus User Manual User Manual
Page 17: 4 battery level indicator, 5 antenna orientation, 3 remote control power led status, Information 17, Receiver antenna (p17), 17 5.1 the remote control
Assembly and Use
©
2014 DJI. All Rights Reserved.
17
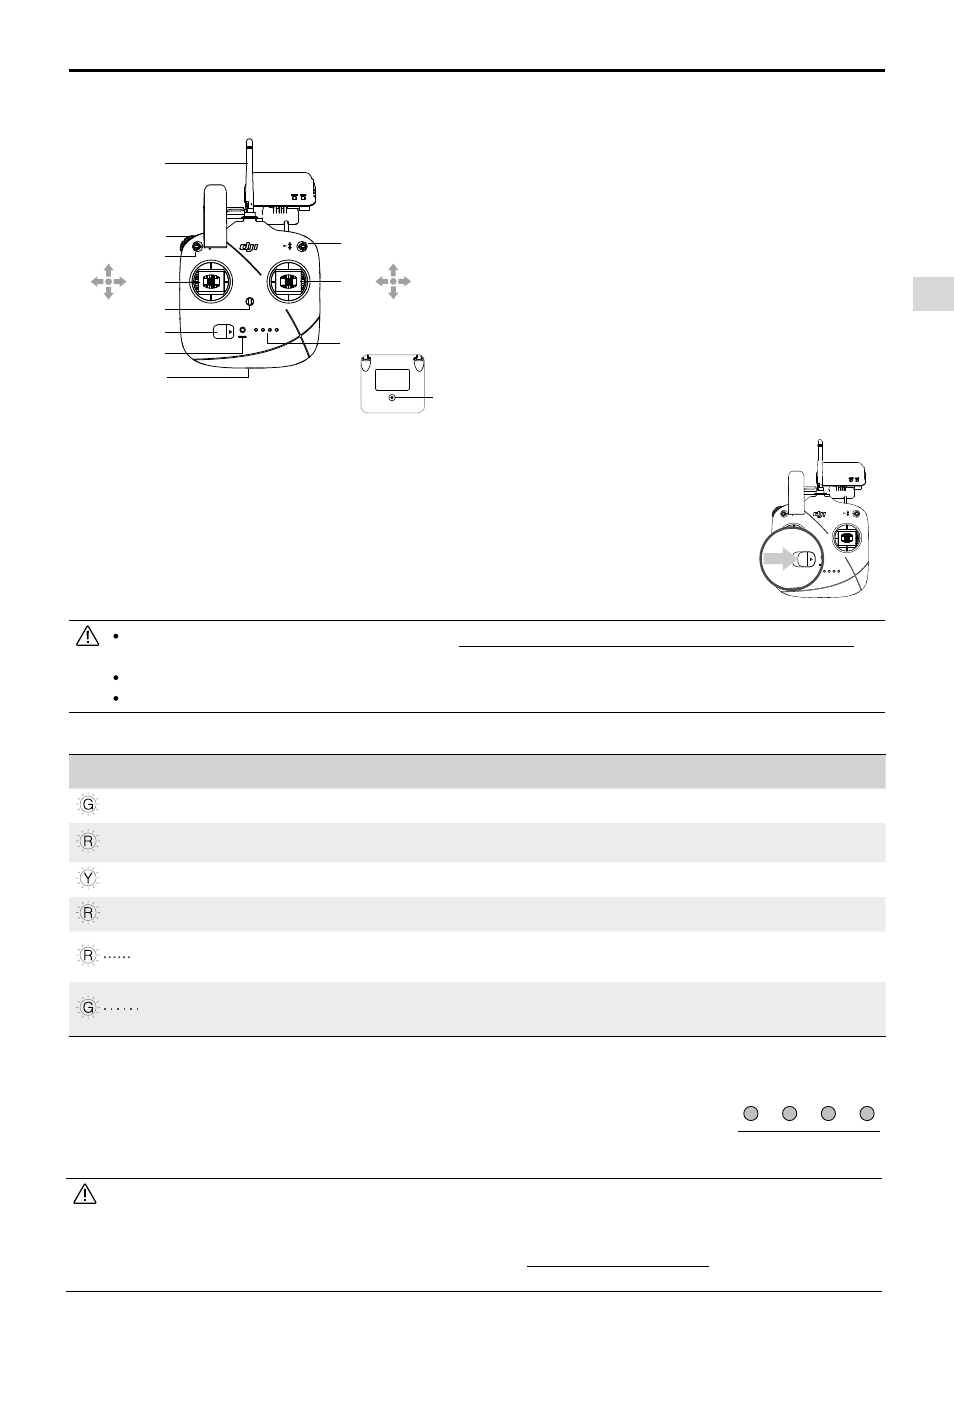
5.1 The Remote Control
[1]
[2]
[3]
[4]
[5]
[6]
[7]
[8]
[9]
[10
]
[11
]
[12
]
Antenna
Left Dial
Switch S1
Switch S2 (Reserved)
Right Stick: J1, Roll [left & right],
J2, Pitch [front & back]
Left Stick: J3, Throttle [up & down],
J4, Yaw [rotation]
Neck Strap Attachment
Power Switch
Power Indicator
Battery Charge & RC Assistant Port (micro-USB port)
Battery Level Indicator
Training Port (on back)
5.2 Power on the Remote Control
(1) Set S1 and S2 switches to the upper most position and place all sticks in the mid-point.
(2) Toggle power switch to the right to switch on.
(3) There will be a power on indicator beep. If the remote control is set to be CE compliant, then
there will be one beep, while the FCC compliant version will emit two beeps. The battery level
indicator displays the current battery level. The indicator will blink green quickly, indicating the
remote control and receiver are linking. Once fully linked, the power indicator will change to a
solid green.
details), please recharge the battery as soon as possible.
Using the incorrect type of charging cable may cause damage.
Following long term storage, recharge the battery before use.
5.3 Remote Control Power LED Status Information
Power LED Indicator
Sound
Remote Control Status
— Solid Green
None
Functioning normally.
— Solid Red
None
Charging( remote control is powered off)
— Solid Yellow
None
Remote control joysticks calibration error, need to be re-calibrate.
— Solid Red
BB---BB---BB
Low voltage (from 3.5V-3.53V), recharge the remote control.
Quick Red flashing
B-B-B......
Critical low voltage (from 3.45V-3.5V). Recharge the remote
control immediately.
Slow Green flashing
B--B--B......
Alert will sound after 15 minutes of inactivity. It will stop once you
start using the remote control.
Preparing the Remote Control
Figure 24
[1]
[2]
[3]
[4]
[5]
[6]
[7]
[8]
[9]
[10]
[11]
[12]
J3
J4
J2
J1
5.4 Battery Level Indicator
Built-in LiPo Battery: The remote control includes a rechargeable LiPo battery with
a capacity of 2000mAh. You can monitor the current battery level using the LED
indicators on the front panel of the remote control as the figure shown:
The remote control will show a blinking LED and sound an alert when the voltage drops below 3.45V, then
automatically power off after 3 seconds. This process will repeat even if you power cycle the remote control. If
this low voltage warning occurs during flight, the remote control will automatically power off, causing the aircraft
to enter Failsafe mode, which cannot be interrupted (refer to Failsafe Function (Page27) for details). It is strongly
recommended that you recharge the battery immediately when the 3.45V-3.5V low voltage warning occurs.
5.5 Antenna Orientation
Keep the antennas pointing skyward, perpendicular to the ground for maximum remote control range during flight.
Battery Level Indicator
25% 50%
75% 100%