Installation instructions – Brandmotion 1022-9590 User Manual
Page 6
INSTALLATION INSTRUCTIONS
9581 Instructions 4-18-13.doc
6 of 13
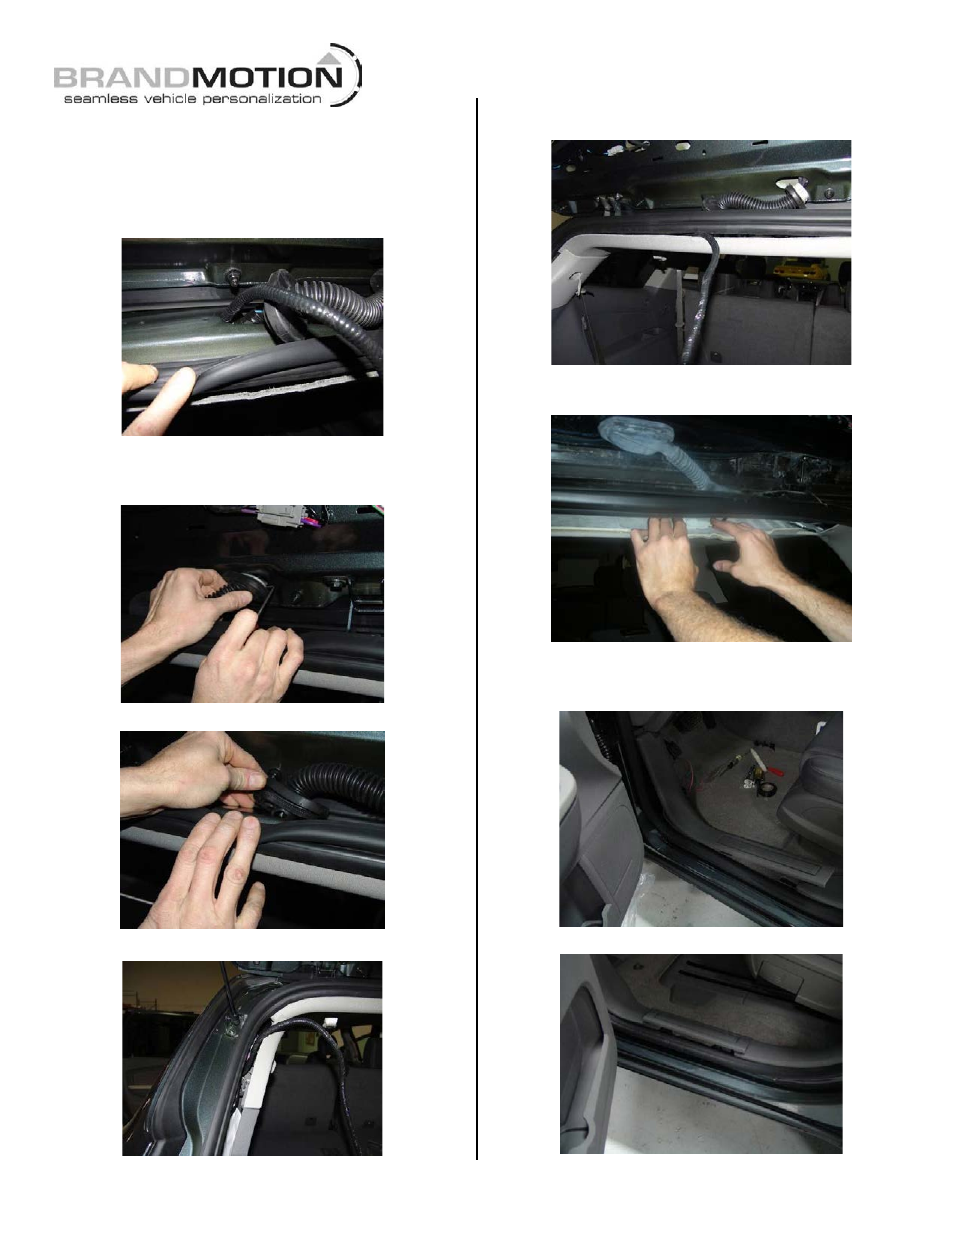
Step 25. Make a loop out of the RCA connector end of
Chassis Harness with electrical tape and route the
Chassis Harness through the liftgate grommet.
Step 26. Route Chassis Harness though the sheet metal
grommet hole with a Fish Tape or a 1’ Tie Strap to ease
the routing through the grommet.
Step 27. Reinstall both grommets removed from the
liftgate and body with your hands (Figures 6 & 7).
Figure 6
Figure 7
Step 28. Pull away D-pillar trim with a plastic trim tool.
Step 29. Route Chassis Harness beneath the headliner
towards the D-pillar.
Step 30. Tuck Chassis Harness under the leading edge
of the headliner and route down the D pillar.
Step 31. Remove the driver’s side front and rear sill
plates with a plastic trim tool (Figures 8 & 9).
Figure 8
Figure 9
- 1008-9527-V1 (18 pages)
- 1008-9527-V2 (38 pages)
- 9002-1010 (8 pages)
- 9002-9503-V1 (2 pages)
- 9002-9503-V2 (12 pages)
- 1008-9520-V1 (2 pages)
- 1008-9520-V2 (34 pages)
- 9002-8836 (7 pages)
- 1013-9530-V1 (2 pages)
- 1013-9530-V2 (16 pages)
- 1009-9518 (7 pages)
- 1009-9517 (18 pages)
- 9002-1015 (6 pages)
- 9002-8522 (6 pages)
- 9002-8525 (5 pages)
- 9002-8523 (7 pages)
- 9002-8524 (5 pages)
- 9002-8521 (5 pages)
- 9002-8520 (4 pages)
- 9002-9651 (2 pages)
- 9002-9650 (2 pages)
- 9002-9511 (4 pages)
- 9002-9516 (3 pages)
- 9002-6014 (1 page)
- 9002-9510-V1 (3 pages)
- 9002-9510-V2 (3 pages)
- 9002-9618 (2 pages)
- 9002-9515 Installation Instructions (2 pages)
- 9002-9515 Wiring Instructions (2 pages)
- 9002-9608 (2 pages)
- 9002-9613 (2 pages)
- 1110-2519 (2 pages)
- 9002-9702 (1 page)
- 9002-9703 (2 pages)
- 1110-2518 (2 pages)
- 9002-9704 (1 page)
- 9002-9701 (1 page)
- FLTW-7604 (2 pages)
- 9002-7607 (2 pages)
- 9002-7609 (2 pages)
- 9002-7608 (2 pages)
- 9002-7605 (3 pages)
- 9002-7606 (2 pages)
- FLTW-7603 (3 pages)
- 9002-8501 (4 pages)