Installation instructions – Brandmotion 1022-9590 User Manual
Page 3
INSTALLATION INSTRUCTIONS
9581 Instructions 4-18-13.doc
3 of 13
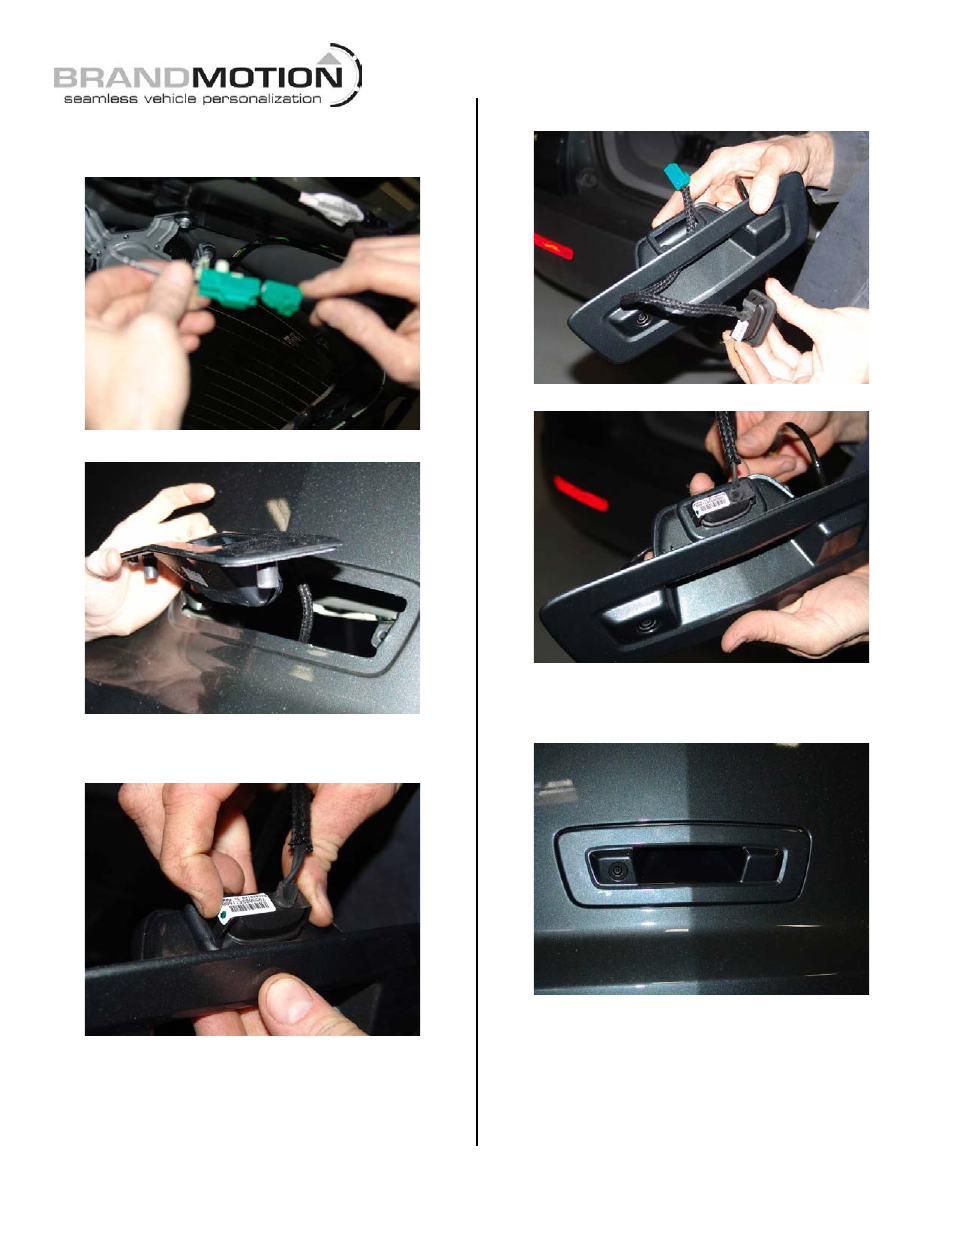
Step 9. Disconnect the liftgate handle release connector
by bending the two white tabs and pressing down on
the connector.
Step 10. Remove the liftgate handle.
Step 11. Remove the liftgate handle release handle by
pushing the tabs inwards and pulling the harness
through the handle.
Step 12. Install the liftgate release harness into the
supplied Camera Handle by routing the harness and
seating it with your hands (Figures 1 & 2).
Figure 1
Figure 2
Step 13. Install the supplied Camera Handle into the
liftgate with your hands ensuring that the harness is
routed through the liftgate.
Step 14. Reinstall the two 10mm liftgate handle screws
and reconnect the liftgate handle release connector.
- 1008-9527-V1 (18 pages)
- 1008-9527-V2 (38 pages)
- 9002-1010 (8 pages)
- 9002-9503-V1 (2 pages)
- 9002-9503-V2 (12 pages)
- 1008-9520-V1 (2 pages)
- 1008-9520-V2 (34 pages)
- 9002-8836 (7 pages)
- 1013-9530-V1 (2 pages)
- 1013-9530-V2 (16 pages)
- 1009-9518 (7 pages)
- 1009-9517 (18 pages)
- 9002-1015 (6 pages)
- 9002-8522 (6 pages)
- 9002-8525 (5 pages)
- 9002-8523 (7 pages)
- 9002-8524 (5 pages)
- 9002-8521 (5 pages)
- 9002-8520 (4 pages)
- 9002-9651 (2 pages)
- 9002-9650 (2 pages)
- 9002-9511 (4 pages)
- 9002-9516 (3 pages)
- 9002-6014 (1 page)
- 9002-9510-V1 (3 pages)
- 9002-9510-V2 (3 pages)
- 9002-9618 (2 pages)
- 9002-9515 Installation Instructions (2 pages)
- 9002-9515 Wiring Instructions (2 pages)
- 9002-9608 (2 pages)
- 9002-9613 (2 pages)
- 1110-2519 (2 pages)
- 9002-9702 (1 page)
- 9002-9703 (2 pages)
- 1110-2518 (2 pages)
- 9002-9704 (1 page)
- 9002-9701 (1 page)
- FLTW-7604 (2 pages)
- 9002-7607 (2 pages)
- 9002-7609 (2 pages)
- 9002-7608 (2 pages)
- 9002-7605 (3 pages)
- 9002-7606 (2 pages)
- FLTW-7603 (3 pages)
- 9002-8501 (4 pages)