Brandmotion 9002-7606 User Manual
Installation instructions
INSTALLATION INSTRUCTIONS
7606 Ford E-Series Instructions 1-28-13.doc
Page 1 of 2
Ford E-Series Camera Installation Instructions, 2010 – current
(Kit # 9002-7606)
Please read thoroughly before starting installation and check that kit contents are complete.
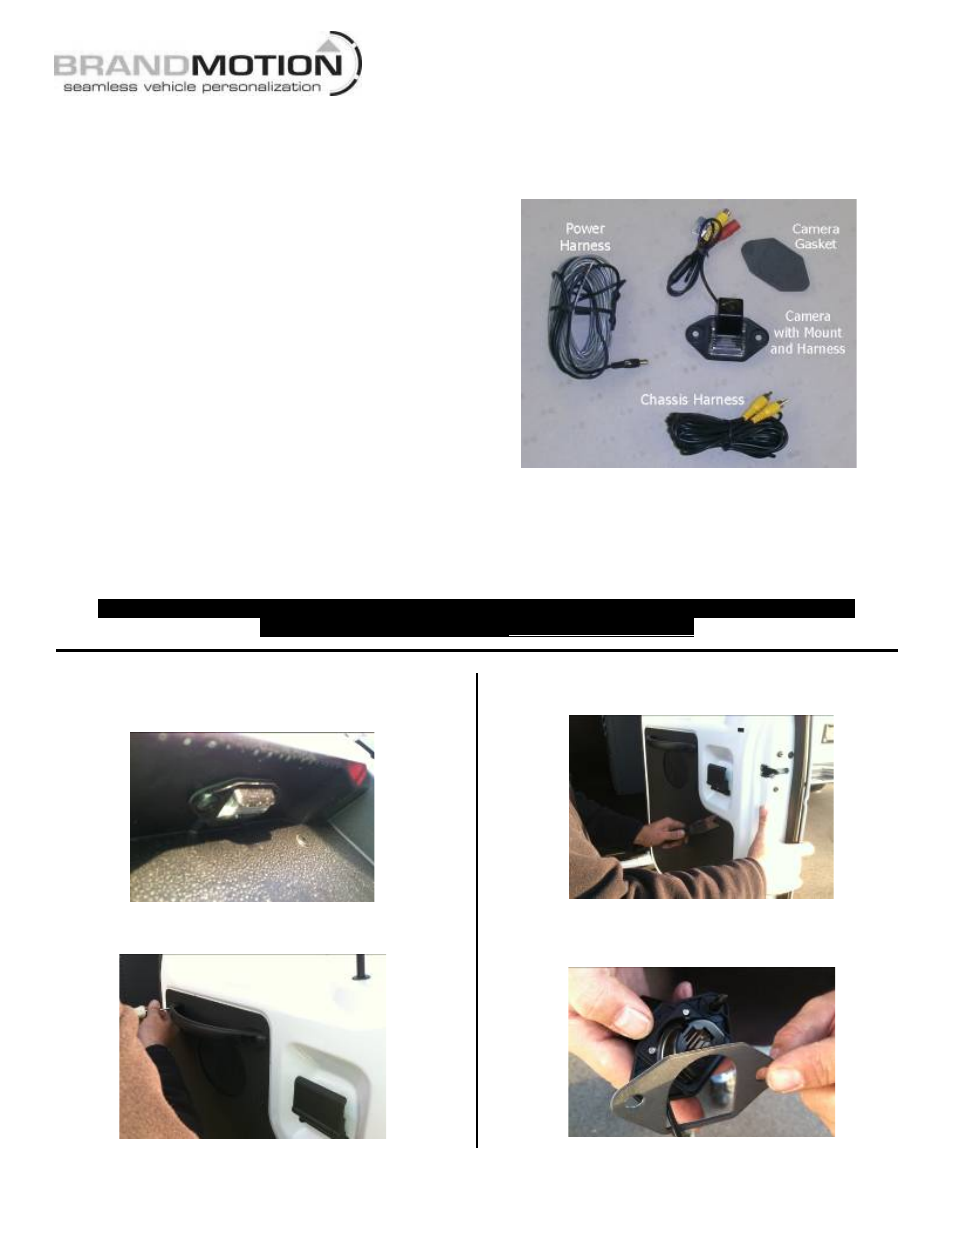
Items Included in Kit:
Camera with License Lamp Mount and Harness
Camera Mount Gasket
Chassis Harness with RCA connectors
Power Harness
These Instructions
Tools & Supplies Needed:
Multi-meter or computer-safe test light
Plastic Trim Removal Tool
Electrical Tape or Heat Shrink Tubing
Soldering Iron
Solder (recommended) or T-Taps
Wire Ties (recommended)
Ground Eyelet (recommended)
Safety Precautions:
•
Work in a well ventilated area that is clear of obstructions.
•
Secure vehicle with tire chucks in both front and rear of tires.
•
Turn vehicle accessories OFF and ensure ignition key is in OFF position.
•
Wear safety goggles and snug fitting clothes.
•
Use tools only for their intended purpose and which are in good repair.
•
Only perform this task if confidence, skill, and physical ability permit.
NOTE: We strive to provide accurate and up-to-date installation instructions. The latest full color
instructions can be accessed at www.brandmotion.com
Step 1: Use a Phillips Screwdriver to remove scrivets
(plastic screw-rivets) retaining the license plate lamp.
Save scrivets to attach Camera.
Step 2: Use a Phillips Screwdriver to remove two
screws securing the door pull and remove it.
Step 3: Use a Plastic Trim Removal Tool to extract pins
from rear passenger door trim panel and remove panel.
Step 4: Press out the three cut outs in the Camera
Mount Gasket, thread Camera Harness through the
large opening, and seat gasket to the mount.