Secure harnesses & reinstall vehicle trim, Camera, chassis, and nav harness pinouts – Brandmotion 1013-9550 User Manual
Page 13
"#$%&''&%"(#!"#$%)*+%"(#$
9550 Instructions 1-8-13.doc
Page 13 of 13
77. Reconnect negative battery terminal. Tighten
negative cable nut to 5 N
"m (44 lb in).
78. Test system functionality.
Secure Harnesses & Reinstall Vehicle Trim
79. Lift NAV Harness and Chassis Harness connection
out of view and secure harnesses to existing wires
under the dashboard using two supplied Wire Ties.
80. Reinstall knee bolster using existing two screws and
a Phillips screwdriver.
81. Reinstall parking brake lever using the existing bolt
and a 10mm socket.
82. Reinstall end of dash cover and M-BEC electrical
cover by popping them back into place with hands.
83. Reinstall front kick panel by pressing it into place
with your hands to reengage the mounting clips.
84. Reinstall front and rear sill plates by pressing them
into place with hands to reengage mounting clips.
85. Coil any excess supplied Chassis Harness and secure
to existing vehicle wiring using remaining supplied
Wire Ties.
86. Reconnect speaker wire in D-pillar and reinstall D-
pillar cover.
87. Reinstall D-pillar cover screw using a Phillips
screwdriver and reinstall D-pillar bolt cover.
88. Reinstall headliner garnish by working your way
from one end to the other and popping the
mounting pins in with your hands. Note: Make sure
liftgate weather stripping is sitting on the outside of
the D-pillar cover, D-pillar trim, and headliner
garnish.
89. Reinstall liftgate sill plate by setting it into place and
pressing down to re-engage mounting clips.
90. Reinstall liftgate button connector to the upper
liftgate trim panel.
91. Reinstall lower liftgate trim by aligning it with the
liftgate. Working your way from one end to the
other, pop the mounting pins in with your hands.
92. Reinstall upper liftgate trim by aligning it with the
liftgate and working your way from one end to the
other, popping the mounting pins in with your
hands.
93. Reinstall pushpins from the rear window latch trim
by pressing them into holes with your fingers.
94. Reinstall liftgate pull strap using existing hardware
and a T30 Torx driver.
95. Reinstall grab cup on the bottom of liftgate using
existing hardware and a T30 Torx driver.
96. Reinstall third row seat.
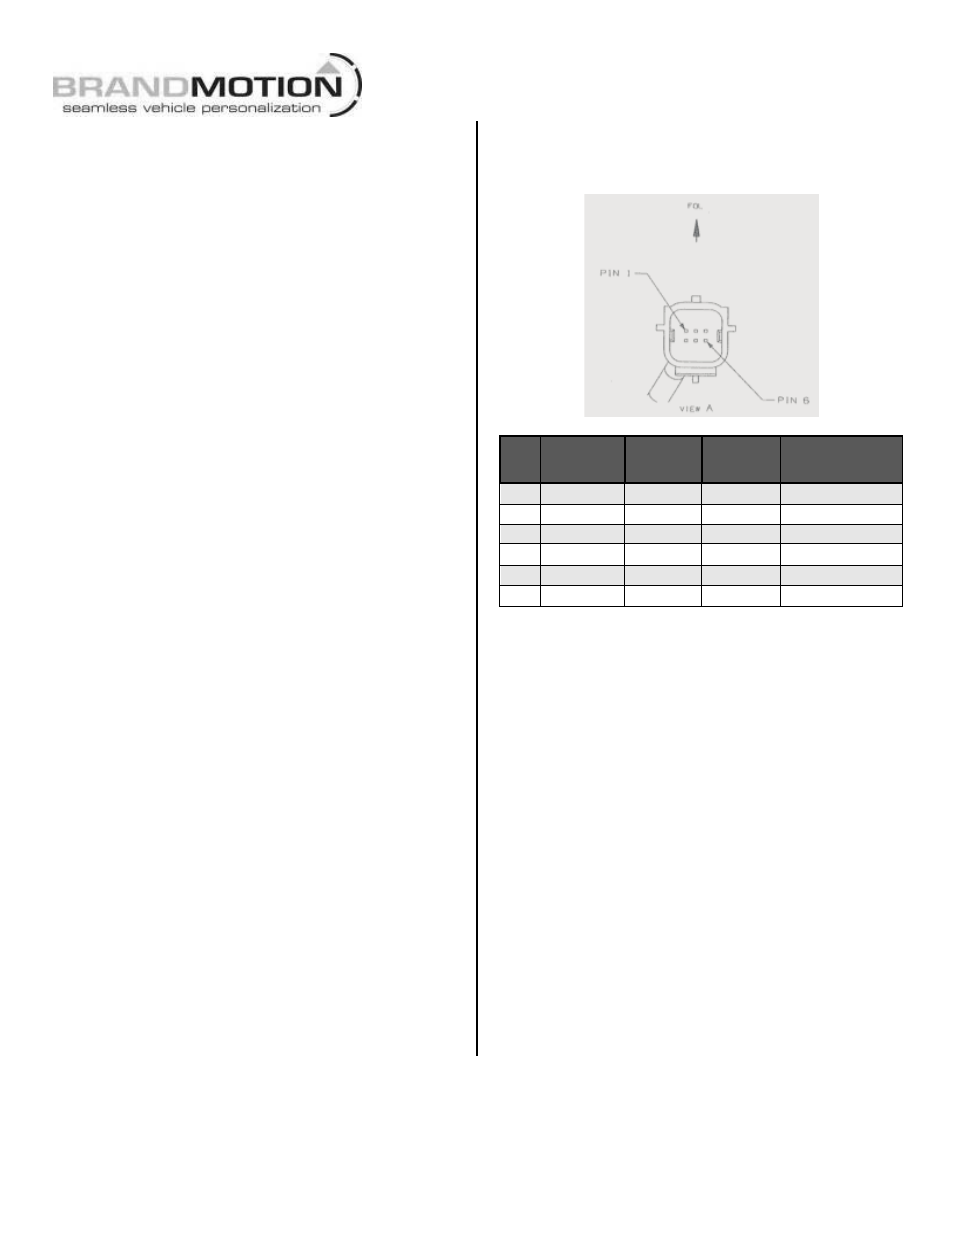
Camera, Chassis, and NAV Harness
Pinouts
(reference only)
PIN
#
FUNCTION
CAMERA
HARNESS
COLOR
CHASSIS
HARNESS
COLOR
NAV
HARNESS
COLOR
1
Video (+)
White
White
Gray/Dark Blue
2
Shield
Blue
Blue
White
3
Reverse
Green
Green
Green
4
Video (-)
Brown
Brown
Gray/Orange
5
Ground
Black
Black
Black
6
Ignition
Red
Red
Pink