Sioux Chief PEX F2159 User Manual
Making crimp connections, 4installation guide
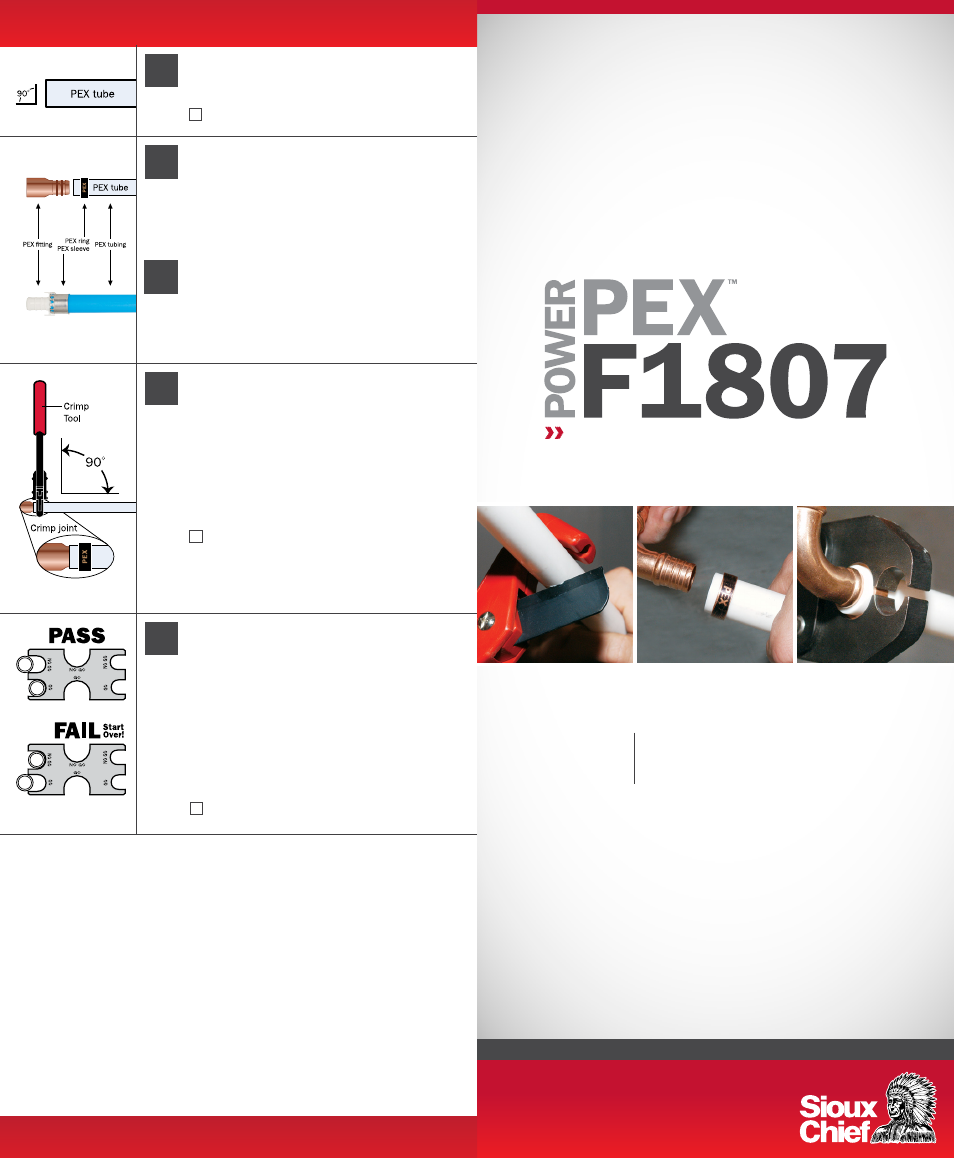
BE SURE TO CHECK EVERY CRIMP
JOINT! Every crimp joint should be
checked with the GO/NO GO Gauge. If
the designated GO slot fits over and will
rotate around the crimped ring, you have
made a proper crimp. If the crimped ring
will fit in the NO GO Gauge or will not fit
in the GO Gauge, you must cut the crimp
joint off and make a new connection.
YOU’LL NEED
GO/NO GO Gauge
Slide the PEX crimp ring over the end
of the PEX tube leaving about ¼″ of the
tube showing. Insert the fitting into the
end of the tube. BE SURE the crimp ring
is centered over the PEX barb.
All of the information you’ll need
to plan and install PEX plumbing
in your home.
Cut tube off square (90°)
with a tube cutter.
YOU’LL NEED
Tube Cutter
More about PEX Crimp Connections
• Can be used with both hot and cold drinking water lines or with
hydronic (radiant) heating.
• Insert fittings can be installed behind walls, but cannot be buried in concrete.
• Use the Home Run system or install in a continuous loop.
• PEX crimp rings are made of annealed copper. Sioux Chief’s PEX V-Sleeve is made
of Stainless Steel.
PEX and PB fittings and crimp rings are not interchangeable.
All Sioux Chief fittings and rings are manufactured to the ASTM Standard F1807
Specification for Metal Insert Fittings Utilizing a Copper Crimp Ring for SDR 9 Cross-
linked Polyethylene (PEX) Tubing, and are compatible with any and all fittings and rings
manufactured to this same standard. All Sioux Chief plastic fittings are made to the
ASTM F2159 specification for plastic insert fittings. Sioux Chief’s V-Sleeve connection is
made to the ASTM F877 standard for hot and cold PEX systems utilizing SDR plastic tubing.
12
PEX INSTALLATION GUIDE – 10/11
© 2011 SIOUX CHIEF MFG.
Note: sleeves and crimp rings are to be used
with either ASTM F1807 or F2159 fittings along
with the appropriate tool.
Center the jaws of the correct size
crimp tool over the crimp ring or sleeve.
Be sure the tool is held STRAIGHT and
close the jaws completely. CRIMP/
PRESS ONE TIME ONLY! If you do not
get a proper crimp connection the first
time, cut the fitting off and start from
the beginning.
YOU’LL NEED
Compression/Crimp Tool
Slide the PEX sleeve over the end of
the PEX tube fully. Insert the fitting into
the end of the tube. BE SURE the fitting
is inserted fully into the pipe.
www.siouxchief.com
Supply
Drainage
Support
12 PEX Installation Tips
Making Crimp Connections
STEP
1
STEP
2
STEP
2
STEP
3
STEP
4
Installation Guide