Hubbardton Forge 139610 User Manual
A113, Assembly & installation instructions
H U B B A R D T O N F O R G E . C O M
hand-forged, vermont-made lighting and accessories
154 RT. 30 SOUTH
•
CASTLETON, VERMONT 05735
All designs and images ©1989-2014 Hubbardton Forge
®
. All rights reserved.
19838 Rev C
Assembly & Installation Instructions
If you need further assistance, or find that you are missing any parts, please contact the dealer from which you purchased this product.
We hope you enjoy your fixture!
* Hubbardton Forge will not be liable for injury or damage caused by improper installation, lamping or use of this fixture.
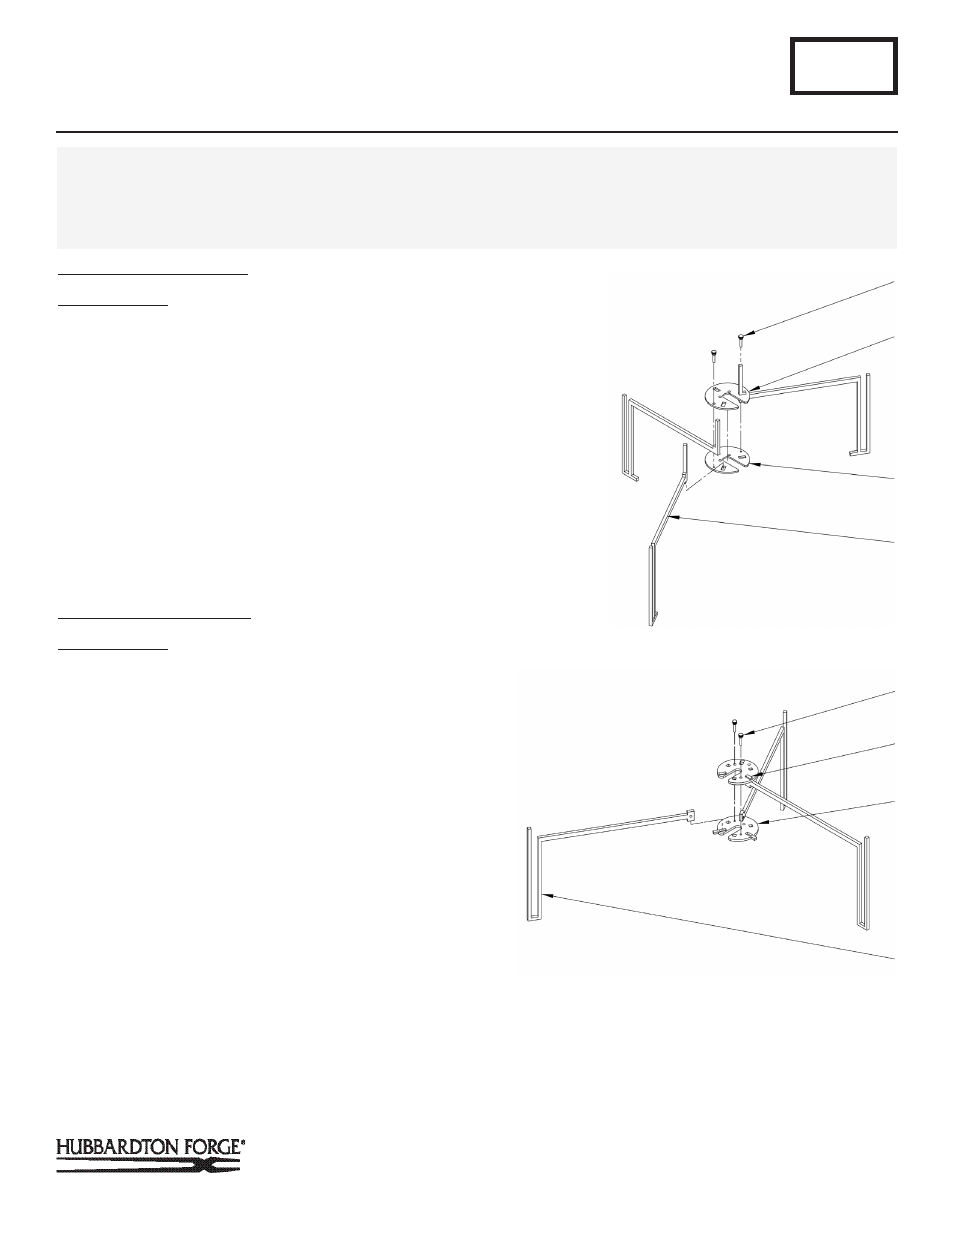
To Assemble Inner Spider
(Figure 1)
Component Parts
A Thumb Screw (2)
B Upper Inner Arm Assembly
C Lower Inner Arm Assembly
D Inner Spider Arm
1. Carefully unpack the fixture from the carton.
2. Assemble inner spider by placing upper inner arm
assembly (B) on lower inner arm assembly (C) with
inner spider arm (D) between them. Make sure inner
spider arm (D) is oriented the same as the other two
arms. Slot in both assemblies should be aligned.
3. Install (2) thumb screws (A) and tighten.
To Assemble Outer Spider
(Figure 2)
Component Parts
A Thumb Screw (2)
E Upper Outer Arm Assembly
F Lower Outer Arm Assembly
G Outer Spider Arm
1. Assemble outer spider by placing upper outer arm as-
sembly (E) on lower outer arm assembly (F) with outer
spider arm (G) between them. Make sure outer spider
arm (G) is oriented the same as the other two arms.
Slot in both assemblies should be aligned.
2. Install (2) thumb screws (A) and tighten.
A113
For Adjustable Shade Pendant Model 139610
Page 1 of 4
CAUTION: FAILURE TO INSTALL THIS FIXTURE PROPERLY MAY RESULT IN SERIOUS PERSONAL INJURY OR DEATH AND
PROPERTY DAMAGE. We recommend installation by a licensed electrician. This product must be installed in accordance with
applicable installation code(s), by a person familiar with the construction and operation of the product and the hazards involved.*
Caution: Do not exceed maximum wattage noted on fixture. Use only recommended bulbs with fixture.
A
(Figure 2)
C
B
D
E
(Figure 1)
(Continued)
A
G
F