Disk drive loop ids – HP StorageWorks 2500 Disk System User Manual
Page 61
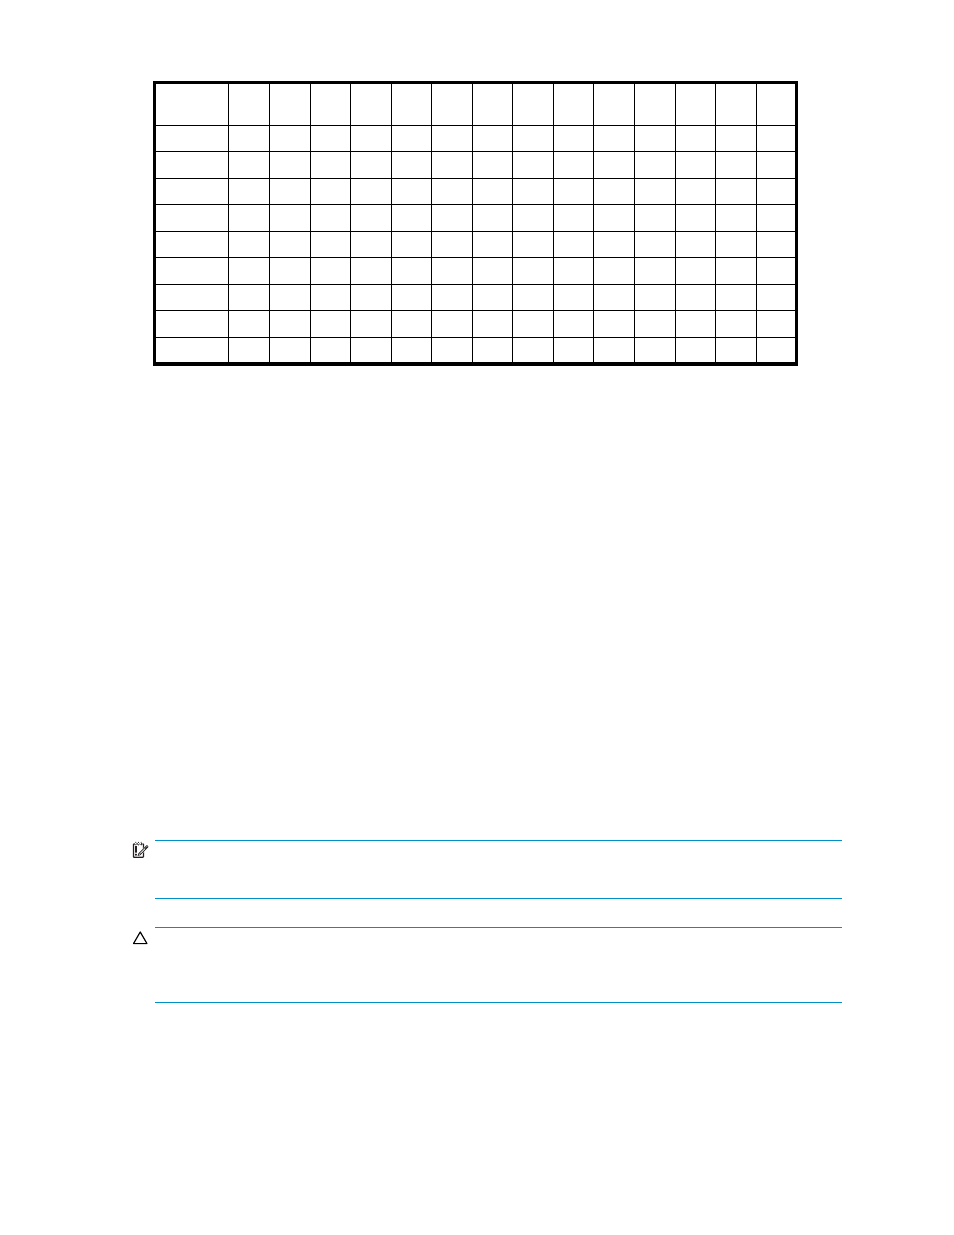
Table 12 Disk drive loop IDs
Enclosure
ID
Bay
1
Bay
2
Bay
3
Bay
4
Bay
5
Bay
6
Bay
7
Bay
8
Bay
9
Bay
10
Bay
11
Bay
12
Bay
13
Bay
14
1
36
35
34
33
32
31
2E
2D
2C
2B
2A
29
27
26
2
51
4E
4D
4C
4B
4A
49
47
46
45
43
3C
3A
39
3
6A
69
67
66
65
63
5C
51
59
56
55
54
53
52
4
80
7C
7A
79
76
75
74
73
72
71
6E
6D
6C
6B
5
A5
A3
9F
9E
9D
9B
98
97
90
8F
88
84
82
81
6
B6
B5
B4
B3
B2
B1
AE
AD
AC
AB
AA
A9
A7
A6
15
D1
CE
CD
CC
CB
CA
C9
C7
C6
C5
C3
BC
BA
B9
16
EF
E8
E4
E2
E1
E9
DC
DA
D9
D6
D5
D4
D3
D2
17
25
23
1F
1E
1D
1B
18
17
10
0F
08
04
02
01
Use ioscan –fn to determine the device file (HBA number).
Example 2. ioscan –fn command
ioscan -fn
Class
I
H/W Path
Driver S/W State
H/W Type
Description
=================================================================
fc
0
0/6/0/0
td
CLAIMED
INTERFACE
HP Tachyon XL2 Fibre Channel Mass
Storage Adapter
/dev/td0
fc
1
0/6/2/0
fcd
CLAIMED
INTERFACE
HP A6826-60001 2Gb Dual Port PCI/PCI-X
Fibre Channel Adapter (FC Port 1)
/dev/fcd1
fc
2
0/6/2/1
fcd
CLAIMED
INTERFACE
HP A6826-60001 2Gb Dual Port PCI/PCI-X
Fibre Channel Adapter (FC Port 2)
/dev/fcd2
=========================================================================
Enter the following command to allow HP-UX to ignore the disk authentication for the replacement disk.
fcmsutil /dev/device_file replace_dsk –l disk_loop_ID
For example, if you are replacing the disk drive installed in bay 5 in an enclosure with an ID 2
attached to HBA td1, enter:
fcmsutil /dev/td1 replace_dsk -l 4B
IMPORTANT:
You must run the fcmsutil replace_dsk command on all HBAs that can access the disk drive.
CAUTION:
Spinning media can make the disk drive difficult to handle. To avoid damaging the disk drive, wait
approximately 30 seconds for the media to stop rotating before removing the drive from the enclosure.
To remove a disk drive:
1.
Push the ejector button (
-1) and pull the release lever (
-2) down to the full
open position.
2500 Disk System user guide
61