GF Signet 3719 pH_ORP Wet-Tap User Manual
Page 5
5
Signet 3719 pH/ORP Wet-Tap
1
2
3
4
OR
OR
Lubricate O-Rings
Lubricate O-Rings
2750
2760
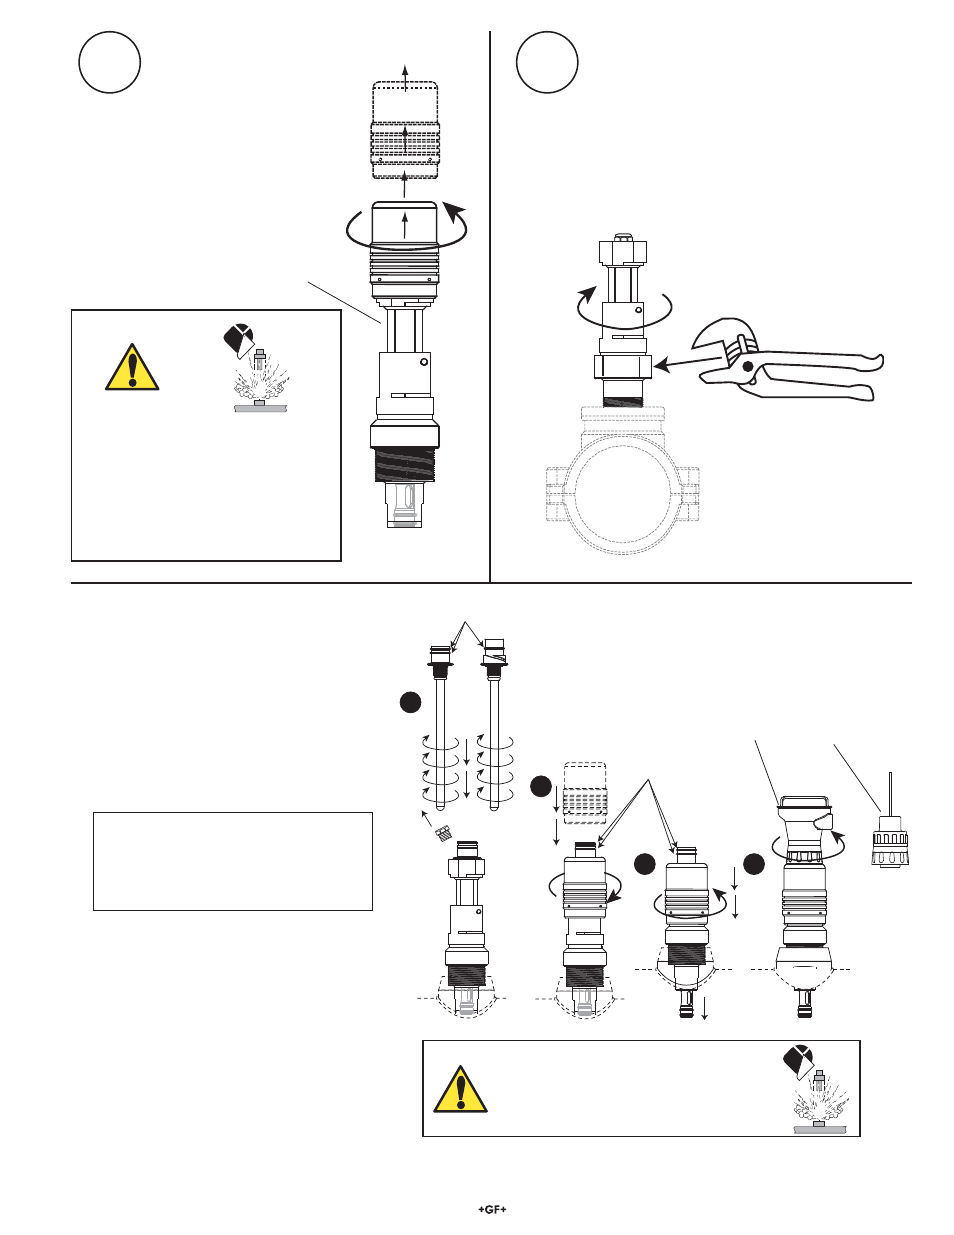
Turn the shroud
1
/
4
-turn counterclockwise
and lift it completely away from the
electrode piston.
•
Thread the Wet-Tap into the pipe fi tting.
•
Smaller pipes may require bracing to support the Wet-Tap
weight and the longitudinal forces required for operation.
•
Use an appropriate thread sealant to prevent leaks.
•
The piping system can now be safely pressurized.
•
Inspect the installation for leaks.
3
4
The electrode piston is locked in position
by SS locking pins.
DO NOT tamper with the locking pins!
If the piston is depressed with no
electrode installed, the pipe contents are
exposed.
Electrode Piston
5.5 Electrode
Installation
Before installation, lubricate O-rings with
a non-petroleum based, viscous lubricant
(grease) compatible with the system.
1. Remove the safety plug from top of
electrode piston. Slide electrode straight
down into electrode piston. Thread electrode
into place until connector shoulder is fl ush
with top of electrode piston. Hand tighten
only.
WARNING:
Do not fl ex the electrode when inserting
into the Wet-Tap assembly. The electrode
can be permanently damaged if it is fl exed
during installation.
2. Place the Locking Shroud over electrode;
turn ¼-turn clockwise to unlock the piston,
then press down fi rmly on the locking
shroud to lower the electrode piston into the
pipe.
3. Turn the shroud
1
/
4
-turn counterclockwise to
lock the piston.
4. Install the matching electronics assembly or
preamplifi er onto the electrode connector.
DO NOT ATTEMPT TO REMOVE THE
RETRACTION HOUSING FROM A
PRESSURIZED PIPING SYSTEM!