Memory presets menu, Advanced configuration menu, Operation – Extron Electronics FOX 500 DVI Tx User Guide User Manual
Page 23: Operation, cont’d
FOX 500 Tx/Rx • Operation
Operation, cont’d
3-8
FOX 500 Tx/Rx • Operation
3-9
Output Level submenu
Rotate either Adjust knob while in the Output Level
submenu to set the audio level for the output. The available
levels are CONS (consumer) line level (–10 dBV) and
PRO (professional) line level (+4 dBu).
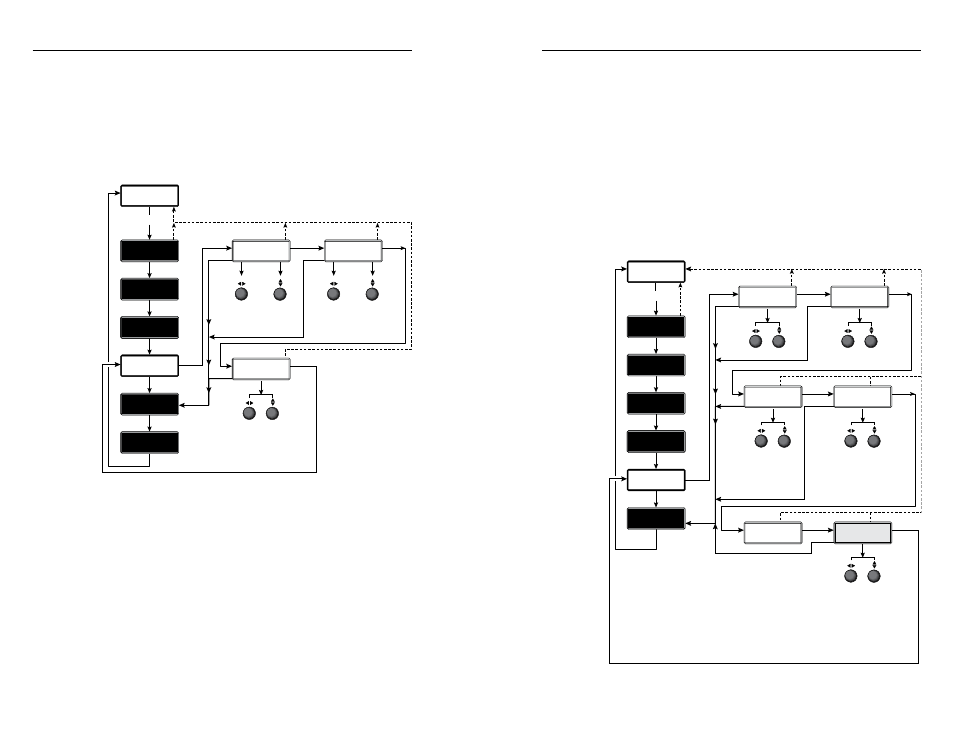
Memory Presets menu
Figure 3-6 is a flowchart that shows an overview of the Memory
Presets menu, its submenus, and the available settings.
ADVANCED
CONFIG
Menu
Menu
30 sec.
Menu
Next
Menu
Menu
Menu
AUDIO
CONFIG
MEMORY
PRESETS
30 sec.
RECALL
<
NA
>
29
30 sec.
CLR PRESETS
<
NO
>
YES
Next
Menu
Menu
SAVE
<
NA
>
30
Next
Next
OUTPUT
CONFIG
PICTURE
CONTROL
AUDIO
CONFIG
Menu
EXIT MENU
PRESS NEXT
Menu
Select N/A
or a preset
number.
Preset
number:
01 to 30.
Select N/A
or a preset
number.
Preset
number:
01 to 30.
FOX 500
nn.nk nnHz
Figure 3-6 — Memory Presets menu flowchart
Memory presets are saved values of the horizontal and vertical
position and sizing information in nonvolatile memory. When
the FOX 500 is powered down and later powered back up, the
settings are available for selection using the Save submenu (see
below). Saving the settings to a preset overwrites the settings
previously written to that preset.
Recall submenu
Rotate the Adjust [ knob while in the Recall submenu to select
(< >) either the displayed preset number (01 through 30) or N/A
(NA) for no preset. Press the Next button to recall the current
settings to the displayed preset. Select N/A and press the Next
button to exit the submenu without recalling the settings.
Save submenu
Rotate the Adjust [ knob while in the Save submenu to select
(< >) either the displayed preset number (01 through 30) or N/A
(NA) for no preset. Press the Next button to save the current
settings. Select N/A and press the Next button to exit the
submenu without saving the settings.
Clear Presets submenu
Rotate either Adjust knob to select (< >) Yes and press the Next
button to erase all presets. Select No and press Next to exit the
submenu without clearing the presets.
Advanced Configuration menu
Figure 3-7 is a flowchart that shows an overview of the Advanced
Configuration menu, its submenus, and the available settings.
Next
AUDIO
CONFIG
Menu
Menu
30 sec.
Menu
Next
Menu
Menu
Menu
ADVANCED
CONFIG
30 sec.
AUTO MEMORY
<
OFF
>
ON
30 sec.
Next
Menu
Menu
AUTO IMAGE
TRIGGER
Next
Menu
Menu
Next
Next
OUTPUT
CONFIG
PICTURE
CONTROL
Menu
EXIT MENU
PRESS NEXT
Menu
• None
• Color Bars
• Grayscale
• Alt. Pixels
• 1920 x 1200 • 1600 x 1200
• 800 x 600
• 480p
• 1024 x 768 • 576p
• 1280 x 768 • 720p
• 1280 x 1024 • 1080i
• 1365 x 768 • 1080p
• 1366 x 768 • 640 x 480
• 1400 x 1050
MEMORY
PRESETS
FOX 500D
nn.nk nnHz
* This submenu is available only when
both of the following are true:
• The receiver is connected to a
FOX 500 DVI transmitter,
AND
• Both fiber cables are installed
between the transmitter and receiver.
This submenu is for display only (the
resolution cannot be changed) if the
rear panel DDC Resolution rotary
switch is in a position other than 1.
TEST PATTERN
NONE
Next
INT. TEMP
104° 40C
• Enable
• Disable
Turn to trigger
LINK#2
ENABLE
DDC RESOL
xxxx*xxxx@60
*
Figure 3-7 — Advanced Configuration menu flowchart