Panel descriptions, Top panel – Roland E-A7 61 Key Expandable Arranger Keyboard User Manual
Page 6
6
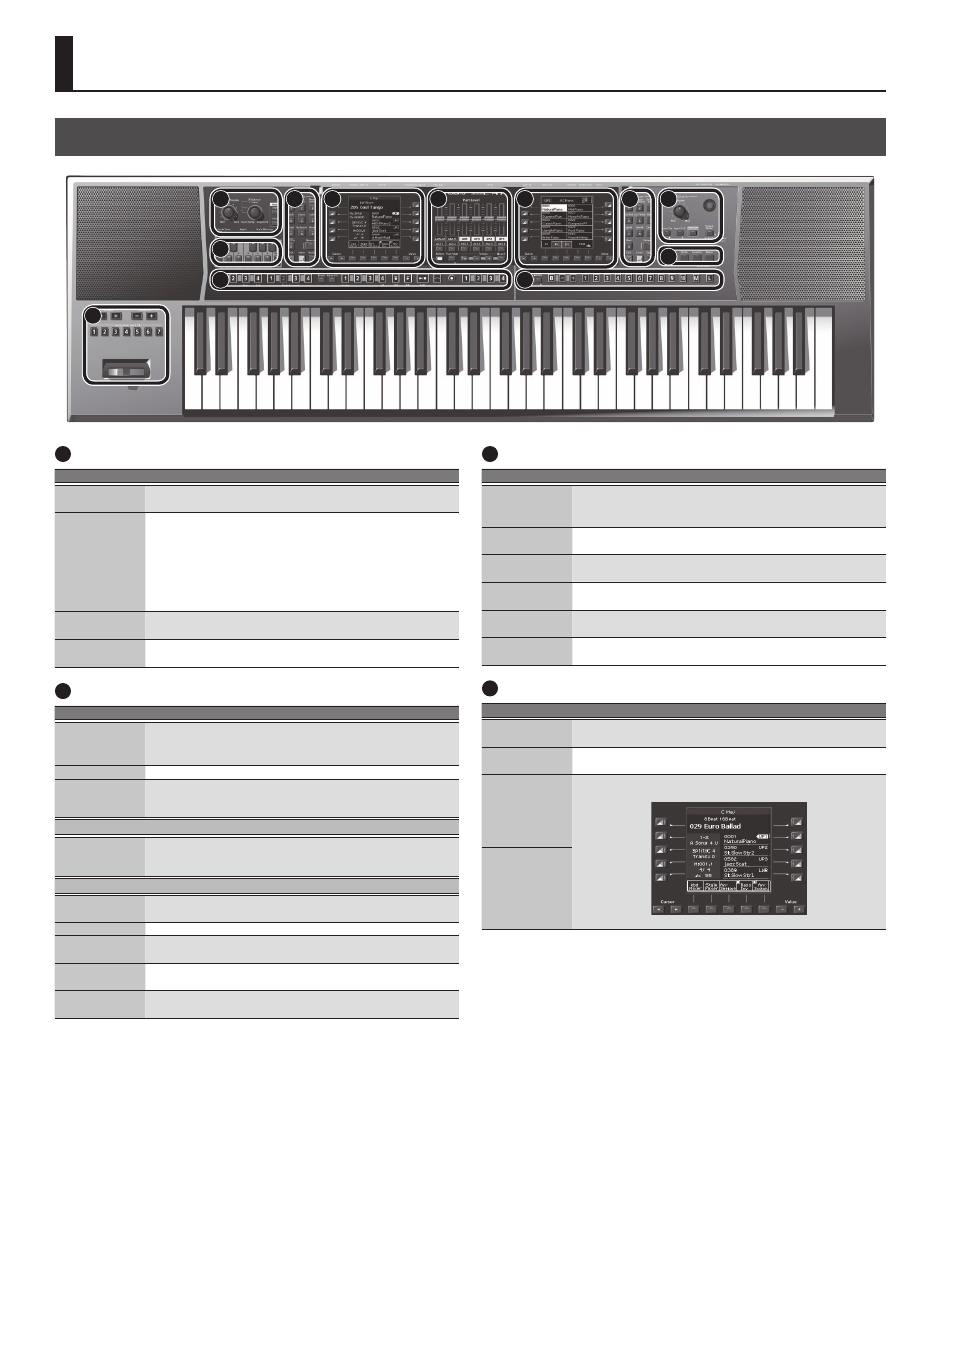
Panel Descriptions
1
Master Volume/ Balance
Controller
Explanation
[Master Volume]
knob
Adjusts the overall volume (the sound that is output from the
speakers and the PHONES/OUTPUT jacks).
[Balance/Value]
knob
Press this knob to switch it between the Balance function (lit) and
the Value function (unlit).
Balance function (lit):
This knob adjusts the volume balance between your keyboard
performance and the backing performance (e.g., Style or Song).
Value function (unlit):
This knob edits the value in the right screen, left screen or tempo.
Mode
[Style]
button
Selects Style mode.
If Style mode is selected, the button is lit (Style Mode).
Mode
[Song]
button
Selects Song mode.
If Song mode is selected, the button is lit (Song Mode).
2
Scale Tune/Pad, Keyboard Buttons
Controller
Explanation
[Scale Tune/Pad]
button
Switches the function of the keyboard buttons.
Scale Tune function (lit)
Pad function (unlit)
[Equal]
button
Sets the Scale Tune to equal temperament.
Scale Memory
[
I ]
–
[III]
buttons
Sets the Scale Tune to
“Scale Memory I–III.”
* Long-press this button to save the Scale Tune settings that are specified
for the keyboard buttons.
Scale Tune (PDF)
Keyboard
buttons
You can use the keyboard buttons to edit the Scale Tuning as
desired.
* Long-press these buttons to access the Scale Tune edit screen.
Pad (p. 36)
Pad
[1]
–
[6]
buttons
These play phrases or sound effects (p. 36).
Pad
[Stop]
button
Stops the sound of all Pads.
Pad
[View]
button
This lets you audition the phrases or sound effects that are
assigned to the pads.
Pad
[Setting]
button
Accesses the setting screen for each pad.
Pad
[Sync Start]
button
Turns on/off the setting (Sync Start) that makes the pads play in
synchronization with the start of a style or song.
3
Style
Controller
Explanation
Style
[0]
–
[9]
buttons
Use these buttons to select the Style category (p. 22).
When you press a button, the styles included in that category are
displayed.
Style
[User]
button
Press this button to select the user styles.
Left side
[Numeric]
button
After pressing this button, you can use the Style
[0]
–
[9]
buttons to
enter a numeric value (p. 14).
Left side
[Exit]
button
Returns to the next higher level of screen (left screen).
* Long-press this button to return to the main screen.
Left side
[Enter]
button
Use this button to confirm a value or execute an operation (left
screen).
Left side
[Option]
button
Displays a context menu for the page that is currently open in the
left screen.
4
Left Display
Controller
Explanation
Left side Cursor
[
K
]
[
J
]
buttons
Move the cursor position (left screen).
Left side Value
[-]
[+]
buttons
Edit the parameter value at the cursor location (left screen).
Left side direct
buttons (
[L1]
–
[L5]
[R1]
–
[R5]
buttons)
These buttons are assigned to the items or functions shown in the
screen.
[L1]
[F1]
[R1]
[L2]
[F2]
[R2]
[L4]
[F4]
[R4]
[L3]
[F3]
[R3]
[L5]
[F5]
[R5]
Left side function
buttons (
[F1]
–
[F5]
buttons)
Top Panel
6
7
8
9
10
11
12
4
1
2
5
3
For details on each functions, refer to
“Reference Manual (English)”
(PDF).