Sampling, Importing samples, Sample editing – Roland E-A7 61 Key Expandable Arranger Keyboard User Manual
Page 29: Een (p. 29, P. 29), Creating sounds, Input level meter
29
Creating Sounds
Sampling
1.
Press the
[Sampling]
button.
The Sampling Menu screen appears (you can also access this via the
Menu).
2.
Press the
[L1]
(Sampling) button.
The Sampling Stanby screen appears.
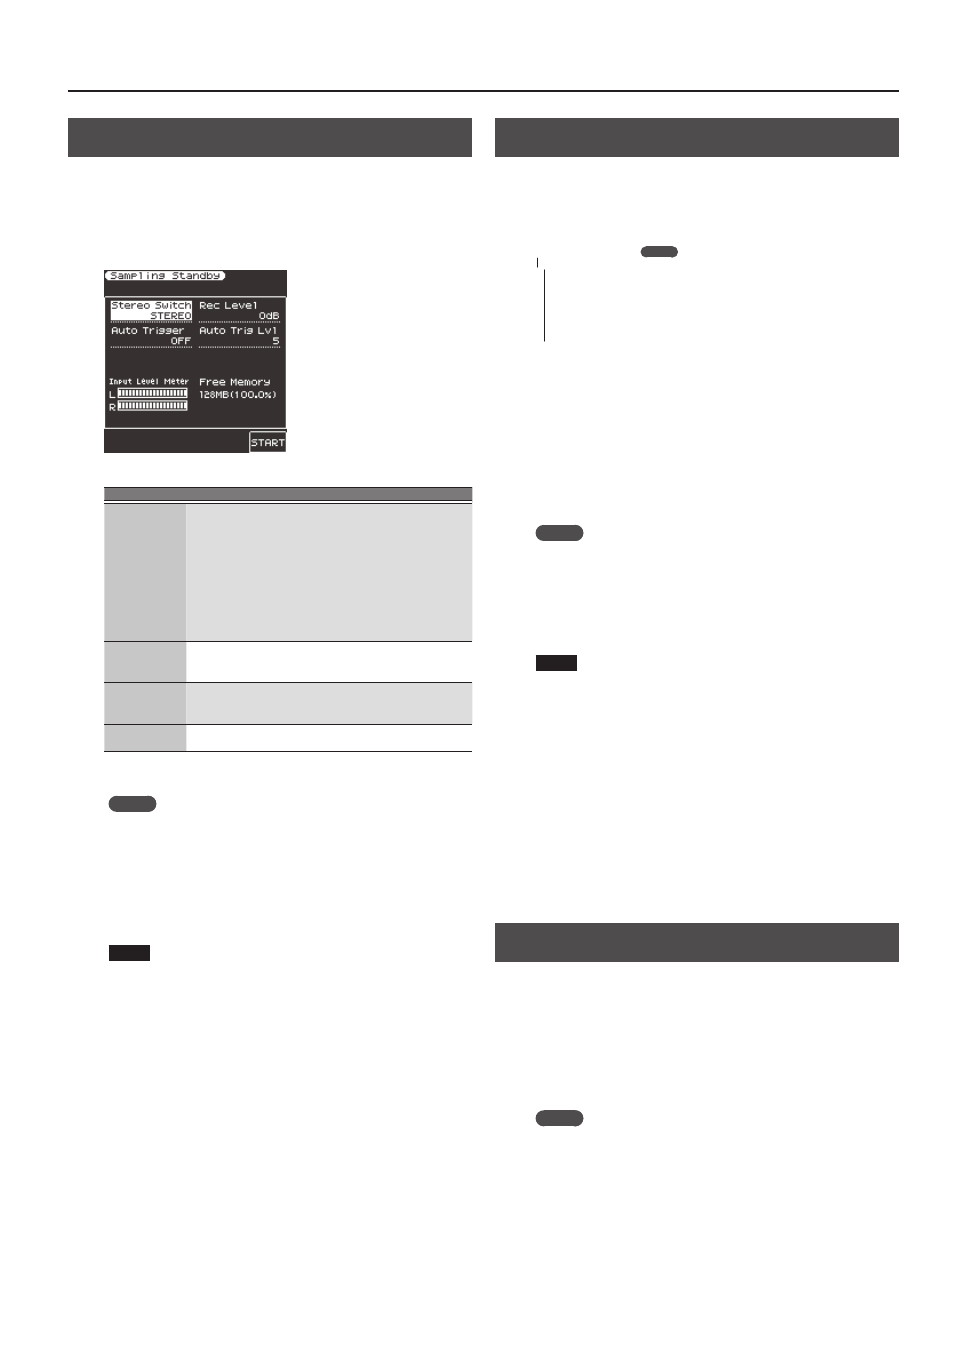
Input Level Meter
The input level is shown. Use the
input volume to adjust the input
level so that the sound does not
distort.
Free memory capacity
The display shows the amount of
free memory in which samples can
be saved. If the memory capacity is
used up during sampling, sampling
ends.
Parameter
Value
Explanation
Stereo Switch
Mono, Stereo
Specify whether sampling is done in stereo
or monaural.
Mono sampling takes only half the amount
of memory.
MONO:
The sound is sampled as a single
waveform. The left and right
channels of stereo sound are
mixed.
STEREO:
The sound is sampled as two
waveforms, L and R.
Auto Trigger
ON, OFF
If Auto Trigger is ON, sampling starts
automatically when sound input is
detected.
Auto Trig Level
1–10
If Auto Trig is ON, specify the volume at
which sampling starts.
0–7 (0 is the minimum)
Rec Level
-24, -18, -12, -6,
+0 dB
Rec level
3.
Press the
[F5]
(Start) button to start sampling.
MEMO
5
If Auto Trigger is ON, sampling starts automatically when input is
detected.
5
Depending on the Auto Trigger Level setting, the beginning of
the sound might be cut off. In this case, lower the Auto Trigger
Level setting.
4.
Press the
[F5]
(Stop) button to stop sampling.
The Sample Edit screen appears (p. 29).
NOTE
5
The sampled data is discarded if you select another sample
without saving the sampled data. Be sure to save important
samples.
5
When you compare the original sampled or imported sound
to the sound that’s played back by the E-A7, you may notice a
difference in the character of the sound.
This is due to the settings of the E-A7; the character of the sound
may be affected by settings such as the effect settings of each
part, or the compressor and EQ settings of the Mastering Tools.
Importing Samples
Audio files (WAV format, 44.1 kHz/16-bit only) can be imported from
a USB flash drive into the E-A7.
1.
Place the audio files on your USB flash drive in the
following folder structure.
MEMO
Create a folder named
“IMPORT”
and place the files to be
imported in that folder.
If you use the E-A7 to format a USB flash drive, an
“IMPORT”
folder
is created.
(Raiz)
– IMPORT
– TEST1.wav
– TEST2.wav
– TEST3.wav
– TEST4.wav
– TEST5.wav
2.
Connect the USB flash drive to the E-A7.
3.
Press the
[Sampling]
button.
The Sampling Menu screen appears (you can also access this via the
Menu).
4.
Press the
[L2]
(Sample Import) button.
The audio files inside the IMPORT folder are listed.
5.
Use the direct buttons to select the file that you want to
import.
MEMO
You can select multiple files.
If you select
[F1]
(Select All), all of the files are selected. Press the
button again to clear the selection of all files.
6.
Press the
[Enter]
button.
The E-A7 imports the selected file(s). When import is completed, the
Sample List screen appears.
NOTE
5
Import may take several minutes if you’re importing multiple files
or if the file size is large. Never turn off the power while the screen
indicates
“Executing...”
5
Import is not possible if sample memory is full.
5
If there is insufficient free memory for Sample Import, a message
asks whether you want to Optimize.
5
When you compare the original sampled or imported sound
to the sound that’s played back by the E-A7, you may notice a
difference in the character of the sound.
This is due to the settings of the E-A7; the character of the sound
may be affected by settings such as the effect settings of each
part, or the compressor and EQ settings of the Mastering Tools.
5
In order for an imported sound to be played from the keyboard, it
must first be edited.
Sample Editing
1.
Press the
[Sampling]
button.
The Sampling Menu screen appears (you can also access this via the
Menu).
2.
Press the
[R1]
(Sample List) button.
The Sample List screen appears.
3.
Use the direct buttons to select the sample that you
want to edit.
MEMO
By using the direct buttons to select a sample and pressing the
[F3]
(Preview) button, you can audition that sample.
4.
Press the
[Option]
button.
The Sample Option screen appears.
5.
Use the direct buttons to select
“Edit.”