Balance/value] knob, Adjusting the volume balance between the keyboard, Parts and the style/song – Roland E-A7 61 Key Expandable Arranger Keyboard User Manual
Page 15: Button functions, Basic operation of the e-a7
15
Basic Operation of the E-A7
[Balance/Value] knob
The
[Balance/Value]
knob has the two functions of Balance and
Value.
These functions alternate each time you press the
[Balance/Value]
knob.
MEMO
If the Balance function is active, the LED at the left of the
[Balance/Value]
knob is lit.
Adjusting the Volume Balance Between the
Keyboard Parts and the Style/Song
1.
Make sure that the Balance LED beside the
[Balance/
Value]
knob is lit.
If it’s not lit, press the
[Balance/Value]
knob once.
2.
Turn the
[Balance/Value]
knob.
The Balance screen opens.
You can view the current setting while you adjust it.
MEMO
After a time, the screen closes automatically.
Using the Knob for the Value [-] [+] Button and
Tempo [-] [+] Button Functions
When using the Value
[-]
[+]
buttons to edit a value in a parameter
screen or an edit screen, you can also use this knob to edit the value.
When the Tempo screen is open, you can use the knob to change the
tempo.
1.
Make sure that the Balance LED beside the
[Balance/
Value]
knob is unlit.
If it’s lit, press the
[Balance/Value]
knob once.
2.
Turn the
[Balance/Value]
knob.
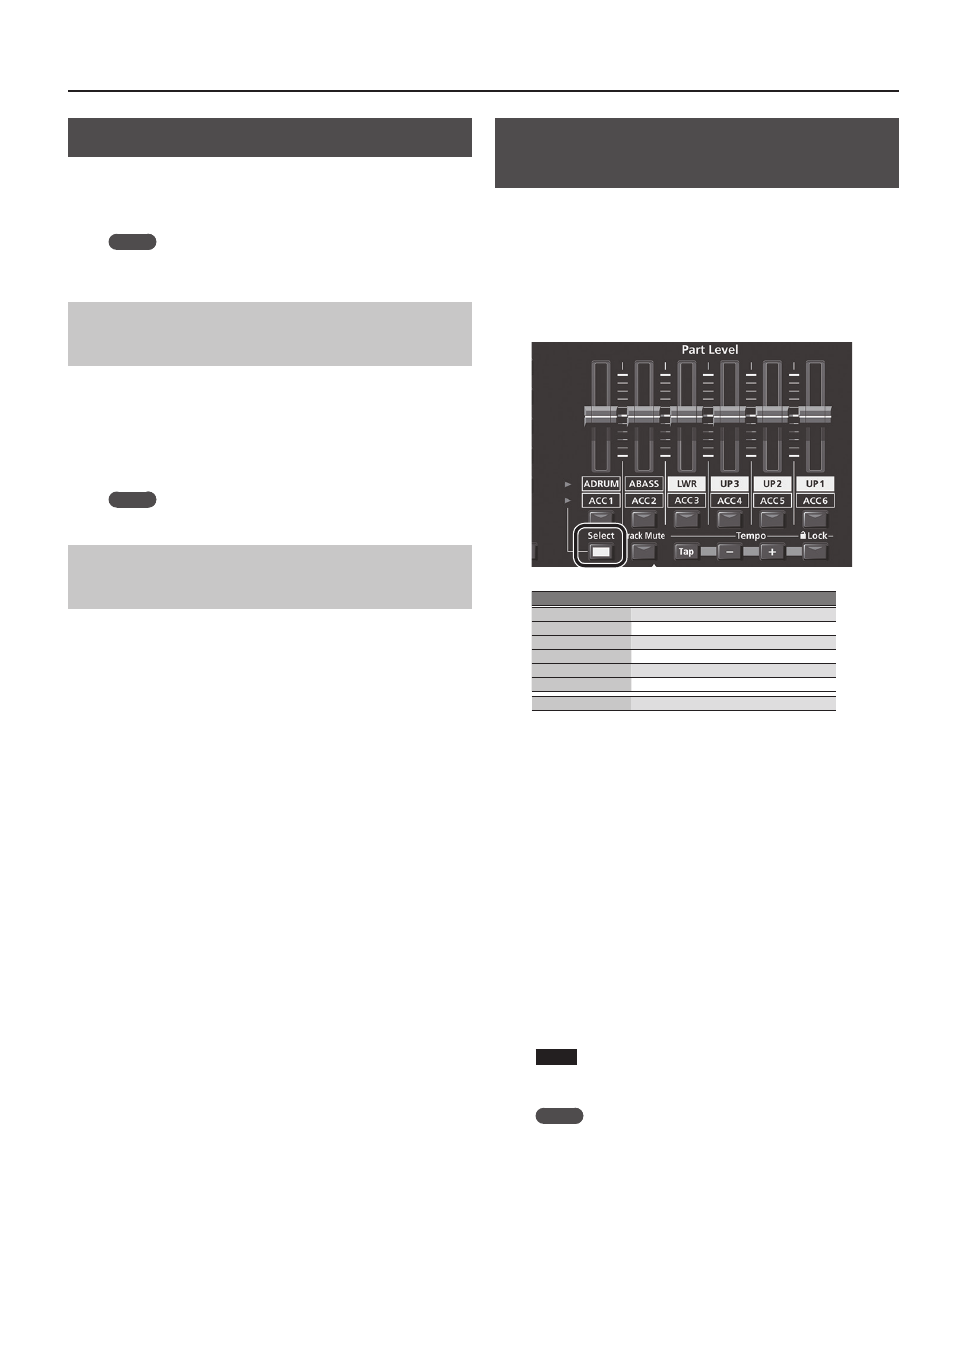
Adjusting the Volume of Keyboard Parts
and Style Parts
If the volume of the Style or song is too loud or too soft in
comparison to your performance, you can adjust the volume balance
as follows.
You can use the Part Level sliders to easily adjust the volume of each
keyboard part and style part.
1.
Each time you press the
[Select]
button, the parts
assigned to the sliders and buttons will change in the
following combinations.
Button
Part
[A DRUM]
Accompaniment drum part
[A BASS]
Accompaniment bass part
[LWR]
Keyboard lower part
[UP3]
Keyboard upper 3 part
[UP2]
Keyboard upper 2 part
[UP1]
Keyboard upper 1 part
[ACC1]
–
[ACC6]
Accompaniment part 1–6
2.
Move the slider for each part.
5
Moving the
[UP1]
[UP2]
[UP3]
or
[LWR]
sliders adjusts the
volume of the corresponding Keyboard Part.
5
Moving the
[A BASS]
slider adjusts the volume of the Style
performance’s Bass part.
5
Moving the
[A DRUM]
slider adjusts the volume of the Style
performance’s Drum part.
5
Moving the
[ACC1]
–
[ACC6]
sliders adjusts the volume of the Style
performance’s ACC1–6 parts.
3.
Turn each part’s button on/off.
5
Pressing the
[UP1]
[UP2]
[UP3]
or
[LWR]
buttons turns the
corresponding Keyboard Part on/off.
5
Pressing the
[A BASS]
button turns the Style performance’s Bass
part on/off.
5
Pressing the
[A DRUM]
button turns the Style performance’s
Drum part on/off.
5
Pressing the
[ACC1]
–
[ACC6]
buttons turns each of the Style
performance’s ACC1–6 parts on/off.
NOTE
You can’t use the Style Part
[A DRUM]
[A BASS]
and
[ACC1]
–
[ACC6]
sliders or buttons while a song is selected.
MEMO
5
You can also make this setting in the Mixer screen.
&
Keyboard Part (p. 18)
&
Style Part (p. 23)
5
Slider settings are remembered even if you switch styles or One
Touch. They are reset if you switch the UPG.