Changing the split point, Specifying lower hold, Transposing your performance (transpose) – Roland E-A7 61 Key Expandable Arranger Keyboard User Manual
Page 18: Volume, Ion (p. 18), Using the part level sliders/buttons, Using the mixer screen, Performing
18
Performing
Turning Each Keyboard Part On/Off and
Adjusting the Volume
Using the Part Level Sliders/Buttons
&
“Adjusting the Volume of Keyboard Parts and Style Parts”
Using the Mixer Screen
If you display the Keyboard Part Mixer screen, you will also be able
to adjust the
“Reverb Send,”
“Chorus Send,”
and
“Panpot”
of the
Keyboard Parts (UP1, UP2, UP3, LWR) as well as the
“Volume”
and
“Part Switch.”
1.
Display the Main screen.
2.
Press the
[F1]
(Keyboard Part Mixer) button.
The Keyboard Part Mixer screen appears.
3.
Use the Cursor
[
K
]
[
J
]
buttons or the direct buttons to
navigate to the parameter that you want to edit.
4.
Use the Value
[-]
[+]
buttons to edit the value.
For details on the parameters that you can edit, refer to the reference
manual.
MEMO
5
You can also edit the setting by
[Menu]
0
“User Program Edit”
0
“Keyboard Part Mixer.”
5
These parameters are saved in the UPG.
&
“Saving Settings as a User Program”
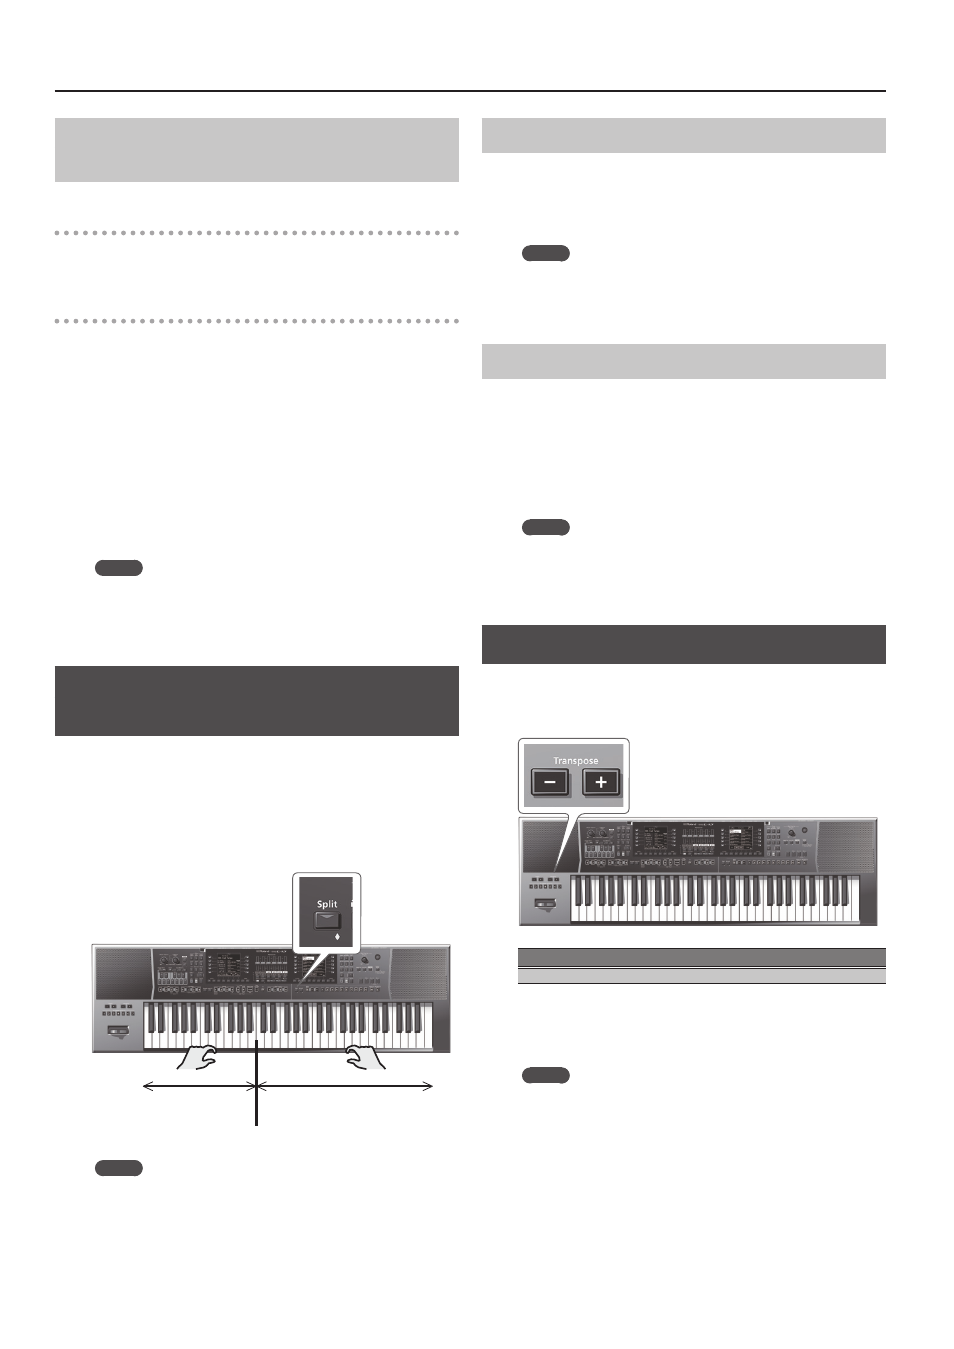
Playing Different Tones in the Right and
Left Hands (Split)
1.
Press the
[Split]
button.
The
[Split]
button lights, and the keyboard is divided at middle C
(C4) into left and right areas.
Use the left-hand area to specify the chord for Style performance, or
to play the tone of the Lower part.
Use the right-hand area to play a melody using the tone of the
Upper1, Upper2, and Upper3 part.
C4
(Factory setting)
Lower
Upper
Split point
MEMO
When you choose the Split setting, the Arranger Setting
“Type”
parameter is automatically set to
“Intelligent.”
Changing the Split Point
You can change the keyboard split point.
1.
Long-press the
[SPLIT]
button.
The Split setting screen appears.
2.
Use the Value
[-]
[+]
buttons to specify the split point.
MEMO
5
You can also specify the split point by pressing a note on the
keyboard.
5
You can also make this setting by
[Menu]
0
“User Program
Edit”
0
“Split.”
Specifying Lower Hold
This function makes the lower note continue sounding until you
press a different key in the left-hand keyboard area.
This function is enabled only if the
[Split]
button is lit.
1.
Long-press the
[SPLIT]
button.
The Split setting screen appears.
2.
Press the function button that corresponds to Lower
Hold; a check mark appears in the check box.
MEMO
5
You can also make this setting by
[Menu]
0
“User Program
Edit”
0
“Split.”
5
This parameter is saved in the UPG.
&
“Saving Settings as a User Program”
Transposing Your Performance (Transpose)
You can transpose the keyboard in semitone steps.
1.
Use the Transpose
[-]
[+]
buttons to specify the desired
key.
Value
-6–0–+5 (semitone steps)
If you’ve specified a key other than
“0,”
the Transpose
[-]
[+]
button
indicator is lit.
The Transpose screen disappears after several seconds. If you want to
close the screen immediately, press the
[Exit]
button.
MEMO
5
If you press both Transpose
[-]
[+]
buttons simultaneously, the
value returns to 0.
5
If you transpose the keyboard part, the Style that’s playing is also
transposed in the same way.
5
You can select or clear the function button
“Song”
and
“Keyboard”
check boxes to specify what is affected by
transposition, for example transposing only the song or only the
keyboard.
5
The transpose setting is saved in the UPG.
&