On the lcd, Chapter 7 –basic moves – Teac SX-1 Quick Start Guide User Manual
Page 31
Chapter 7 –Basic Moves
TASCAM SX-1
Quick Start Guide
31
NOTE
You are doing this so that you can monitor the signal
off the HDR’s output. Leaving Channel 1 feeding the L/R
bus, at the same time that it is feeding the input to a
Take that is record-enabled, will result in phasing of the
signal. Phasing is a time-delay related anomaly that
results when a signal from a source arrives at the listen-
ing position from two different distances (causing some
frequencies to cancel each other out). It is a nasty,
unpleasant-sounding thing in most cases…
8
Navigate back to the
Track
screen.
9
Record-enable your Take; either by pressing
the
button to the left of the
icon, or
by pressing the
REC
arm key for channel 17
on the surface.
10
Bring up fader 17 (which is HDR 1 return) to
unity (
0
).
11
Adjust the level using the analog input
GAIN
knob on the top panel of the SX-1.
12
Press
PLAY
and
RECORD
, and make some
recordable sounds with your sound source.
13
After a few seconds, press
STOP
and you
should see the waveform appear on
Audio Test
.
On the LCD
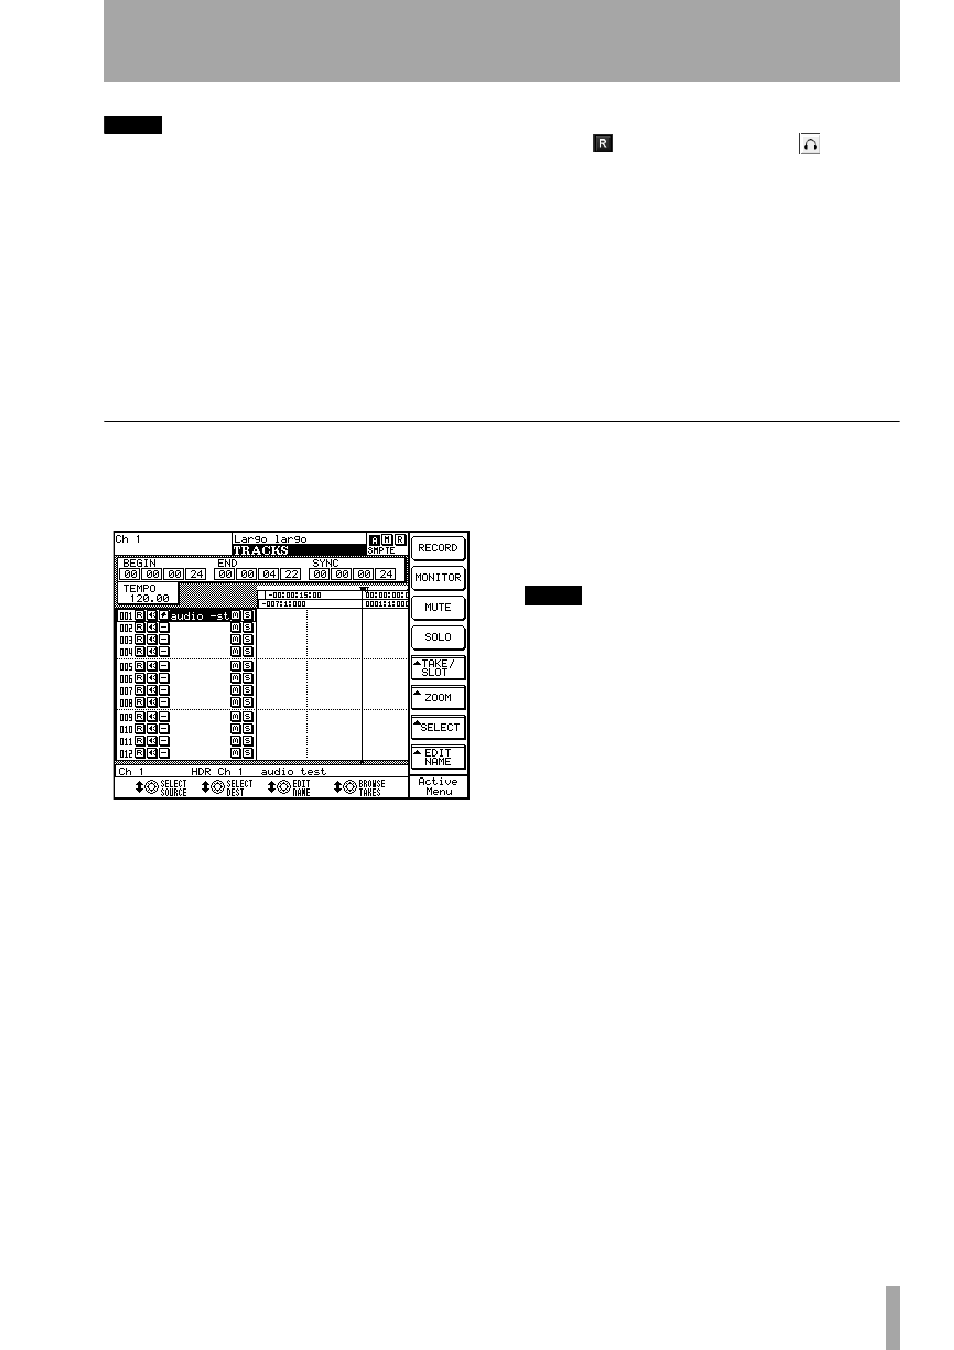
1
On the
TRACKS
page, press the
Take/Slot
soft
key, and select
New Audio Take
from the menu
that appears.
2
Press the
EDIT NAME
key (bottom right), and
using the same principles you learned in
naming a project, name this Take
Audio Test
.
3
If you want to change (or simply verify) the
input or the output of the Take, you can use
the
Select Source
and
Select Dest
soft knobs to see
what is currently selected for each, and to
change the setting if you wish.
4
Press the
1–16
key on the
FADER BANKS
sec-
tion of the slanted front panel, and then press
and hold the
SELECT
key for channel 1 on
the surface. The LCD view should then auto-
matically change to the
CHANNEL
page (you
have just selected channel 1 for viewing).
5
Bring up fader 1 (analog input 1) to unity (
0
).
6
Press the
BUSS ASSIGN
button (bottom right)
and then the
ST
button from the menu that
appears. This removes Channel 1’s output
from the L/R bus.
NOTE
You are doing this so that you can monitor the signal
off the HDR’s output. Leaving Channel 1 feeding the L/R
bus, at the same time that it is feeding the input to a
Take that is record-enabled, will result in phasing of the
signal—a messy, undesirable business.
7
Press the
TRACK
screen key again, and
record arm your audio Take; either by select-
ing the Take on the
Track
screen (highlighting
it) and then pressing the
RECORD
button (top
right of the screen), or by selecting the 17–32
fader bank and pressing the
REC
arm key for
channel 17 on the surface.
8
Bring up fader 17 (which is HDR 1 return) to
unity (
0
).
9
Adjust the level using the analog input
GAIN
knob on the top panel of the SX-1.
10
Press
PLAY
and
RECORD
, and make some
recordable sounds with your sound source.
11
After a few seconds, press
STOP
and you
should see the waveform appear on
Audio Test
.