Loading tabs/stamps – Rena T-950 User Manual
Page 25
SETUP & OPERATION
19
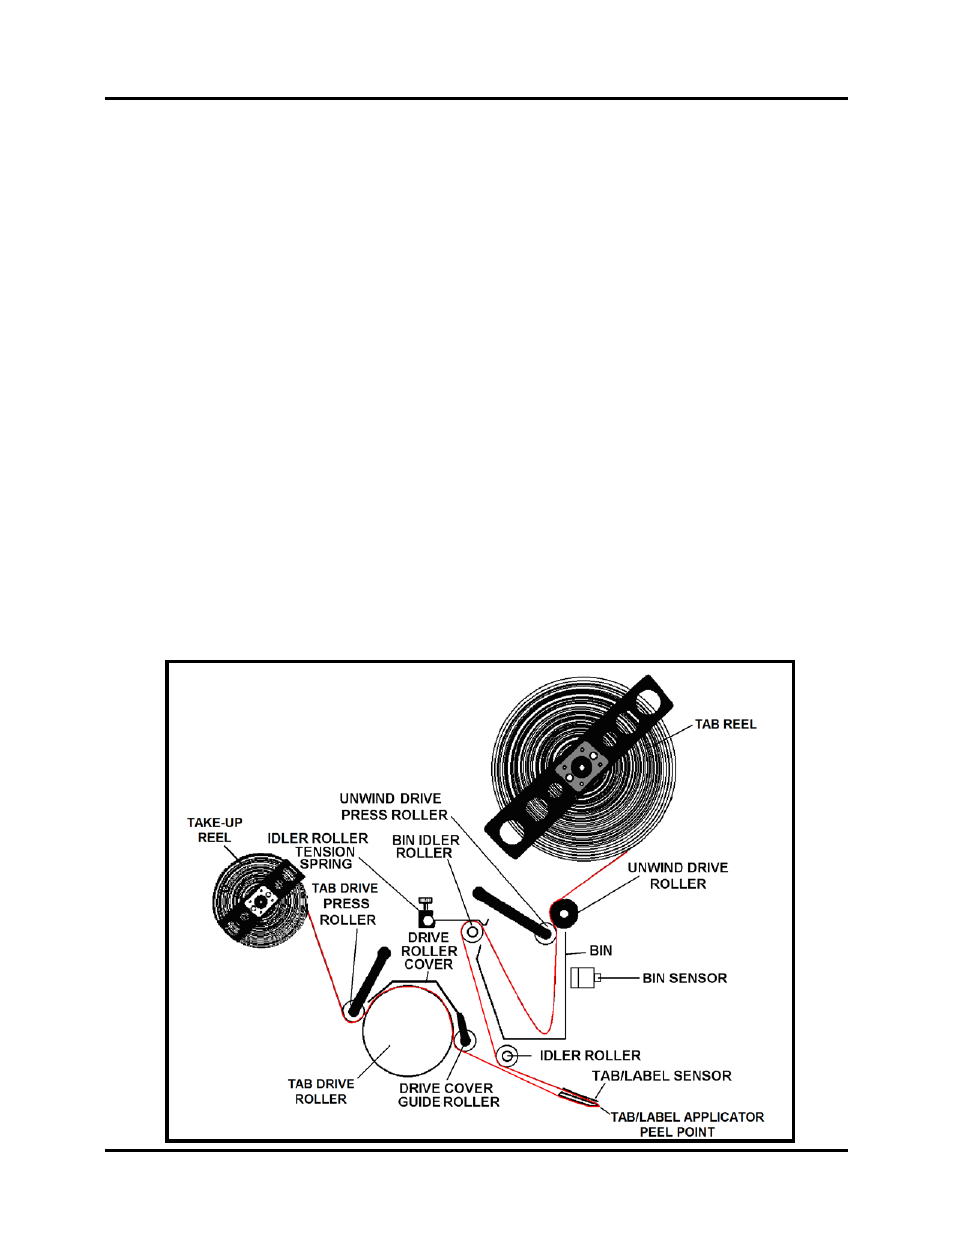
Loading Tabs/Stamps
1. Unscrew and remove the black “Rubber End Cap” from the end of the Tab Reel shaft.
2. Remove the Tab Reel Side Guide
3. Install the tab roll with the tabs unwinding face up from the right side of the roll.
Tip: To keep the tab reel from unwinding by itself; press the tab roll snuggly against the wall of the Tab
Reel frame. This will add a little resistance to the rotation of the tab reel when the brake is not engaged.
4. Re-install the Tab Reel Side Guide and press it snuggly against the tab roll.
5. Re-install the black “Rubber End Cap” to the end of the Tab Reel shaft. This rubber end cap helps protect
the user from accidental injury, due to contact with the end of this shaft.
6. Remove approximately 30 tabs from the roll to create a leader.
7. Release the Unwind Drive Press Roller by rotating the knob.
8. Thread the leader over the Unwind Drive Roller.
9. Engage the Unwind Drive Press Roller so that it contacts the Unwind Drive Roller.
10. Thread the leader into the Bin then over the Bin Idler Roller.
11. Adjust the Idler Roller Tension Spring so that it lightly touches the tab backing.
12. Continue threading the leader under the Idler Roller then through the slot in the Tab/Label Applicator
Head. This device contains the Tab Sensor and provides the peel point for dispensing tabs/stamps/labels.
13. Bring the leader back up and under the Idler Roller.
14. Lift the Drive Roller Cover.
15. Release the Tab Drive Press Roller.
Then thread the leader under the Drive Cover Guide Roller, over the
Drive Roller and under the Drive Press Roller.
16. Close the Drive Roller Cover.
17. Engage the Tab Drive Press Roller so it contact with the Tab Drive Roller
18. Remove the Take-up Reel Side Guide.
19. Thread the leader through the pins on the Take-up Reel, and then replace the Side Guide.
20. Make sure that the Web Guides, located on the Idler Rollers, are adjusted so they lightly contact the side of
the tab/label backing, in order to hold the backing web close to the frame of the Head Assembly.
21. To program the job, refer to the “Programming the Job” instructions in this manual.