Step 3, Français stade 3. fixation de l’aile, Deutsch schritt 3. anbringen der tragfläche – ParkZone PKZ1570 User Manual
Page 8
7
Step 3
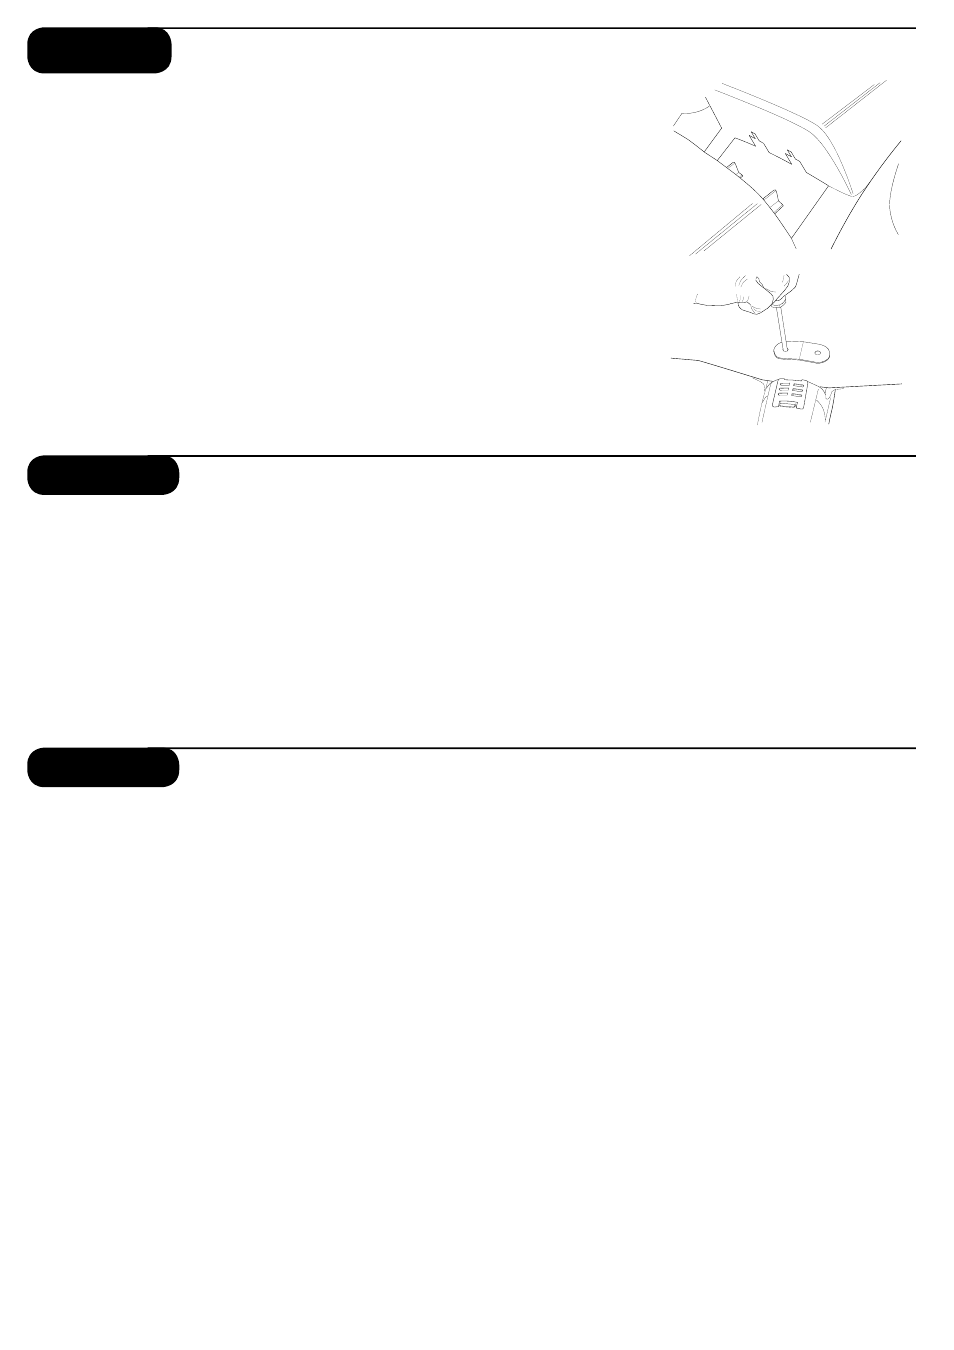
Attaching the Wing
In order to attach the wing of your P-51D, please follow these simple instructions:
1. Locate the two wing securing screws in the box.
2. Turn over the fuselage so you are looking at the bottom.
Do the same with the wing (also silver side).
3. Carefully mate the aileron extension from the receiver to the lead coming from the wing.
The plug is polarized to fit one way.
Note: The aileron extension includes servo reversing so if this is not attached correctly, or if
the extension is not used, the ailerons will be backwards when transmitter input is given.
Always check this function prior to each flight.
4. Carefully slide the two points of belly scoop on the trailing edge of the wing into the two notches
inside the rear of the fuselage.
5. Slide the joined aileron extension inside the fuselage so that it will not become pinched in between
the wing and fuselage when securing the wing.
6. Slide the bottom of the leading edge of the wing into the fuselage as shown, making certain it is
perfectly centered. This must be done correctly in order to allow the two screws to thread into the
fuselage. Once you are certain the wing is centered, tighten the two screws to secure the wing.
7. The wing is correctly installed when no gap exists between wing and fillet.
Français
Stade 3. Fixation de l’aile
Pour fixer l’aile de votre P-51D, suivre les instructions ci-dessous:
1. Préparer les 2 vis de fixation de l’aile.
2. Mettre le fuselage à l’envers et approcher l’aile qui doit également
être à l’envers (côté argent visible).
3. Connecter le câble provenant du récepteur au câble de commande
des ailerons qui sort de l’aile. Un détrompeur empêche une
mauvaise connexion.
Note: Le câble d’extension comporte un reverse servo, si ce câble est
mal ou pas connecté, les ailerons ne fonctionneront pas correctement.
Toujours vérifier le fonctionnement des gouvernes avant chaque vol.
Deutsch
Schritt 3. Anbringen der Tragfläche
4. Insérer le bord de fuite de l’aile dans son logement à l’arrière
du fuselage.
5. Glisser le câble d’extension des ailerons dans le fuselage et vérifier
qu’il ne soit pas pincé entre l’aile et le fuselage.
6. Placer le bord d’attaque de l’aile dans le fuselage comme indiqué
en vérifiant qu’il est parfaitement centré. Ceci doit permettre de
pouvoir insérer les vis de fixation dans le fuselage. Quand l’aile est
correctement alignée, visser les deux vis de fixation.
7. Quand l’aile est en place, il ne doit pas y avoir d’espace entre l’aile
et le carénage.
Um die Tragfläche Ihrer P51D zu montieren, gehen
Sie bitte wie folgt vor:
1. Suchen Sie die beiden Tragflächenbefestigungsschrauben.
2. Drehen Sie den Rumpf auf den Rücken. Machen Sie dasselbe mit
der Tragfläche.
3. Stecken Sie das Kabel für die Querruder in die Buchse, die vom
Empfänger kommt.
Hinweis: Die Querruderverlängerung enthält auch eine Servoumkehr.
Wenn sie nicht richtig montiert ist oder nicht verwendet wird, laufen
die Servos in die falsche Richtung. Prüfen Sie die Funktion bitte vor
jedem Flug.
4. Schieben Sie die beiden Nasen an der Lufthaube innen in die im
Rumpf vorhandenen Vertiefungen des Rumpfes.
5. Schieben Sie das Servokabel in den Rumpf, so dass es nicht
zwischen Rumpf und Tragfläche eingeklemmt wird.
6. Schieben Sie die Tragfläche in den Rumpf. Stellen Sie sicher,
dass die Fläche zentriert ist. Nur in dieser Stellung lassen sich die
Schrauben einschrauben. Schrauben Sie die Tragfläche fest.
7. Die Tragfläche ist dann korrekt installiert, wenn keine Lücken
zwischen Tragfläche und Rumpf vorhanden sind.