If the key switch doesn’t shut off the engine, Storing your tiller – Troy-Bilt 8 HP User Manual
Page 62
Attention! The text in this document has been recognized automatically. To view the original document, you can use the "Original mode".
If the key switch doesn’t shut
off the engine
There are tw o w ays to stop the
engine on your electric start tiller:
1. M ove the throttle lever on the
handlebar to the “S TO P position.
2. Turn the key sw itch to the “O FF”
position.
B oth m ethods stop the engine
by grounding out the ignition sys
tem . If the key sw itch doesn’t w ork,
here’s w hat to do:
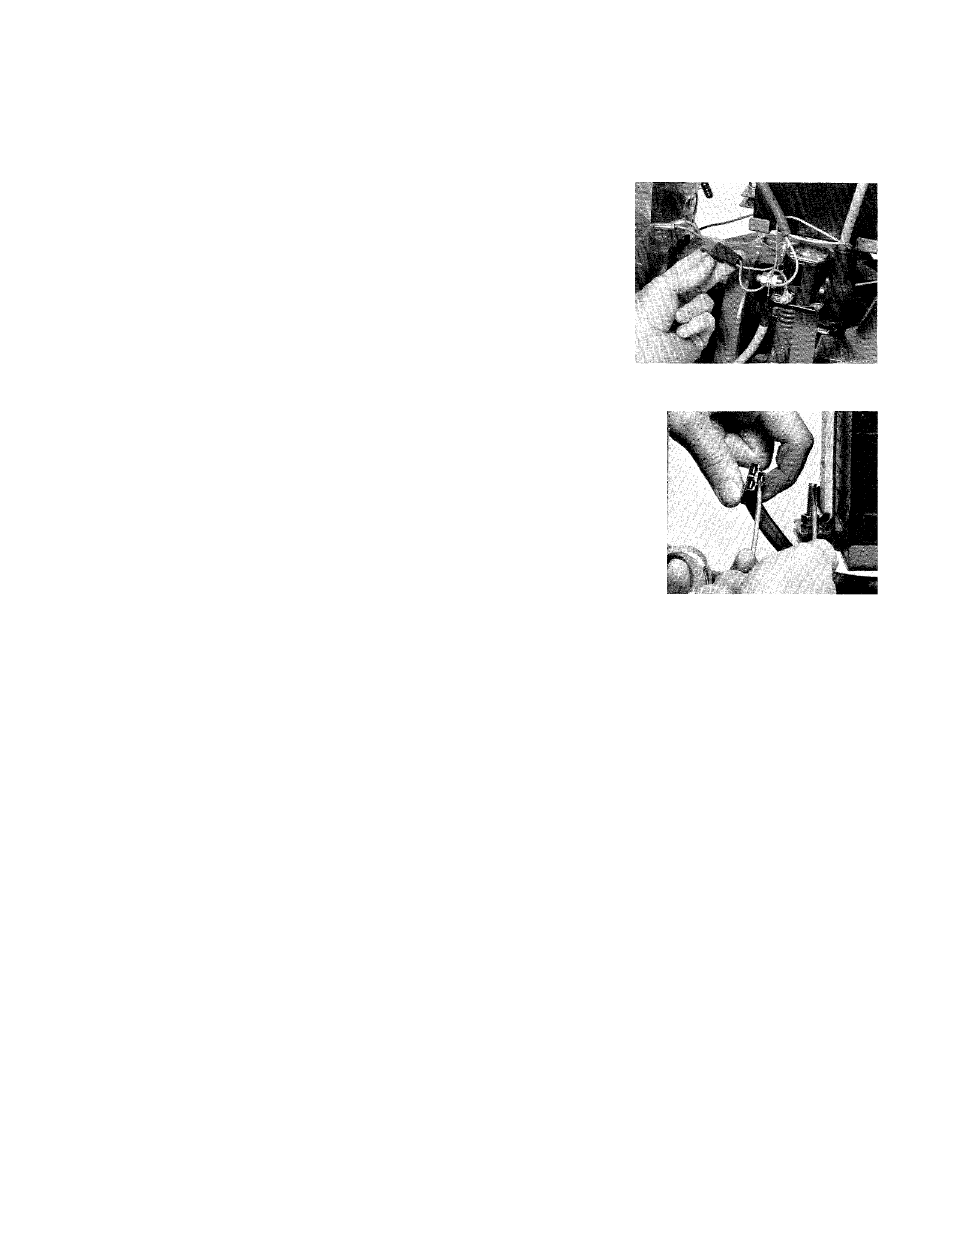
A . Inspect the green w ire that
leads from the key sw itch recepta
cle to the plastic term inals show n
in Photo 6-72. P ush these term i
nals together to ensure a good
connection. N ow test if the engine
w ill stop w hen the key sw itch is
m oved to the “O FF” position. If the
engine doesn’t stop, proceed to
the next step.
B . W hile the engine is running,
unplug the receptacle from the
back of the key sw itch.
C . P lace one end of a jum per w ire
(#10 or heavier insulated w ire) into
the receptacle socket that the
green w ire goes into. Touch the
other end to the m ounting screw at
the front of the battery hold-dow n
clam p (P hoto 6-73). If the engine
stops, then the key sw itch is faulty.
If it doesn’t stop, then you m ay
have a break som ew here in the
green w ire (call us if you suspect
this is the problem ).
D . To check the key sw itch, re
m ove it from its m ounting bracket
w ith large pliers or a % -inch
w rench. To shut the engine off, the
w asher underneath the nut m ust
be contacting bare m etal. If the
key sw itch decal is blocking that
m etal-to-m etal contact, scrape
som e of the decal aw ay so that
good contact is m ade. R einstall
the sw itch and check it to m ake
sure that it w ill now shut the engine
off. If the sw itch still doesn’t w ork,
contact us for further advice.
6-72: Make sure plastic terminals are
connected securely.
6-73: Run jumper wire from single
hole (for green wire) in receptacle to
screw that secures hold-down clamp
to battery bracket.
Storing your tiller
W hen your tiller w on’t be used
for a long period of tim e, you
should protect it from deterioration
by follow ing these sim ple steps.
1. C lean the tiller and the engine.
2.
P erform routine tiller lubrication
and check for loose bolts and nuts.
3. R un the engine until all of the
gasoline is used up. A void leaving
gasoline in the fuel tank for long
periods of tim e as it can form gum
deposits that w ill foul the carbure
tor and fuel lines.
4. W hile the engine is still w arm ,
drain the engine crankcase oil.
R efill w ith fresh oil.
5.
To protect the engine’s cylinder
against rust, rem ove the spark plug
and pour one ounce of clean en
gine oil into the spark plug hole.
P ull the recoil rope slow ly 2 or 3
tim es to distribute the oil (avoid oil
spray from the spark plug hole
w hen cranking the engine over
slow ly) and then replace the plug.
D o not reconnect the spark plug
w ire to the plug. N ow , slow ly pull
the rope until you feel resistance;
then let it rew ind. A t this point, the
valves are seated, w hich w ill help
to prevent rust from form ing in the
cylinder or the valve seats.
6.
C harge the battery on electric
start m odels and store it in a cool,
dry place.
7. P lace the W heels/Tines/P TO
D rive Lever in “N EU TR A L” and
store the tiller in a clean, dry place.
8. N ever store m achine w ith fuel
in the fuel tank inside a building
w here fum es m ay reach an open
flam e or spark, or w here ignition
sources are present (such as hot
w ater and space heaters, furnaces,
clothes dryers, stoves, electric
m otors, etc.)
9.
R em em ber— this is a good tim e
to order replacem ent parts for the
next tilling season.
60